PMC T-Shell is a type of middleware that runs on top of T-Engine.
We introduced the overall details of PMC T-Shell in Vol. 81 of this magazine, also, but, on this occasion, we will give a more detailed explanation of the drawing functions for such things as figures in PMC T-Shell, and practical uses of the event management functions of PMC T-Kernel Extension.
By the way, although there are individuals who know, there were also occasions on which PMC T-Shell was previously called "Cho Kanji for T-Engine." For that reason, PMC T-Shell is equipped with a large number of functions that Cho Kanji (B-right/V) possesses.
In concrete terms, besides functions that draw such things as figures and characters on the screen and functions that realize the basic GUI [1], called windows and parts, there are functions such as kana-to-kanji conversion and communications based on TCP/IP. Moreover, functions such as real object/virtual object and multi-character (multi-kanji), which we can certainly give as fortes of BTRON [2], are provided as is in PMC-T-Shell.
Therefore, if one is doing things from the point of view of an individual who has development experience with BTRON up to now, then development with PMC T-Shell will be easy, and that person can use almost as is his/her development experience and resources up to this point.
However, in the field of embedded systems, we believe that there will also be technicians with little development experience on BTRON.
On this occasion, with that type of technician as our subject, we would like to explain the methods of development with PMC T-Shell.
Development with C Language and Development with MicroScript
Among the development methods for software that runs on PMC T-Shell, there are, broadly divided, the development method using C language, and the development method using the visual language "MicroScript." Below, we will summarize the features of both.
[A] Method Using C Language
This is a method in which we utilize in the form of C language function calls the functions that PMC T-Shell possesses, and it has the following characteristics.
- You can make use of the functions that PMC T-Shell possesses to the maximum limit.
- You can also directly utilize the functions of PMC T-Kernel Extension, such as file management and event management.
- Because it's binary code (native code) for each process, the execution efficiency is good.
- Sufficient knowledge of PMC T-Shell APIs is necessary. Also, there are many cases where knowledge of PMC T-Kernel Extension also becomes necessary.
- Knowledge of C language is also necessary.
- Because we use Linux as the development host, knowledge of Linux is also necessary.
- It's not well suited to developing prototypes.
- In a case where you will execute on T-Engines that possess different CPUs, recompiling work will be necessary. Also, in a case where you will execute on Cho Kanji, which runs on personal computers, there are cases that will make slight modifications necessary [3].
[B] Method Using MicroScript
This is a method in which by utilizing the language processing system software called MicroScript that is on top of PMC T-Shell, we develop application programs on top of that. This has the following characteristics.
- The exact same program runs on top of T-Engines possessing different CPUs and Cho Kanji that runs on personal computers [4].
- Compared to the [A] method, program creation is possible even without knowledge of PMC T-Shell.
- Errors that easily occur in the case of C language, such as processor exceptions resulting from memory protection violations, are difficult to occur [5].
- The development time is short, and thus it is suited to prototype development.
- Acquiring a knowledge of the language called MicroScript is necessary [6].
- Because it employs an intermediate code method based on a compiler/interpreter, there are cases where the execution efficiency drops compared to the [A] method in which native code is executed.
If we explain the differences of both while concretely contrasting them, we get the following.
When we use the [A] method, you can put to use most efficiently and to the maximum limit the operating system and middleware functions of PMC T-Shell and PMC T-Kernel Extension. Nevertheless, to the extent that the level of freedom in development is high, it makes necessary a lot of knowledge. For example, as will be seen in an example given below, even just realizing a button switch makes necessary its own preparations and environment readying. Drawing a button makes necessary knowledge of the PMC T-Shell display primitives and parts management functions, and, in order to process the user action of pressing in relation to the button, knowledge of the event management function included in PMC T-Kernel Extension is also necessary. On the other hand, the level of freedom in the functions that can be realized is high, and finely detailed processing becomes possible.
On the other hand, with the [B] method, because the MicroScript language processing system carries out the troublesome processing, such as initialization and environment readying, for you, the source code the user writes is finished in several lines, and direct knowledge of PMC T-Shell and PMC T-Kernel Extension are unnecessary. To put it conversely, because the MicroScript processing system wraps around the functions realized with PMC T-Shell and PMC T-Kernel Extension, it becomes impossible for you to directly use these functions.
Parallel Use and Cooperation of Both Methods
As noted above, there are respectively good aspects to the development method using C language and the development method using MicroScript, and one could say that dividing between both of them and using them in response to the circumstances and the purpose would be desirable. For example, for something like a device driver, because the demands on the performance side at execution time are severe, and finely detailed processing of the type for directly controlling the hardware is made necessary, generally development based on C language is necessary. On the other hand, for parts that process the user control screens based on a GUI, there are cases that require trial and error on the design side, and thus there also are not a few cases where development efficiency rather than execution efficiency is made the priority. For these types of parts, development based on MicroScript is suitable.
In order to respond to these types of demands, in PMC T-Shell and Cho Kanji, a development method that combines both is also possible. In other words, the GUI part and the part that becomes the overall framework are implemented using MicroScript, and for functions lacking with that, we supplement with programs that use C language. The concrete development methods for this type of purpose can further be classified in the following manner.
[a] Method of Realizing the C Language Part as a Device Driver
This is a method in which we realize a function lacking in MicroScript as a device driver written in C language. We call up the device driver from MicroScript by means of the DREAD statement and the DWRITE statement. Furthermore, the DREAD statement and the DWRITE statement are MicroScript commands that carry out reading out from the device and writing onto the device, and thus they possess the same functions as b_wri_dev() and b_rea_dev() of PMC T-Kernel Extension.
[b] Method of Realizing the C Language Part by Starting Up a Separate Process
This is a method in which we realize a function lacking in MicroScript as a separate process written in C language. We execute the C language process by means of the PROCESS statement from MicroScript. The PROCESS statement possesses the same function as b_cre_prc() of PMC T-Kernel Extension.
[c] Method of Realizing the C Language Part by Communicating with a Separate Process
In the same manner as [b], we realize the function lacking in MicroScript as a separate process written in C language. However, we do not start up a new process each time a request occurs, rather we carry out the giving and receiving of requests and processing results by means of the inter-process message communication function vis-à-vis processes that have started up. For the message communication, we utilize the MicroScript MSEND statement and the MRECV. The MSEND statement is a command for sending a message, and the MRECV statemen is a command for receiving a message; they possess the same functions as b_snd_msg() and b_rcv_msg() of PMC T-Kernel Extension.
Among those mentioned above, the one that is frequently used is the [c] method. The [c] method has aspects that resemble [b], but on the point that synchronization and the giving and receiving of processing results is easy to realize, it seems that [c] rather than [b] is easier to put to practical use. Moreover, the [c] method is frequently utilized also in cases where we make multiple processes created in C language cooperate with each other.
Of course, in a case where MicroScript and C language are used in parallel, it requires a knowledge of both development methods, and there is also the demerit that we will have to create two (or more) applications. However, we could say that it is a superior method on the points that the outlook for the program overall becomes good, it is easy to modify and port, and to start with there will also be no problem with execution efficiency.
Next, within the PMC T-Shell "[A] method using C language," we will give an explanation, including actual examples, of the display primitives that realize figure and character drawing functions.
We can connect an LCD with an attached touch panel to Standard T-Engine, and a driver for this LCD is included in the T-Engine development kit. However, this driver is something that carries out the initial settings of the LCD, and thus it is not the case that it possesses drawing functions for such things as figures and characters. In drawing figures and characters on the LCD, it is necessary to create the bitmap image by yourself and write that image into the VRAM compatible with the LCD screen. In the stopwatch sample program (stpwtc) attached to T-Engine development kits, processing as far as this is actually carried out. For that reason, even the character font data for drawing numerals on the LCD screen have been prepared in a form to be included in sample program source code. In other words, when we try creating a GUI screen with just the software included in the T-Engine development kits, it is necessary to independently prepare on the application side even character fonts, and thus it takes a little time.
In contrast to this, if we utilize PMC T-Shell, these functions and character fonts are provided as middleware, and because it is not necessary to develop them on the user side, we can drastically shorten the labor and period of application development. The figure and character drawing functions included in PMC T-Shell are called display primitives (DPs).
Display Primitives Drawing Environment
The main purpose of display primitives is drawing figures and characters on the screen; the target area that will be drawn upon that corresponds to a canvas or paper at such time is made abstract by the name of "drawing environment." In the drawing environment, besides the address and configuration (number of vertical and horizontal pixels, color expression method numbers, etc.) of the compatible VRAM, various types of attribute information for drawing, such as specification of the clipping area and character attributes, are included. Moreover, in addition to being able to create the drawing environment on VRAM directly compatible with the screen hardware, it is also possible to create it on top of ordinary memory. We call the former the device drawing environment, and the latter the memory drawing environment. A drawing environment created on top of memory can, for example, be utilized in a case such as expanding onto memory an image that will be output on a printer.
We will explain below the main contents of the attribute information that belongs to the drawing environment. Furthermore, as there are a lot of functions even in addition to these in the drawing environment, please look at the manual attached to the "PMC T-Shell development kit," "PMC T-Shell Manual," in regard to the details.
|
|
| These define information such as address, plane number, and pixel bit number (information on the bit number of each pixel, etc.) of the VRAM or memory that will become the target to be drawn on; the bit number of the horizontal width of the plane; the boundary rectangle (definition of the size and coordinates of the bitmap) etc. | |
|
|
| This specifies regions that mask drawing (actually, regions that aren't drawn on). In a multi-window environment, for example, we utilize this function in a case such as avoiding the part of window overlap at the front and drawing only on the window at the rear. | |
|
|
| This specifies the internal paint over color at the time of drawing such things as rectangles, polygons, and circles. This can be utilized not just with the painting over of monocolors, but also with designer patterns such as checkered patterns, and user defined patterns. | |
|
|
| These specify such things as the drawing location, character color, character spacing, and drawing direction at the time of character drawing. Also, in order to draw multi-characters expressed in TRON Code, we specify the initial value of the language-specifier code. | |
Figure Drawing
Well then, let's try drawing simple figures on the T-Engine screen by actually using the PMC T-Shell display primitives (DPs). The flow of processing for figure drawing in which we utilize DPs becomes as in the following manner.
|
|
Create the drawing environment |
|
|
If necessary, carry out various settings for the drawing environment |
|
|
Carry out the drawing of the figure |
|
|
Delete the drawing environment |
Because appropriate initial values are given to the drawing environment when we create the drawing environment, at stage (2) we process only the parts where changes are necessary.
 |
|
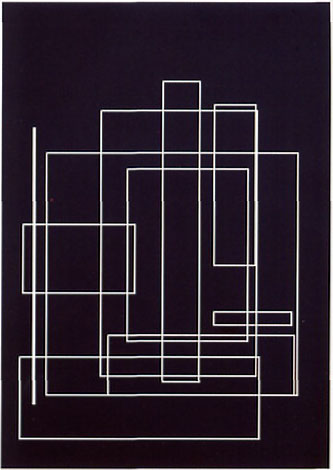
We show in prog_1-main.c of List 1 an actual program example that follows the above mentioned flow (please look at the CD-ROM attached to this issue for the full text of the program). Because this program is a simple one that only draws squares in suitable places on the screen, we shows its execution results in Fig. 1. We have utilized the following DP functions (APIs [7]) inside this program. As there is an explanation of the details of each API in the "PMC T-Shell Manual," please try reading it and comparing it with the program example.
|
Retrieve device information |
|
Create device drawing environment |
|
Delete drawing environment |
|
Paint over with a rectangle |
|
Draw a rectangular frame |
Next, lets try compiling this program example, and then execute it on top of the actual PMC T-Shell (T-Engine). The method for compiling and executing is the same as for a process base application that will be executed on top of PMC T-Kernel Extension, and the concrete procedures for such are the following. Furthermore, in this example, "PMC T-Shell/SH7727 Development Kit" and "T-Engine/SH7727 Development Kit" are the targets.
|
|
Prepare the work directory on top of the host |
|
|
|
|
Place Makefile and the source code inside the src that was created |
| Please copy it from inside the CD-ROM attached to this issue | |
|
|
Preparation for make by moving to the directory for make |
|
|
|
|
Execute gmake |
| % gmake | |
|
|
Confirm that you have succeeded at make, and that file prog_1.biz has been created |
|
|
Connect the serial port of the development host with the serial port of the T-Engine that serves as the execution environment |
|
|
Start up gterm |
|
|
Turn on the T-Engine power supply and start up PMC T-Shell |
| Please refer to the manual attached to the PMC T-Shell development kit concerning the methods of installing and starting up PMC T-Shell | |
|
|
On top of gterm on the development host, acquire the file created in (4) |
| % recv -d /usr/local/te/bappl/sample/tw82/prog_1/sh7727/prog_1.bz | |
|
|
Because the acquired file is compressed in .bz format, decompress with the expf of cli tool |
|
|
|
|
Execute the obtained prog_1 on the cli (on gterm of the development host) |
| % prog_1 |
Here, we will explain the source program and processing details of this example.
|
|
Secure the variable |
| Because the target device is the screen, it has the name SCREEN. We define a character string variable for the propose of referencing this. | |
|
|
Initialize the random number |
| We initialize by using a method in which we give the current time as a type of random number. | |
|
|
Acquire target device information |
| We are making it so that the acquired contents are output in the console for debugging use with printf(). Also, for the meanings of the individual values that DEV_SPEC possesses, please refer to the manual. | |
|
|
Confirm whether the target device possesses an individual bitmap |
| Because the device drawing environment cannot be created in a case where the target device does not possess one, we confirm this in advance. | |
|
|
Create the device drawing environment |
| Normally, because there is no need to set device-dependent parameters, we make this NULL. Furthermore, when the individual number of a dawning environment already exists as a system restricted number or some other some other abnormality exists, it comes about that the drawing environment cannot be created. Because an error will be returned from the API at this time, you must by all means evaluate these values. | |
|
|
Paint over the entire screen as a background |
| We previously acquired the target device information, but because the contents that correspond to the screen width are described here, we paint over the entire screen based on these. Furthermore, in painting over, we use b_gfil_rec(). Also, because the drawing environment we make the target is the device drawing environment for SCREEN that we created previously, we can carry out direct drawing in regard to the screen by means of doing this (in this example, the screen will be painted over with black monocolor temporarily). | |
|
|
Generate the coordinates of the frames |
| We create an appropriate four points. Furthermore, with RECT that shows these four points, the coordinates we indicate with (RECT.c.left, RECT.c.top) must by all means indicate the top left, and the coordinates we indicate with (RECT.c.right, RECT.c.bottom) must by all means indicate the bottom right. For that reason, we adjust in a manner in which there is no contradiction about each value of left and right, and top and bottom. | |
|
|
Draw the frames |
| Using the previously created appropriate frame coordinates, we carry out the drawing of rectangles. Here also, the drawing environment that we make the target is the previously created device drawing environment. Also, we are drawing the frame with b_gfra_rec(), but it doesn't matter if we replace this with something else (if we make it something else, the drawing of a different figure can be confirmed). Furthermore, in this example, we are making it so that we draw white monocolor frames with a line width of 1 and an angle of rotation of 0. | |
|
|
Delete the drawing environment |
| At the point in time the created drawing environment has become unnecessary, deleting it is a desirable implementation. Furthermore, even if we delete the drawing environment, there will not be any disappearance of images drawn by means of that environment. For that reason, there will not be any changes to the screen, even if we delete the drawing environment. | |
|
|
Terminate the process |
| In this case, we terminate by issuing b_ext_prc()[8]. |
Character Drawing
Continuing on, we will now explain a program example in which we draw characters on the screen.
In PMC T-Shell, we have adopted multi-kanji/multi-character-compatible TRON Code, and thus we can display a very large number of characters, a maximum of 1.5 million characters [9]. Furthermore, for details of TRON Code and the multi-kanji function, as a large number of BTRON-related reference documents exist, interested parties should please look at these together.
The procedures for drawing characters are generally as follows, and they are almost the same as those in the case of figure drawing in the preceding section. However, if you are going to modify the character color or typeface (font) at the time you draw the character, it is necessary to make settings in the drawing environment at the (2) stage.
|
|
Create the drawing environment |
|
|
If necessary, carry out various settings for the drawing environment |
|
|
Draw the character (or character strings) |
|
|
Delete the drawing environment |
 |
|
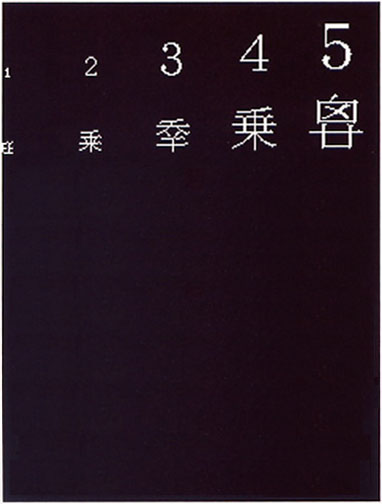
We show in prog_2-main.c of List 2 a program that actually draws characters (for the complete text of the program, please see the CD-ROM attached to this issue). In this example, as an example of displaying the multi-kanji character set, we also display characters that are included in the GT-Font. We show in Fig. 2 the execution results of this program. Among the APIs utilized inside this program, the ones that did not appear in the prog_1-main.c example of the previous section as as follows:
|
Set the character drawing color |
|
Specify the character font |
|
Retrieve the character font information |
|
Specify the character script (SCRIPT) |
|
Draw the characters (position specification) |
In regard to the details of each API, please look at the "PMC T-Shell Manual." Also, the compiling and transfer procedures are the same as the previous section. We will now explain the source program and processing contents of this example centering on the parts that differ with the example of the previous section.
|
|
Secure the necessary resources and set the initial values |
|
|
Acquire the DEV_SPEC of SCREEN |
|
|
Confirm the existence of a unique bitmap |
|
|
Generate the device drawing environment |
|
|
Paint over the background |
|
|
Set the character color |
| When drawing characters, the character foreground color and the character background color of the drawing environment will be set [10]. In this example, we are setting white to the foreground color and black to the background color, but specifying other colors is also possible. Moreover, one can also make the background color transparent. | |
|
|
Acquire font information |
| In this example, switching of the character font we will draw is necessary in order to make the character size variable. At this time, in order to make it so that we do not change font settings outside of the character size (typeface and attributes), we adopt a method in which we temporarily acquire the font information of the drawing environment, modify only the attributes concerning character size inside that, and then reset the font-related information. What carries out the acquisition of font information for that purpose is this part. | |
|
|
Set the character set |
| As preparation for drawing characters, we set the language specifier code on the drawing environment side. Here, we have specified by means of TSC_SYS the language plane that includes JIS Level 1, JIS Level 2, and Auxiliary Kanji (we call this the System Script). | |
|
|
Set the font information |
| Based on the font information acquired in 7., we are carrying out font setting by switching just the character size. | |
|
|
Draw the characters |
| First, we draw one character at a time the characters included in the System Script specified in 8. Incidentally, among the DPs, outside of a function that draws one character at a time, an API that draws character strings is also provided [11]. Furthermore, the characters and character strings that we draw with the DPs must be described with TRON Code. | |
|
|
Set the character set |
| In order to draw characters included on the GT typeface font plane, we carry out switching of the language specifier code. | |
|
|
Draw the characters |
| The processing of this part is the same as 10., but because we have switched the language specifier code in 11., GT typeface characters, not those of the System Script, are drawn. | |
|
|
Delete the drawing environment |
|
|
Terminate |
Utilizing Multiple Drawing Environments
Well then, in the examples up to here, we have made a single drawing environment the target, but in PMC T-Shell it is also possible to create multiple drawing environments and utilize them in parallel. Creating separate drawing environments on top of separate devices is something that is a matter of course, but we can also simultaneously create multiple drawing environments on top of the same device. In such a case, mutual exclusion is carried out inside the DPs so that problems don't occur even though the DP APIs for different drawing environments are processing simultaneously. However, in a case where the target bitmaps overlap, the drawing results of the overlapping parts are not guaranteed [12]. On the other hand, under a multitasking environment, in a case where DP APIs for the same drawing environment are executed simultaneously in multiple, their results are not guaranteed.
In other words, in a case such a general multi-window system where we are simultaneously drawing onto the same screen from multiple tasks or processes, it is best to prepare a separate drawing environment for each task or process.
 |
|
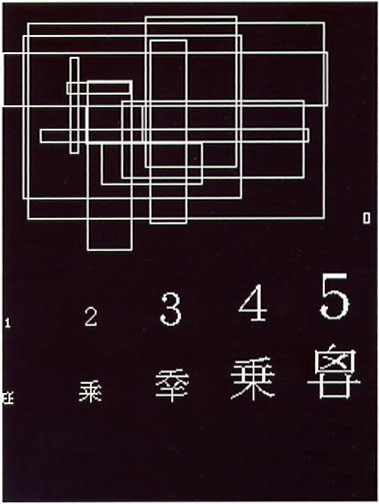
We show in prog_3-main.c recorded in the CD-ROM attached to this issue a program example in which we have actually used multiple drawing environments [13]. Moreover, we show in Fig. 3 the execution results of this program. In this program example, we create a subtask, issue b_gopn_dev() separately in the main task and the subtask, and then create the separate drawing environments vis-à-vis SCREEN.
At this time, please be careful that separate drawing environment IDs are obtained in the b_gopn_dev() that is issued with the main task, and b_gopn_dev() that is issued with the subtask. That is to say, even in a case where we have created a drawing environment on top of the same device from the same process, it is a case in which separate things are created as objects called drawing environments.
Incidentally, in this example, drawing based on the main task and drawing based on the subtask interfere with each other on the screen. For that reason, depending on the timing, there are also instances in which the top-to-bottom relationship of the drawing results of both become inverted, and they do not become uniform. In a case where there is inconvenience with this, we can lock a drawing environment by utilizing the mutual exclusion API called b_gloc_env(), and thus make drawing from another task temporarily wait. If we carry out this kind of measure also in the example of prog_3-main.c, then it will come about that we can draw without the top-to-bottom relationship.
The drawing-to-screen functions explained up to the previous section were functions for outputting information to a user from the computer. On the other hand, in order to realize a GUI, we also need functions for the purpose of inputting information from the user into the computer. In concrete terms, a framework that neatly transmits to the GUI middleware and applications input information from pointing devices such as such a mouse, electronic pen, and touch panel (abbreviated as PDs) or from the keyboard, including 10-key pad and physical buttons switches, becomes necessary. What realizes this is the event management function included in PMC T-Kernel Extension [14].
In the event management function, we handle both click operations of the mouse and input operations from the keyboard as "events." At this time, if it is a mouse click, the coordinates position and the time are included as additional information of the event. Also, if it is an input from the keyboard, the time the key was pressed and the key code become additional information of the event. Moreover, whether key or whether mouse, because we can separately acquire the event when the key or mouse button is pressed and the event when either is released, carrying out more detailed processing is also possible.
We show below the main APIs that are provided in the event management function.
|
Acquire the event |
|
Generate the event |
|
Delete the event |
|
Acquire the pointing device position |
|
Set the pointing device position |
Among these, the one that is particularly important and frequently utilized is b_get_evt(). This API, as the characters imply, possesses a function that acquires issued events, and it can also obtain simultaneously various types of information that belong to events (event type, time of issue, PD coordinates, key codes, etc.). If you are going to realize an event driven application in which you accept one after the other issued events and then go on to process them in order, basically using just this API is sufficient.
 |
|
We show in prog_4-main.c, which is recorded on the CD-ROM attached to this issue, a program example in which we have used the event management function. This program is one in which we realize on the screen a button shaped switch (inside the program we call it "parts"), and as a GUI example it is the simplest one. In order to draw the picture of the switch on the screen, we utilize DPs, and in order to input the click operations of the mouse and touch panel, we utilize the event management function. We show in Fig. 4 the execution results of this program.
Incidentally, because a parts management function is also provided in PMC T-Shell, and as there are also several types of ready made parts that have been prepared, you can realize the same functions as this example more easily if you use them. However, because the example on this occasion is an example for explaining the event management function and not the parts management function, we are realizing the same function as the parts management function by using the event management function and DPs.
Among the DP APIs that we are utilizing inside prog_4-mani.c, there is only the following one as one that did not appear in the previous examples of prog_1~prog_3.
|
Draw a straight line |
In b_get_evt() of prog_4-main.c, we are carrying out the specification of (EM_BUTDWN | EM_BUTUP) at the time we acquire an event. Between these, EM_BUTDWN is a mask pattern vis-à-vis the event when the button of the PD has been pressed (a button down event), and EM_BUTUP is a mask pattern vis-à-vis the event when the button of the PD has been released (a button up event). Because we can specifically determine the event we want to acquire by means of this kind of specification, and thus it becomes unnecessary to consider other unnecessary events, implementation is done without trouble.
Furthermore, as events that are acquired with b_get_evt(), outside of PD press (EV_BUTDWN) and release (EV_BUTUP), there is the event called EV_NULL, which is obtained when there is no change in the state. In the interval from EV_BUTDWN until EV_BUTUP, in other words also in a case where we have carried out b_get_evt() during pressing, EV_NULL is obtained, so please be careful.
We have briefly collected below the correspondences between the flow of processing and the source program in this example.
|
|
Acquire the target device information |
|
|
Confirm the existence of a unique bitmap |
|
|
Create the device drawing environment and initialize the background |
|
|
Display the button drawing |
|
|
Begin the event loop |
| Enter into the processing of the function event_loop(). This is a loop that will go around forever until the doloop variable becomes False. | |
|
|
Acquire the event |
| If the event is acquired, we store the acquired event in the variable evt. | |
|
|
Verify the acquired event type |
| In a case where by chance an error occurs, we exit the event loop, but in a case where that isn't so, we carry out the next process that matches the type of the acquired event. | |
| 7-a. Processing in the case of EV_NULL | |
|
|
| 7-b. Processing in the case of EV_BUTDWN, EV_BUTUP | |
|
|
| 7-c. Processing in other cases | |
|
|
|
|
Continuing the event loop |
| If a click of the part in 7-b has not occurred, because the doloop remains True, the loop based on do - while() will continue. | |
|
|
Terminate |
Furthermore, we take up only one part (a switch) in this program example, but implementation with almost the same program is possible also in a case where the number of parts have become multiple in number, or in a case where we deal with parts (switches) that differ in type.
If we use the functions of PMC T-Shell, we can easily create programs of the type in which we draw figures and characters on the screen. Also, by using in parallel the event management function of PMC T-Kernel Extension, it will come about that we are able to easily implement even the parts types necessary in a GUI.
Nevertheless, in this article, we have done nothing more than introduce a small fraction among the functions that PMC T-Shell possesses. In PMC T-Shell, outside of the the display primitives (DPs) explained in this article, we have provided GUI-related functions, such as window, menu, parts, and panels, and PMC T-Shell even possesses functions such as kana-to-kanji conversion and TCP/IP. Moreover, in the PMC T-Shell development environment, a library that handles image formats, such as JPEG and PNG, has been prepared, and thus even handling these images on top of PMC T-Shell is simple. We believe that this type of function can be put to practical use in a case where, for example, one is developing a digital camera on a T-Engine base.
We would be happy if the reader together with taking advantage of this article to try out T-Engine programming in which PMC T-Shell is utilized feels the new possibilities of T-Engine.
____________________
| List 1 Program Example of Figure Drawing Using PMC T-Shell (prog1-main.c) |
/*
 *	proc_1-main.c (T-Shell Sample/Main)
 *
 *	(C) Copyright 2003 by Personal Media Corporation.
 */

#include	<basic.h>
#include	<btron/outer.h>
#include	<btron/dp.h>
#include	<tcode.h>
#include	<stdio.h>
#include	<stdlib.h>


/* ---------------------------------------------------- main (cli style main) */
/*
 * main (cli style main)
 */
EXPORT	W	main(W ac, TC *av[])
{
	W	rv;
	W	i;			/* Arbitrary */
	W	l;
	GID	gid;
	RECT	r;
	DEV_SPEC	scr_spec;
	/* 1. Securing of the variable (Defining the character string SCREEN of the target device name)	*/
	TC	SCREEN_NM[] = {
			TK_S, TK_C, TK_R, TK_E, TK_E, TK_N, TNULL
		};

	rv = 0;

	/* 2. Initialize random number */
	b_get_tim((STIME *)(&i), NULL);
	srand(i);

	/* 3. Acquire target device information */
	rv = b_gget_spc(SCREEN_NM, &scr_spec);
	printf("b_gget_spc : %d, %d\n", rv, rv >> 16);
	if (rv < ER_OK) {
		goto EXIT;
	}
	printf("--------/SCREEN DEV_SPEC\n");
	printf("attr : 0x%x\n", scr_spec.attr);
	printf("planes : %d\n", scr_spec.planes);
	printf("pixbits : 0x%x\n", scr_spec.pixbits);
	printf("hpixels : %d, vpixels : %d\n", scr_spec.hpixels, scr_spec.vpixels);
	printf("hres : %d, vres : %d\n", scr_spec.hres, scr_spec.vres);
	printf("color : 0x%x, 0x%x, 0x%x, 0x%x\n", scr_spec.color[0], scr_spec.color[1], scr_spec.color[2], scr_spec.color[3]);

	/* 4. Confirm whether the target device possesses a unique bitmap */
	if (!(scr_spec.attr & DA_HAVEBMP)) {
		printf("can't open device.\n");
		rv = ER_NOSPT;
		goto EXIT;
	}

	/* 5. Create the device drawing environment */
	gid = b_gopn_dev(SCREEN_NM, NULL);
	printf("b_gopn_dev : %d, %d\n", gid, gid >> 16);
	if (gid < 0) {
		/* Failure */
		rv = gid;
	} else {
		/* 6. Paint over the whole surface as a background */
		r = (RECT){{0, 0, scr_spec.hpixels, scr_spec.vpixels}};
		b_gfil_rec(gid, r, BLACK100, 0, G_STORE);

		/* Draw */
		for (l = 0; l < 10; l++) {
			/* 7. Create the coordinates of the frame */
			r.c.left = (rand() * scr_spec.hpixels) / RAND_MAX;
			r.c.top = (rand() * scr_spec.vpixels) / RAND_MAX;
			r.c.right = (rand() * scr_spec.hpixels) / RAND_MAX;
			r.c.bottom = (rand() * scr_spec.vpixels) / RAND_MAX;
			if (r.c.left >= r.c.right) {
				i = r.c.left;
				r.c.left = r.c.right;
				r.c.right = i;
			}
			if (r.c.top >= r.c.bottom) {
				i = r.c.top;
				r.c.top = r.c.bottom;
				r.c.bottom = i;
			}

			/* 8. Draw the frame */
			b_gfra_rec(gid, r, 0x0001, WHITE0, 0, G_STORE);
			printf("r : %d, %d, %d, %d\n", r.c.left, r.c.top, r.c.right, r.c.bottom);
		}

		/* 9. Delete the drawing environment */
		b_gcls_env(gid);
	}

	/* 10. Terminate the process */
EXIT:
	b_ext_prc(rv);
	return rv;
}
|
|
/*
 *	proc_2-main.c (T-Shell Sample/Main)
 *
 *	(C) Copyright 2003 by Personal Media Corporation.
 */

#include	<basic.h>
#include	<btron/outer.h>
#include	<btron/dp.h>
#include	<tcode.h>
#include	<stdio.h>
#include	<tlang.h>


/* ---------------------------------------------------- main (cli style main) */
/*
 * main (cli style main)
 */
EXPORT	W	main(W ac, TC *av[])
{
	W	rv;
	W	l;
	GID	gid;
	RECT	r;
	FSSPEC	fspec;
	DEV_SPEC	scr_spec;
	TC	SCREEN_NM[] = {
			TK_S, TK_C, TK_R, TK_E, TK_E, TK_N, TNULL
		};

	rv = 0;

	/* 2. Acquire the DEV_SPEC of SCREEN */
	rv = b_gget_spc(SCREEN_NM, &scr_spec);
	printf("b_gget_spc : %d, %d\n", rv, rv >> 16);
	if (rv < ER_OK) {
		goto EXIT;
	}
	printf("--------/SCREEN DEV_SPEC\n");
	printf("attr : 0x%x\n", scr_spec.attr);
	printf("planes : %d\n", scr_spec.planes);
	printf("pixbits : 0x%x\n", scr_spec.pixbits);
	printf("hpixels : %d, vpixels : %d\n", scr_spec.hpixels, scr_spec.vpixels);
	printf("hres : %d, vres : %d\n", scr_spec.hres, scr_spec.vres);
	printf("color : 0x%x, 0x%x, 0x%x, 0x%x\n", scr_spec.color[0], scr_spec.color[1], scr_spec.color[2], scr_spec.color[3]);

	/* 3. Confirm the existence of unique bitmap */
	if (!(scr_spec.attr & DA_HAVEBMP)) {
		printf("can't open device.\n");
		rv = ER_NOSPT;
		goto EXIT;
	}

	/* 4. Create of the device drawing environment */
	gid = b_gopn_dev(SCREEN_NM, NULL);
	printf("b_gopn_dev : %d, %d\n", gid, gid >> 16);
	if (gid < 0) {
		/* Failure */
		rv = gid;
	} else {
		/* 5. Paint over the background */
		r = (RECT){{0, 0, scr_spec.hpixels, scr_spec.vpixels}};
		b_gfil_rec(gid, r, BLACK100, 0, G_STORE);

		/* 6. Set the character color */
		b_gset_chc(gid, 0x10ffffff, 0x00000000);

		/* 7. Acquire the font information */
		b_gget_fon(gid, &fspec, NULL);

		/* 8. Set the character set (making it the System Script) */
		b_gset_scr(gid, TSC_SYS);
		for (l = 0; l < 5; l++) {
			/* 9. Set the font information */
			fspec.size.h = (l + 1) * 8;
			fspec.size.v = fspec.size.h;
			b_gset_fon(gid, &fspec);

			/* 10. Draw the characters */
			b_gdra_chp(gid, l * 48, 48, TK_1 + l, G_STORE);
		}

		/* 11. Set the character set (making it the GT Font plane) */
		b_gset_scr(gid, 0x0022);
		for (l = 0; l < 5; l++) {
			fspec.size.h = (l + 1) * 8;
			fspec.size.v = fspec.size.h;
			b_gset_fon(gid, &fspec);

			/* 12. Draw the characters */
			b_gdra_chp(gid, l * 48, 96, TK_1 + l, G_STORE);
		}

		/* 13. Delete the drawing environment */
		b_gcls_env(gid);
	}

	/* 14. Terminate */
EXIT:
	b_ext_prc(rv);
	return rv;
}
|
| List 3 |
/*
 *	proc_3-main.c (T-Shell Sample/Main)
 *
 *	(C) Copyright 2003 by Personal Media Corporation.
 */

#include	<basic.h>
#include	<btron/outer.h>
#include	<btron/dp.h>
#include	<tcode.h>
#include	<stdio.h>
#include	<stdlib.h>
#include	<tlang.h>


/* Internal variables */
LOCAL	W	sid = -1;		/* subtask ID */
LOCAL	DEV_SPEC	scr_spec;	/* DEV_SPEC of SCREEN */
LOCAL	TC	SCREEN_NM[] = {		/* [SCREEN]*/
			TK_S, TK_C, TK_R, TK_E, TK_E, TK_N, TNULL
		};


/* Internal function prototypes */
LOCAL	ERR	get_scr_spec(VOID);
LOCAL	ERR	init_proc(VOID);
LOCAL	VOID	fin_proc(VOID);
LOCAL	ERR	main_loop(VOID);
LOCAL	VOID	sub_loop(W arg);


/* ---------------------------------------------------------------- Internal functions */
/*
 * Acquire DEV_SPEC of SCREEN
 */
LOCAL	ERR	get_scr_spec(VOID)
{
	ERR	er;

	er = b_gget_spc(SCREEN_NM, &scr_spec);
	printf("b_gget_spc : %d, %d\n", er, er >> 16);
	if (er >= ER_OK) {
		printf("--------/SCREEN DEV_SPEC\n");
		printf("attr : 0x%x\n", scr_spec.attr);
		printf("planes : %d\n", scr_spec.planes);
		printf("pixbits : 0x%x\n", scr_spec.pixbits);
		printf("hpixels : %d, vpixels : %d\n", scr_spec.hpixels, scr_spec.vpixels);
		printf("hres : %d, vres : %d\n", scr_spec.hres, scr_spec.vres);
		printf("color : 0x%x, 0x%x, 0x%x, 0x%x\n", scr_spec.color[0], scr_spec.color[1], scr_spec.color[2], scr_spec.color[3]);
	}

	return er;
}


/*
 * Initialization processing
 */
LOCAL	ERR	init_proc(VOID)
{
	ERR	er;
	W	i;

	er = ER_OK;
	sid = 0;

	/* Random number initialization */
	b_get_tim((STIME *)(&i), NULL);
	srand(i);

	/* Acquire DEV_SPEC of SCREEN */
	er = get_scr_spec();
	if ((er >= ER_OK) && (!(scr_spec.attr & DA_HAVEBMP))) {
		/* Cannot create the device drawing environment */
		printf("can't open device.\n");
		er = ER_NOSPT;
	} else {
		/* Create subtask */
		sid = b_cre_tsk(sub_loop, -1, 0);
		printf("b_cre_tsk : %d, %d\n", sid, sid >> 16);
		if (sid < ER_OK) {
			er = sid;
		}
	}

	return er;
}


/*
 * Termination processing
 */
LOCAL	VOID	fin_proc(VOID)
{
	/* Stop subtask */
	if (sid >= 0) {
		b_ter_tsk(sid);
	}
	sid = -1;

	return;
}


/*
 * Main task drawing
 */
LOCAL	ERR	main_loop(VOID)
{
	ERR	er;
	W	i;
	W	l;
	GID	gid;
	RECT	br;
	RECT	fr;

	er = ER_OK;

	/* Create the device drawing environment of SCREEN */
	gid = b_gopn_dev(SCREEN_NM, NULL);
	printf("main : b_gopn_dev : %d, %d\n", gid, gid >> 16);
	if (gid < ER_OK) {
		er = gid;
	} else {
		br = (RECT){{0, 0, scr_spec.hpixels, (scr_spec.vpixels >> 1)}};
		for ( ; ; ) {		/* Infinity */
			/* Paint over the background part */
			b_gfil_rec(gid, br, BLACK100, 0, G_STORE);

			for (l = 0; l < 20; l++) {
				fr.c.left = br.c.left + (rand() * br.c.right) / RAND_MAX;
				fr.c.top = br.c.top + (rand() * br.c.bottom) / RAND_MAX;
				fr.c.right = br.c.left + (rand() * br.c.right) / RAND_MAX;
				fr.c.bottom = br.c.top + (rand() * br.c.bottom) / RAND_MAX;
				if (fr.c.left >= fr.c.right) {
					i = fr.c.left;
					fr.c.left = fr.c.right;
					fr.c.right = i;
				}
				if (fr.c.top >= fr.c.bottom) {
					i = fr.c.top;
					fr.c.top = fr.c.bottom;
					fr.c.bottom = i;
				}

				/* Frame drawing */
				b_gfra_rec(gid, fr, 0x0001, WHITE0, 0,G_STORE);
				printf("main : fr : %d, %d, %d, %d\n", fr.c.left, fr.c.top, fr.c.right, fr.c.bottom);

				/* Wait a moment */
				b_wai_prc(10);	/* 10[msec] */
			}
		}

		/* Delete the drawing environment */
		b_gcls_env(gid);

	}

	return er;
}


/*
 * Subtask drawing
 */
LOCAL	VOID	sub_loop(W arg)
{
	W	l;
	GID	gid;
	RECT	br;
	FSSPEC	fspec;

	printf("sub  : start\n");

	/* Create the device drawing environment of SCREEN */
	gid = b_gopn_dev(SCREEN_NM, NULL);
	printf("sub  : b_gopn_dev : %d, %d\n", gid, gid >> 16);
	if (gid >= ER_OK) {
		/* Set the colors (using absolute color specifications) */
		b_gset_chc(gid, 0x10ffffff, 0x00000000);

		/* Acquire the font information */
		b_gget_fon(gid, &fspec, NULL);

		br = (RECT){{0, (scr_spec.vpixels >> 1), scr_spec.hpixels, scr_spec.vpixels}};
		for ( ; ; ) {		/* Infinity */
			/* Paint over the background part */
			b_gfil_rec(gid, br, BLACK100, 0, G_STORE);

			/* Draw the System Script characters */
			b_gset_scr(gid, TSC_SYS);
			for (l = 0; l < 5; l++) {
				/* Switch the character size */
				fspec.size.h = (l + 1) * 8;
				fspec.size.v = fspec.size.h;
				b_gset_fon(gid, &fspec);

				/* Draw */
				b_gdra_chp(gid, br.c.left + l * 48, br.c.top + 48, TK_1 + l, G_STORE);
				printf("sub  : TSC_SYS - %04x\n", TK_1 + l);

				/* Wait a moment */
				b_wai_prc(100);	/* 100[msec] */
			}

			/* Draw characters of the GT Font*/
			b_gset_scr(gid, 0x0022);
			for (l = 0; l < 5; l++) {
				/* Switch the character size */
				fspec.size.h = (l + 1) * 8;
				fspec.size.v = fspec.size.h;
				b_gset_fon(gid, &fspec);

				/* Draw */
				b_gdra_chp(gid, br.c.left + l * 48, br.c.top + 96, TK_1 + l, G_STORE);
				printf("sub  : GT - %04x\n", TK_1 + l);

				/* Wait a moment */
				b_wai_prc(100);	/* 100[msec] */
			}
		}

		/* Delete the drawing environment */
		b_gcls_env(gid);
	}

	/* Exit subtask */
	printf("sub  : exit\n");
	sid = -1;
	b_ext_tsk();
/* return; */	/* Subtask cannot be exited with return */
}


/* ---------------------------------------------------- main (cli style main) */
/*
 * main (cli style main)
 */
EXPORT	W	main(W ac, TC *av[])
{
	W	rv;

	rv = 0;

	/* Initialize */
	rv = init_proc();
	if (rv >= ER_OK) {
		/* Enter into drawing in main task */
		rv = main_loop();
	}

	/* Termination processing */
	fin_proc();

	b_ext_prc(rv);
	return rv;
}
|
| List 4 |
/*
 *	proc_4-main.c (T-Shell Sample/Main)
 *
 *	(C) Copyright 2003 by Personal Media Corporation.
 */

#include	<basic.h>
#include	<btron/outer.h>
#include	<btron/dp.h>
#include	<tcode.h>
#include	<stdio.h>
#include	<tlang.h>


/* Internal macros */
#define	inrect(r, p)	(((r).c.left <= (p).x) && ((p).x < (r).c.right) && \
			 ((r).c.top <= (p).y) && ((p).y < (r).c.bottom))


/* Internal constants */
#define	PCAP_LN		20		/* Parts internal character string length (TC units) */

#define	RGB_BLACK	0x10000000
#define	RGB_WHITE	0x10ffffff
#define	RGB_GRAY	0x10e0e0e0
#define	COL_TRANS	0x80000000
#define	TRS_BLACK	(COL_TRANS | RGB_BLACK)
#define	TRS_WHITE	(COL_TRANS | RGB_WHITE)
#define	TRS_GRAY	(COL_TRANS | RGB_GRAY)


/* Internal type declarations */
typedef	struct {			/* Definition of parts information */
	RECT	r;			/* Position */
	W	len;			/* Character string length (TC units) */
	TC	str[PCAP_LN + 1];	/* Display character string length (+1, TNULL use) */
} DEF_PAR;


/* Internal variables */
LOCAL	GID	mygid = -1;		/* Drawing environment ID */
LOCAL	Bool	in = False;		/* True : Control, parts internal */
LOCAL	Bool	prs = False;	        /* True : While pressed	*/
LOCAL	Bool	doloop = False;	        /* True : Event loop continuation */
LOCAL	EVENT	evt;			/* Acquired event */
LOCAL	DEV_SPEC	scr_spec;	/* DEV_SPEC of SCREEN */
LOCAL	TC	SCREEN_NM[] = {		/* [SCREEN] */
			TK_S, TK_C, TK_R, TK_E, TK_E, TK_N, TNULL
		};
LOCAL	PAT	G_PAT = {		/* Gray pattern	*/
			{0, 16, 16, RGB_GRAY, RGB_BLACK, FILL100}
		};
LOCAL	DEF_PAR	but_exit = {		/* [EXIT] button information */
			{{10, 10, 10 + 16 * 4 + 8, 10 + 16 * 1 + 8}},
			4,
			{TK_E, TK_X, TK_I, TK_T, TNULL}
		};


/* Internal function prototypes */
LOCAL	ERR	get_scr_spec(VOID);
LOCAL	ERR	init_proc(VOID);
LOCAL	VOID	fin_proc(VOID);
LOCAL	VOID	draw_parts(Bool pimg);
LOCAL	VOID	evt_EV_NULL(VOID);
LOCAL	VOID	evt_EV_BUT(W type);
LOCAL	WERR	event_loop(VOID);


/* ---------------------------------------------------------------- Internal functions */
/*
 * Acquire the DEV_SPEC of SCREEN (1. Acquire the target device information)
 */
LOCAL	ERR	get_scr_spec (VOID)
{
	ERR	er;

	er = b_gget_spc(SCREEN_NM, &scr_spec);
	printf("b_gget_spc : %d, %d\n", er, er >> 16);
	if (er >= ER_OK) {
		printf("--------/SCREEN DEV_SPEC\n");
		printf("attr : 0x%x\n", scr_spec.attr);
		printf("planes : %d\n", scr_spec.planes);
		printf("pixbits : 0x%x\n", scr_spec.pixbits);
		printf("hpixels : %d, vpixels : %d\n", scr_spec.hpixels, scr_spec.vpixels);
		printf("hres : %d, vres : %d\n", scr_spec.hres, scr_spec.vres);
		printf("color : 0x%x, 0x%x, 0x%x, 0x%x\n", scr_spec.color[0], scr_spec.color[1], scr_spec.color[2], scr_spec.color[3]);
	}

	return er;
}


/*
 * Initialization processing
 */
LOCAL	ERR	init_proc(VOID)
{
	ERR	er;

	er = ER_OK;
	mygid = -1;
	in = False;
	prs = False;
	doloop = False;

	/* 1. Acquire target device information */
	/* 2. Confirm the existence of a unique bitmap */
	er = get_scr_spec();
	if (er < ER_OK) {
		/* Error occurred */
		;
	} else if (!(scr_spec.attr & DA_HAVEBMP)) {
		printf("can't open device.\n");
		er = ER_NOSPT;
	} else {
		/* 3. Create a device drawing environment; initializing the background */
		mygid = b_gopn_dev(SCREEN_NM, NULL);
		printf("b_gopn_dev : %d, %d\n", mygid, mygid >> 16);
		if (mygid < ER_OK) {
			er = mygid;
		} else {
			/* Paint over the screen temporarily */
			b_gfil_rec(mygid, (RECT){{0, 0, scr_spec.hpixels, scr_spec.vpixels}}, &G_PAT, 0, G_STORE);

			/* Draw the parts */
			draw_parts(False);
		}
	}

        return er;
}


/*
 * Termination processing (9. terminate)
 */
LOCAL	VOID	fin_proc(VOID)
{
	/* Close the drawing environment */
	if (mygid >= 0) {
		b_gcls_env(mygid);
	}
	mygid = -1;

	return;
}


/* -------------------------------------------------------------- Main processing system */
/*
 * Draw the parts
 *
 * pimg : True : Draw the pressed down state
 */
LOCAL	VOID	draw_parts(Bool pimg)
{
	PNT	p;
	RECT	r;

	r = but_exit.r;
	r.c.right++;			/* For the half-open property */
	r.c.bottom++;

	/* Paint over the background portion of the parts */
	b_gfil_rec(mygid, r, &G_PAT, 0, G_STORE);

	/* Draw the frame */
	b_gfra_rec(mygid, r, 0x0001, BLACK100, 0, G_STORE);
	r.c.right--;
	r.c.bottom--;
	p = (pimg) ? r.p.rightbot : r.p.lefttop;
	b_gdra_lin(mygid, p, (PNT){r.c.left, r.c.bottom}, 0x0001, WHITE0, G_STORE);
	b_gdra_lin(mygid, p, (PNT){r.c.right, r.c.top}, 0x0001, WHITE0, G_STORE);

	/* Draw the character strings */
	b_gset_chc(mygid, RGB_WHITE, TRS_GRAY);
	b_gset_scr(mygid, TSC_SYS);
	b_gdra_stp(mygid, r.c.left + 5, r.c.bottom - 3, but_exit.str, but_exit.len, G_STORE);
	b_gset_chc(mygid, RGB_BLACK, TRS_GRAY);
	b_gset_scr(mygid, TSC_SYS);
	b_gdra_stp(mygid, r.c.left + 4, r.c.bottom - 4, but_exit.str, but_exit.len, G_STORE);

	return;
}


/*
 * Processing at the time event hasn't yet occurred (EV_NULL)(7-a. processing in the case of EV_NULL)
 */
LOCAL	VOID	evt_EV_NULL(VOID)
{
	Bool	inF;			/* Previous in state */

/* printf("evt_EV_NULL\n"); */
/* printf("evt.pos : %d, %d\n", evt.pos.x, evt.pos.y); */

	if (prs) {
		/* While pressing down parts */
		inF = in;
		in = inrect(but_exit.r, evt.pos);
		if (in != inF) {
			draw_parts(in);
		}
	}

	return;
}


/*
 * Event processing of button operations (7-b. processing in the case of EV_BUTDWN, EV_BUTUP)
 */
LOCAL	VOID	evt_EV_BUT(W type)
{
	printf("evt_EV_BUT : %d\n", type);
	printf("evt.pos : %d, %d\n", evt.pos.x, evt.pos.y);

	if (prs) {
		/* While pressing down parts */
		if (type == EV_BUTUP) {
			/* Press down occurred */
			if (in) {
				draw_parts(False);
			}
			in = False;
			prs = False;
			if (inrect(but_exit.r, evt.pos)) {
				/* Parts click occurred */
				doloop = False;
			}
		}
	} else {
		/* No operation in particular occurred */
		if (type == EV_BUTDWN) {
			/* Press down occurred */
			prs = True;
			in = inrect(but_exit.r, evt.pos);
			if (in) {
				draw_parts(True);
			} else {
				/* Invalid as it is outside range of parts */
				prs = False;
			}
		}
	}

	return;
}


/*
 * Event loop
 */
LOCAL	WERR	event_loop(VOID)
{
	WERR	rv;
	W	type;

	rv = ER_OK;
	in = False;
	prs = False;

	/* Event loop */
	doloop = True;
	do {
		/* 6. Acquire an event */
		type = b_get_evt(EM_BUTDWN | EM_BUTUP, &evt, CLR);
/*		printf("b_get_evt : 0x%x\n", type); */
		if (type < ER_OK) {
			/* Error occurred */
			rv = type;
			break;
		}

		/* 7. Verify type of event acquired */
		switch (type) {
			case EV_NULL:
				/* 7-a. processing in the case of EV_NULL */
				evt_EV_NULL();
				break;
			case EV_BUTDWN:
			case EV_BUTUP:
				/* 7-b. processing in the case of EV_BUTDWN, EV_BUTUP */
				evt_EV_BUT(type);
				break;
			default:
				/* 7-c. processing in other case */
				printf("type : other(%d)\n", type);
				break;
		}

		/* 8. Continue the event loop */
	} while (doloop);

	return rv;
}


/* ---------------------------------------------------- main (cli style main) */
/*
 * main( cli style main)
 */
EXPORT	W	main(W ac, TC *av[])
{
	W	rv;

	rv = 0;

	/* Initialization */
	rv = init_proc();
	if (rv >= ER_OK) {
		/* Event loop start */
		rv = event_loop();
		printf("event_loop : %d, %d\n", rv, rv >> 16);
	}

	/* 9. Termination */
	fin_proc();

	b_ext_prc(rv);
	return rv;
}
|
____________________
| ReadMe |
"PMC T-Shell Practical Methods of Application"-Related Source Code

We have recorded the source files and Makefiles that were taken up in
"PMC T-Shell Practical Methods of Application" in Vol. 82 of TRONWARE.

Recorded Contents

     tw/ :
     |
     +-- ReadMe : This document
     |
     +-- prog_1/ : Example 1 (drawing figures)
     |    |
     |    +-- src/ : source
     |
     +-- prog_2/ : Example 2 (drawing characters)
     |    |
     |    +-- src/ : source
     |
     +-- prog_3/ : Example 3 (multiple drawing environments)
     |    |
     |    +-- src/ : source
     |
     +-- prog_4/ : Example 4 (event control)
          |
          +-- src/ : source
|
| Makefile 1 |
#
#	@(#)Makefile (prog_1)
#		For use with GNU make
#
#	make method
#	  make
#		Create release use regular version
#	  make mode=debug
#		Create for use in debugging
#	  make clean
#		Delete all files created with make
#	  make install
#		Install in prescribed place (for actual machine use only)
#
# Version
version = 0x1000
# Set release use to default
#mode =
# Source dependencies-related file (automatically created)
DEPS = Dependencies
DEPENDENCIES_OUTPUT := $(DEPS)
# Application standard rules
include ../../../../etc/makerules
# ----------------------------------------------------------------------------
# Create target
TARGET = prog_1
# Search path of source file
S = ./ ../src
VPATH = $(S)
# Header file directory addition
HEADER := $(S) $(HEADER)
# Source file
SRC =	main.c
OBJ = $(addsuffix .o, $(basename $(SRC)))
WC_SRC = $(filter %.C, $(SRC))
DBFLAGS += -l
ifeq ($(mode), debug)
    CFLAGS += -Wall
endif
# ----------------------------------------------------------------------------
.PHONY: all clean
INST = $(addprefix $(TARGET), .bz .map)
INST2 = $(addprefix $(TARGET), .out)
all: $(INST)
$(TARGET).out: $(OBJ)
	$(LINK.o) $(LDOBJS) $^ $(LOADLIBES) $(LDLIBS) $(OUTPUT_OPTION)
clean:
	$(RM) $(OBJ)
	$(RM) $(WC_SRC:%.C=%.c) $(DBSRC)
	$(RM) $(INST) $(INST2) *.lst $(DEPS)
# Compression archive
$(TARGET).bz: $(INST2)
	$(CP) $(TARGET).out _t
	$(STRIP) _t
	$(MKBTF) -o$@ -a0x8003 -c -tprog_1 \
		9.$(CPU_TYPE)._t
	$(RM) _t
# Source dependencies related
$(WC_SRC:%.C=%.c):
ifdef DEPENDENCIES_OUTPUT
$(DEPS):	; touch $(DEPS)
else
$(DEPS): $(SRC)	; $(MAKEDEPS) $@ $?
endif
include $(DEPS)
|
| Makefile 2 |
#
#	@(#)Makefile (prog_2)
#		For use with GNU make
#
#	make method
#	  make
#		Create release use regular version
#	  make mode=debug
#		Create for use in debugging
#	  make clean
#		Delete all files created with make
#	  make install
#		Install in prescribed place (for actual machine use only)
#
# Version
version = 0x1000
# Set release use to default
#mode =
# Source dependencies-related file (automatically created)
DEPS = Dependencies
DEPENDENCIES_OUTPUT := $(DEPS)
# Application standard rules
include ../../../../etc/makerules
# ----------------------------------------------------------------------------
# Create target
TARGET = prog_2
# Search path of source file
S = ./ ../src
VPATH = $(S)
# Header file directory addition
HEADER := $(S) $(HEADER)
# Source file
SRC =	main.c
OBJ = $(addsuffix .o, $(basename $(SRC)))
WC_SRC = $(filter %.C, $(SRC))
DBFLAGS += -l
ifeq ($(mode), debug)
    CFLAGS += -Wall
endif
# ----------------------------------------------------------------------------
.PHONY: all clean
INST = $(addprefix $(TARGET), .bz .map)
INST2 = $(addprefix $(TARGET), .out)
all: $(INST)
$(TARGET).out: $(OBJ)
	$(LINK.o) $(LDOBJS) $^ $(LOADLIBES) $(LDLIBS) $(OUTPUT_OPTION)
clean:
	$(RM) $(OBJ)
	$(RM) $(WC_SRC:%.C=%.c) $(DBSRC)
	$(RM) $(INST) $(INST2) *.lst $(DEPS)
# Compression archive
$(TARGET).bz: $(INST2)
	$(CP) $(TARGET).out _t
	$(STRIP) _t
	$(MKBTF) -o$@ -a0x8003 -c -tprog_2 \
		9.$(CPU_TYPE)._t
	$(RM) _t
# Source dependencies related
$(WC_SRC:%.C=%.c):
ifdef DEPENDENCIES_OUTPUT
$(DEPS):	; touch $(DEPS)
else
$(DEPS): $(SRC)	; $(MAKEDEPS) $@ $?
endif
include $(DEPS)
|
| Makefile 3 |
#
#	@(#)Makefile (prog_3)
#		For use with GNU make
#
#	make method
#	  make
#		Create release use regular version
#	  make mode=debug
#		Create for use in debugging
#	  make clean
#		Delete all files created with make
#	  make install
#		Install in prescribed place (for actual machine use only)
#
# Version
version = 0x1000
# Set release use to default
#mode =
# Source dependencies-related file (automatically created)
DEPS = Dependencies
DEPENDENCIES_OUTPUT := $(DEPS)
# Application standard rules
include ../../../../etc/makerules
# ----------------------------------------------------------------------------
# Create target
TARGET = prog_3
# Search path of source file
S = ./ ../src
VPATH = $(S)
# Header file directory addition
HEADER := $(S) $(HEADER)
# Source file
SRC =	main.c
OBJ = $(addsuffix .o, $(basename $(SRC)))
WC_SRC = $(filter %.C, $(SRC))
DBFLAGS += -l
ifeq ($(mode), debug)
    CFLAGS += -Wall
endif
# ----------------------------------------------------------------------------
.PHONY: all clean
INST = $(addprefix $(TARGET), .bz .map)
INST2 = $(addprefix $(TARGET), .out)
all: $(INST)
$(TARGET).out: $(OBJ)
	$(LINK.o) $(LDOBJS) $^ $(LOADLIBES) $(LDLIBS) $(OUTPUT_OPTION)
clean:
	$(RM) $(OBJ)
	$(RM) $(WC_SRC:%.C=%.c) $(DBSRC)
	$(RM) $(INST) $(INST2) *.lst $(DEPS)
# Compression archive
$(TARGET).bz: $(INST2)
	$(CP) $(TARGET).out _t
	$(STRIP) _t
	$(MKBTF) -o$@ -a0x8003 -c -tprog_3 \
	        9.$(CPU_TYPE)._t
	$(RM) _t
# Source dependencies related
$(WC_SRC:%.C=%.c):
ifdef DEPENDENCIES_OUTPUT
$(DEPS):	; touch $(DEPS)
else
$(DEPS): $(SRC)	; $(MAKEDEPS) $@ $?
endif
include $(DEPS)
|
| Makefile 4 |
#
#	@(#)Makefile (prog_4)
#		For use with GNU make
#
#	make method
#	  make
#		Create release use regular version
#	  make mode=debug
#		Create for use in debugging
#	  make clean
#		Delete all files created with make
#	  make install
#		Install in the prescribed place (for actual machine use only)
#
# Version
version = 0x1000
# Set release use to default
#mode =
# Source dependencies-related file (automatically created)
DEPS = Dependencies
DEPENDENCIES_OUTPUT := $(DEPS)
# Application standard rules
include ../../../../etc/makerules
# ----------------------------------------------------------------------------
# Create target
TARGET = prog_4
# Search path of source file
S = ./ ../src
VPATH = $(S)
# Header file directory addition
HEADER := $(S) $(HEADER)
# Source file
SRC =	main.c
OBJ = $(addsuffix .o, $(basename $(SRC)))
WC_SRC = $(filter %.C, $(SRC))
DBFLAGS += -l
ifeq ($(mode), debug)
    CFLAGS += -Wall
endif
# ----------------------------------------------------------------------------
.PHONY: all clean
INST = $(addprefix $(TARGET), .bz .map)
INST2 = $(addprefix $(TARGET), .out)
all: $(INST)
$(TARGET).out: $(OBJ)
	$(LINK.o) $(LDOBJS) $^ $(LOADLIBES) $(LDLIBS) $(OUTPUT_OPTION)
clean:
	$(RM) $(OBJ)
	$(RM) $(WC_SRC:%.C=%.c) $(DBSRC)
	$(RM) $(INST) $(INST2) *.lst $(DEPS)
# Compression file
$(TARGET).bz: $(INST2)
	$(CP) $(TARGET).out _t
	$(STRIP) _t
	$(MKBTF) -o$@ -a0x8003 -c -tprog_4 \
		9.$(CPU_TYPE)._t
	$(RM) _t
# Source dependencies related
$(WC_SRC:%.C=%.c):
ifdef DEPENDENCIES_OUTPUT
$(DEPS):	; touch $(DEPS)
else
$(DEPS): $(SRC)	; $(MAKEDEPS) $@ $?
endif
include $(DEPS)
|
____________________
[1] Abbreviation of Graphical User Interface.
[2] Cho Kanji (B-right/V) is a BTRON-specification operating system. PMC T-Shell is also a BTRON-specification operating system, but we could also look at it as middleware that runs on top of T-Kernel.
[3] If we compare Cho Kanji that runs on personal computers and PMC T-Shell, the basic functions and the APIs are the same, but because there are name differences and differences in dependency relationships in the development environment, applications that run on top of both of these are not in a state in which there is complete source code compatibility.
[4] In regard to the screen size and the number of colors that can be used, the peripheral equipments that can be used, etc., please be careful, as there are also cases in which one should consider the differences based on the model type of the T-Engine or PC.
[5] In C language, it is easy for memory- and pointer-related bugs in particular to occur, but, in MicroScript, the possibilities of being troubled by these types of errors are exceedingly few in number.
[6] In terms of language specification, "MicroScript" is in the image of things like BASIC and LOGO; compared to C language and Java, it is easy to learn. Even among Cho Kanji users, there are not a few individuals who are enjoying programming using MicroScript. As for the details of MicroScript, please look at the reference documentation, the manual attached to Cho Kanji 4, etc.
[7] Abbreviation of Application Programming Interfaces. The expression "utilize (issue, call up) the APIs" means utilizing the functions that are realized by means of the APIs.
[8] In T-Engine process base applications, even if we exit main() or MAIN() with return, the end result is b_ext_prc() being executed. For that reason, with the final b_ext_prc(); and return rv;, it is sufficient if there is just one or the other, but when we want to make the meaning clear, and for the purpose of escaping a compiler warning, we leave both statements in order to be sure.
[9] In the realization of character drawing functions, besides display primitives, fonts (the Font Manager) also are utilized. The Font Manager manages multiple outline fonts or dot fonts, and it possesses functions for selecting the most suitable font matched to character size and attributes. However, if we are just drawing characters, as the Font Manger's functions are automatically called up and utilized from the display primitives, there is no need for an application that utilizes display primitives to be aware of of the Font Manager.
[10] What we call character foreground color is the color specification we attach to the letter part (line part) of the characters. On the other hand, what we call character background color is the color specification of the part that forms the background of the character.
[11] It is also possible to include language-specifier codes in these character strings. For that reason, if we hand over a TRON Code character string made up from a language-specifier code and character codes as is to an API for character string drawing use, then we can drawn a character string that includes multi-kanji or multi-characters with a one-time API, and processing corresponding to 8. becomes unnecessary.
[12] As mentioned later, if we carry out explicit mutual exclusion on the application side, guaranteeing the drawing results in a case like this is also possible. In particular, in a case where we carry out processing of the type in which we invert colors, mutual exclusion is important.
[13] With this program example, there is no means of termination while entered in the infinite loop. In terminating the program, please do something along the lines of exiting the program with [ctrl] + [c].
[14] The event management function is a function included in PMC T-Kernel Extension, not PMC T-Shell; because its relationship with the GUI is deep, we are bringing facts together and explaining them in this article.
Reference Documentation and Web Sites
[1] Sakamura, Ken Gen. Ed.; PMC Institute Ed.: Maikurosukuriputo nyuumon [An Introduction to BTRON MicroScript] , Personal Media Corp., 1999. (ISBN4-89362-160-2)
[2] Sakamura, Ken Gen. Ed.; PMC Institute Ed.: BTRON Maikurosukuriputo [BTRON MicroScript Reference Manual], Personal Media Corp., 1997. (ISBN4-89362-155-6)
[3] Matsui, Akira: "Ta-kanji-no mondai to TRON Koodo" [The multi-kanji problem and TRON Code], Intaafueesu [Interface], December 2002, pp 75-86, CQ Publishing Co., Ltd.
[4] Tookyoo Daigaku takokugo shori kenkyuukai [The University of Tokyo Multilingual Processing Research Group], GT shotai fuonto [GT Typeface Font] http://www.lu-tokyo.ac.jp/GT/
[5] Choo Kanji kaihatsusha saito [Cho Kanji Developer's Site] http://www.personal-media.co.jp/tron/developer/
[6] Personal Media Corporation (T-Engine-related page) http://www.t-engine4u.com/en/index.html (previously, http://www.personal-media.co.jp/te/)
[7] T-Engine project http://www.t-engine.org/
The above article on PMC T-Shell appeared on pages 49-58 in Vol. 82 of TRONWARE . It was translated and loaded onto this Web page with the permission of Personal Media Corporation.
Copyright © 2003 Personal Media Corporation
Copyright © 2008 Sakamura Laboratory, University Museum, University of Tokyo