On this occasion, we will try building a system that actually does work. By connecting an infrared remote control that has RS-232C input with 1B and writing a program with MicroScript, we will realize a television timer (that turns on the television at a specified time and matches it to a specified channel), which we will control through the GUI.
1B MicroScript is a programming language that runs on the BTRON-specification 1B personal computer series. Programming using a graphical user interface (GUI) with such things as windows can be easily done.
In No. 1 of this series, I explained the programming work procedures in detail. And then, we tried creating a simple presentation system that realizes a picture-story show.
On this occasion, using 1B MicroScript, let's challenge the control of home appliances. What we shall create is a "television timer" through which we will turn on the television's power supply at a specified time, and then watch a program on a specified channel.
Necessary Equipment
I shall now give the equipment necessary in programming [1].
- 1B personal computer
- 1B MicroScript
- Programmable infrared remote control
- Fixed price 23,800 yen, HAL Laboratory, Inc.
- Television
 |
 |
|
|
When you connect these devices, they become as in Fig. 2.
Initializing CROSSAM2
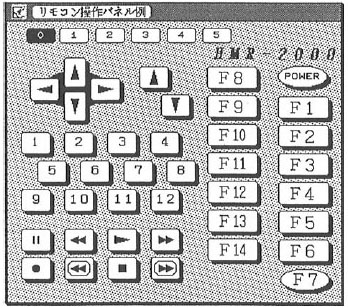
It is necessary to do initialization work for the "CROSSAM2" infrared remote control prior to using it. In a state in which it is connected to 1B, run the sample program called "Remote Control Control Panel Example," which has been entered into the 1B MicroScript product (Fig. 3). By means of this, the remote control will automatically be initialized [TN1].
 |
|
Make It Learn the Television's Infrared Signals
It is necessary to make the "CROSSAM2" learn the infrared signals of the television you will use [2]. For 39 types of equipment from 11 major companies, the signals have been built into the "CROSSAM2" beforehand. If the television you will use corresponds to one of those, then the learning is simple. At that time, I would like you to set the remote control's dial to the '1' position. Because I have described this dial number on the 153rd line of the script (p. 82), modifications also are possible.
What will we be able to do using the television timer we will use on this occasion? I would like to lay out an explanation of that at the outset. So that the program commentary will be easy to do, the functions are fairly restrained [TN2].
|
|
When you double click the virtual object, a window appears, and the television timer starts up (Fig. 4).
|
||
|
|
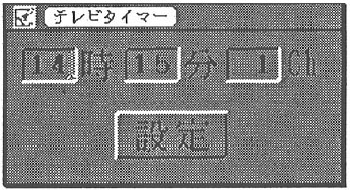
Inside the window, character boxes in which you can input the time you want to switch on and the channel has appeared. As a norm, the present time and one channel are set (Fig. 5).
|
||
|
|
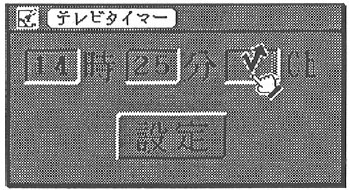
By clicking on a character box, you enter numerals from the keyboard. If you press the "TAB" key, you can move the cursor to the character box on the right (Fig. 6).
|
||
|
|
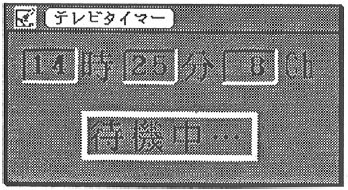
When the specification of the values is finished, you press the [Set] switch. It's all right if you press the Return key. In an instant, the switch will indent (Fig. 7).
|
||
|
|
Until it becomes the specified time, it will enter standby state (Fig. 8).
|
||
|
|
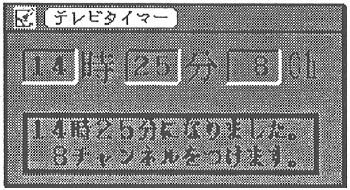
When it becomes the specified time, a message will appear inside a window and at the bottom of the screen. And then, using the remote control, the computer automatically turns on the television and changes the channel. Of course, it is not necessary for the television timer window to appear in the forefront. Even if you move to another window and are doing other work, this timer will operate properly (Fig. 9).
|
||
The Stage and the Actors Are Made Up in This Way
The Entirety of the Stage
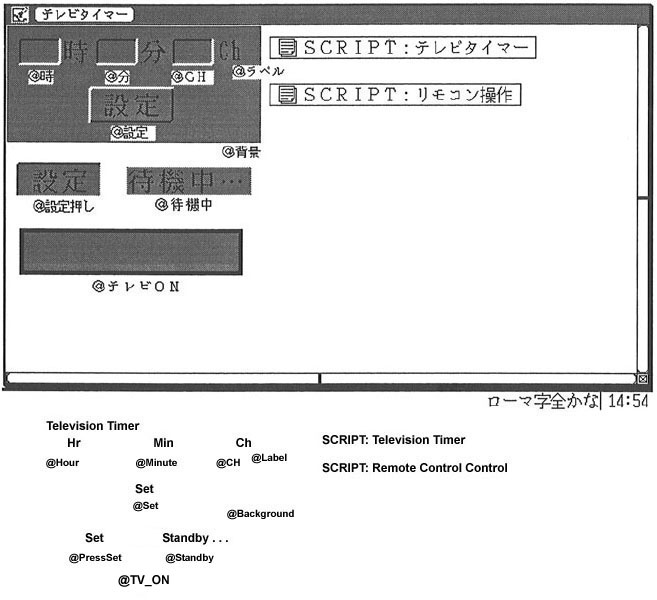
We will create the actors of this television timer using the figure editor. As was mentioned in the previous installment of this series, we create the parts that will serve as actors on the stage with the figure editor, and then we group them together with a text framework in which we have written the names of the actors (Fig. 10).
 |
|
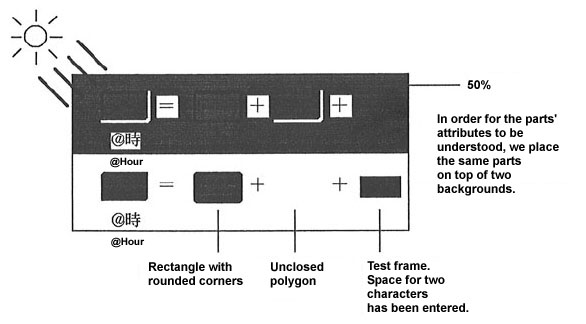
Three-Dimensional Design
The parts are designed so that they appear three-dimensional. All you have to do is draw them by dividing into parts that become dark and parts that become bright when you hit them with light from the upper left (Fig. 11).
 |
|
|
In contrast to the "@Set" switch that sticks up, when we invert it left to right and top to bottom, it becomes "@PressSet," which is indented. It's a situation in which a shadowy state inverts.
Text Segments
As for the four segments "Hour," "Minute," "CH," and "TV_ON," text frameworks created with the figure editor have been grouped together with them. When you do things in this manner, you can do such things as allow the user to input characters inside these text frameworks and display favorite characters from the program side. In these text frameworks, it is necessary to insert space to the extent of the maximum number of characters that are allowed to be input and displayed. We call these segments, in particular, text segments.
Script
The script is described by dividing it into the two text real objects "SCRIPT TV Timer" and "SCRIPT Remote Control Control." Of course, it's all right to insert all of the script inside one text real object. However, when the number of lines in a script become great, dividing it and describing it in this manner is convenient and management is easy to do.
I show the entirety of the script in Program1 (p. 80). "SCRIPT TV Timer" (1st~145th lines) and "SCRIPT Remote Control Control" (147th~209th lines) are actually stored in separate real objects. However, here, consecutive line numbers have been attached so that it is easy to comment on.
Below, I will follow in order the operations of this program. In particular, I will explain this by narrowing the explanation down to the peculiar grammar of 1B MicroScript. In spots where it seems things can be judged with analogies from other general programming languages, I will explain in brief.
Notation
In explaining MicroScript statements, the following notations are used.
Places where there are
. . .
show that it is possible to write multiple immediately preceding elements by delimiting them with a space or tab.
Places where there are
[]
show that it is possible to omit those contents.
For example, where there is
CALL <procedure name> [<argument expression> . . . ]
it shows that any of the following descriptions are also possible.
CALL to initialize
CALL to square 5
CALL to multiply 3 6
Macro Definitions (6th to 9th Lines)
In the 6th to9th lines, I have specified macros with the DEFINE statement. A macro is a function that can replace a character string inside the text with another character string by following a definition made beforehand with the DEFINE statement. In cases where you will be repeatedly describe the same character string, if you use a macro, you can describe concisely, and corrections also become easy.
For example, if you directly write character codes inside the program, such as '1C', '4', and '9', you immediately end up forgetting what they are about. I have defined macros in the manner of the sixth to ninth lines. When you do things like this, and, for example, if you write inside the program
1B code = TAB
then it becomes the same as having written
1B code = 9
Declaring Variables (11th to 14th Lines)
In the 11th to 14th lines, I have declared beforehand all the variables that I will use. The variables that have been declared here can be accessed from all the scripts that run inside this window.
It is also possible to use Japanese for the variables. Even though they become a little long, if you make them into names that use Japanese, then even afterwards, the program is easy to read.
The 14th line forms a declaration of string variables.
If we write this as
VARIABLE Minimum[3]
then we can we can define a string made up from three elements. We use this by specifying added characters in the manner of
Minimum[0] Minimum[1] Minimum[2]
When MicroScript starts up, what is executed first are the statements enclosed by the PROLOGUE statement and the END statement (36th to the 48th lines).
SET Statement (37th to 42nd Lines)
The SET statement substitutes values in variables.
SET <variable> <expression>
In the 37th to 39th lines, we substitute the values that the three text segments "Hour," "Minute," and "CH" can take into the string variables "Minimum" and "Maximum." In other words, "Hour" takes values of the range '0~23', Minute '0~59', and "CH" '1~12'. Using these string variables, we do a check of the numerical values that are input. This we carry out with the procedure "Check Whether or Not the Input Value Is Proper" (130th to 139th lines) [TN3].
On the 37th to 39th lines, there are two SET statements within a single line, and those are bound together with a ':' (a colon). When you want to write multiple statements inside a single line, you do it in this manner.
In the 40th to 42nd lines, we substitute the "Hour," "Minute," and "CH" character segments in the string variable "boxes." Saying that we are substituting segments, and not numerical values, into variables may not appeal to some. However, this can be used rather conveniently. The detailed method of using it will be described below.
SCENE Statement (43th Line)
What makes the segments appear in the window is the SCENE statement. I explained this statement in detail in the previous installment.
CALL Statement (44th to 47th Lines)
By means of the CALL statement, we call up a specified procedure. In other words, we move control of execution of the script to that procedure.
For the CALL statement, we use in the form
CALL <procedure name> [<argument expression> . . . ]
In the second and thereafter, we specify the argument to that procedure. On the procedure side, we can reference the argument that was handed over using the system variables $ARG[0]~$ARG[7].
For example, suppose we executed
CALL Addition 1 2
when the substance of the procedure "Addition" was
|
At this time,
1+2=3
would be displayed in the message area at the bottom of the screen [TN 4].
Below, I will explain about the four procedures that are called up here.
Procedure "Calculate Coordinate Difference in X Direction of Message" (27th to 32 Lines)
In the procedure, we do a simple coordinate calculation for the purpose of displaying two segments of different width by arranging them in the center. This is preparation for displaying in the middle the segment "Standby" and the segment "TV_ON," centering on the segment "Set." We use these calculation results in the 82nd to 92nd lines.
When we make it so that we can decide the display location based on this type of calculation, circumstances are good later. Even in a case where it comes about that we would like to modify the location and size of the segments, there is no need whatsoever for the program to be modified.
Well then, on the 29th line, we calculate the difference in horizontal width of the segment "Standby" and the segment "Set," and we substitute half of that into the variable "Difference in Width of Standby and Set." When we write "Standby.W," we can reference the horizontal width of the segment "Standby."
We call the "W" part the "state name." Through the form "segment name state name," we can retrieve various kind of information concerning that segment. I have collected together the things that have been prepared as state names in the form of a list at the end of this article.
Procedure "Initialize 'Hour', 'Minute', 'CH'" (17th to 23rd Lines)
With this procedure, we insert the initial values into the three segments "Hour," "Minute," and "CH." We use the TEXT statement below.
TEXT <text segment> <expression character string> [<expression> . . . ]
Using the expression character string, we decide the expression. This specification is almost the same as that of C language. If we write "%2d," we will display the value of the <expression> as a decimal number in two places right aligned. I will omit the details of the expression character string.
$TIME is a variable that returns the current time. This is a variable that has been prepared in the system, and we call it a "system variable." It returns the values
Hour (0~23) x 10000 + Minute(s) (0~59) x 100 + Second(s) (0~59)
For example, if we reference $TIME when the current time is 15:23:45, it returns the value
152345
If we make it $TIME/10000, the hour "15" can be extracted. Because this variable can only be dealt with as an integer, the remainder of the division is cut off and discarded.
I have collected together at the end of this article the system variables that have been prepared.
Procedure "Initialize the Remote Controller" (181st to 195th Lines)
When we use the remote control, it is necessary to call up this procedure only once. This is something that referenced the script entered into the attached sample program "Remote Control Control Panel Example" (Fig. 3).
With the RSINT statement on the 182nd line, we have initialized the RS-232C port. With the RSPUT statement on the 172nd to 174th lines, we have output data to the RS-232C port. With the RSWAIT statement on the 175th line, we are waiting for the data specified to the RS-232C port to return.
Because it will lead to a very detailed discussion, I will not touch on the initialization of the remote controller beyond this. It is sufficient if I have gotten you to know that it is necessary to call up this procedure in the beginning as a convention.
Procedure "Activate Box" (52nd to 55th Lines)
With this procedure, we put the specified character box into input status, and we show the cursor. In the 47th line, this is made as
CALL Activate_Box 0
By means of this, at startup time, it will come about that the cursor will appear in the text segment in which the array variable "Box [0]" has been entered, in other words, "Hour." What actually puts the character box in the input state is the INPUT statement. However, the INPUT statement just merely displays the cursor there so that one can input characters. With this statement itself, it is not a case in which one does character input processing and waiting for termination. What carries that out is the procedure "If a Key Is Pressed" (116th to 124th lines).
When PROLOGUE to END Finishes, Wait for Processing from the User
By this, the execution of the PROLOGUE statement to the END statement on the 36th to 48th lines has terminated. From here forward, MicroScript will not execute anything. It will just wait for operations from the user.
Let's explain the part in which we process input from the keyboard.
Procedures "___ Has Been Clicked" (57th to 67th Lines)
With these procedures, we do the processing for when the segments "Hour," "Minute," or "CH" are clicked. We are just simply calling up the procedure "Activate_Box," and moving the cursor into its segment. Immediately, the program returns to a state in which it is again waiting for an operation from the user.
When we describe the ACTION statement in this manner, this procedure is called up when the user makes a click operation. In regard to this, I gave a detailed explanation in the previous installment.
Procedure "If a Key Is Pressed" (116th to 125th Lines)
This procedure is called every time the user presses a key. In the system variable $KEY, the key code of the key that had been pressed has been entered. With this procedure, we perform some sort of processing only when the pressed key is [TAB], [Execute], or [Return]. In regard to inputs of keys other than these, nothing is processed, and we terminate this procedure as is. And then, we return to a state in which we are waiting for an operation from the user.
Even if there is the input of numerals from the user, it is not necessary to process anything inside the script program. Those values are automatically displayed inside the text segment. The text segment also supports the correction of input values by means of the backspace. Accordingly, there is no need whatsoever to describe backspace input processing either.
When the [TAB] key has been input, we call up the procedure "Activate Box" through the 119th line, and then we make the cursor move to the next box. The variable "Active Box" shows the box number where the cursor currently is. Accordingly, by making the calculation
(Active_Box + 1) % 3
when the variable "Active Box" is 0, it computes 1, when 1, 2, and when 2, 0. "%" is an operator that looks for a remainder.
When the [TAB], [Execute], or [Return] key is pressed, we call up the procedure "Check Input Value and Wait Specified Time" through the 122nd line.
In the IF statement on the 121st line, outside of the operator ' = = ' [equal value operator], we also use ' | '. This is an operator that means "or."
Procedure "Check Input Value and Wait Specified Time" (First Half: 98th to 107th Lines)
When the [TAB], [Execute], or [Return] key was pressed, this procedure was called up through the 122nd line.
In the 100th to 102nd lines, we call up the procedure "Check Whether or Not the Input Value Is Proper," and we investigate whether the values of the segments "Hour," "Minute," and "CH" are settled in the proper range. Using the state name "V," we take out numerals entered in the segment, and we pass these over to the procedure "Check Whether or Not the Input Value Is Proper."
In a case where the [TAB] or [Execute] key has been pressed, it is the end of the execution of this procedure. The program returns to a state in which it is waiting for an operation from the user.
In a case where the [Return] key has been pressed, the program at last enters the timer wait state. First, we call up the procedure "Indent the Set Switch and Show Standby Message" through the 105th line.
And then, by means of the WAIT statement on the 107th line, the program waits until it arrives at the specified time. We write the WAIT statement is in the form below.
WAIT <conditional expression> [:<time out expression>]
The WAIT statement waits until the <conditional expression> is satisfied. If the <conditional expression> is satisfied, the program comes out of the WAIT statement, and control moves to the next statement. In a case where a <time out expression> has been specified, even though the program has not satisfied the <conditional expression>, the program comes out of the WAIT statement if the specified second passes. To put this conversely, if we do not specify a <time out expression>, it will come about that the program will wait forever until it satisfies the <conditional expression>.
However, even though I say it will wait forever, if one selects the [Exit] menu or double clicks the pictogram of the television timer window, the window will close. In other words, because the execution of the script itself thereupon terminates, the WAIT statement also becomes invalid.
In the 107th line, I am using a value in which I have divided the system variable $TIME by 100. In other words, the program enters waiting until the "Set Time" and the "Current Time" match in units of "hours" and "minutes," ignoring "seconds."
Procedure "Check Whether or Not the Input Value Is Proper" (130th to 139th Lines)
This procedure investigates whether the values of the segments "Hour," "Minute," and "CH" are settled in the proper range. If they are not settled there, they are corrected and forcefully set to the minimum value or the maximum value. This is called up from the 100th to the 103nd lines.
Furthermore, we write the MicroScript IF statement as
IF <conditional expression>
~
[ELSE
~
]
ENDIF
When you would like to line up multiple conditional judgments, you cannot write it in the form of
IF <conditional expression 1>
~
ELSEIF <conditional expression 2>
~
ELSE
~
ENDIF
It is necessary to make them as follows:
IF <conditional expression 1>
~
ELSE
IF <conditional expression 2>
~
ELSE
~
ENDIF
ENDIF
We come to write at the end ENDIF statements to the extent of the number of conditional expressions.
Procedure ""Set" Has Been Pressed" (69th to 72nd Lines)
When the [Set] switch is pressed, this procedure is called up. In this television timer, pressing the [Set] switch and pressing the "Return" key are completely the same meaning. Accordingly, we substitute RET in the variable "code," and we call up the procedure "Check Input Value and Wait Specified Time."
Procedure "Indent the Set Switch and Show Standby Message" (76th to 83rd Lines)
This procedure is called up from the 105th line. In other words, it immediately precedes entering the state in which the timer is in standby, following the "Return" key being pressed or the [Set] switch being clicked.
We move the segment "PressSet" to the same location as [Set] through the 77th line. By means of this, the [Set] switch appears as if it has turned into an indented state (Fig. 7). And then, after 0.5 second, we delete that segment. In other words, the [Set] switch that projected up before from the bottom appears, and then it again returns to its original state (Fig. 6). It is not a case in which, in the manner of a normal switch, it reacts to release by the user and returns to a switch state.
By means of the 82nd line, we display by covering the top of the [Set] switch with the message "Standby . . . " (Fig. 8). The Y coordinate (vertical direction) is the same location as the set switch. On the other hand, on the X coordinate (horizontal direction), we display by closing to the left to the extent of the portion of the variable "Difference in Width of Standby and Set." By means of this, it will come about that the message will be displayed in the center of the window.
In the MOVE statement on the 78th to 82nd lines, we specify the coordinates by making a particular segment the reference. I explained the notation for this in the previous installment.
Procedure "Check Input Value and Wait Specified Time" (Second Half: 107 to 113th Lines)
When we satisfy the condition of the WAIT statement on the 107th line (= when we arrive at the specified time), we come out of the WAIT statement. And then, we call up the procedure "Show Message Informing Specified Time Has Arrived" through the 108th line.
By means of the 110th line, we call up the procedure "Turn Television ON and Set to the Specified Channel." As the argument, "CH.V," in other words, the specified channel number is passed. Inside this procedure, we operate the remote control, and we actually set the television's power supply to ON.
The program closes its own window and terminates the execution of the entire script by means of the 111th line. Immediately prior to closing, it executes the EPILOGUE statement to the END statement (143rd to 145th lines).
Procedure "Show Message Informing Specified Time Has Arrived" (88th to 94th Lines)
This procedure is called from the 108th line after the specified time has arrived.
Through the TEXT statement on the 89th line, the program writes in the message informing that it will turn on the television in the segment "TV_ON." Moreover, the program shows the same message in the message area at the bottom of the screen by means of the MESG statement on the 90th line.
The program sounds the buzzer with the BEEP statement on the 91st line. The 92nd line, using the same method as the 82nd line, shows the message in the center of the window.
Procedure "Turn Television ON and Set to the Specified Channel" (199th to 209th Lines)
This procedure holds the channel number in the argument. The program sends a command to the "CROSSAM2" remote control, turns on the television power supply, and then releases an infrared signal that turns to that channel number
The 201st line is a command that instructs the pressing of the power switch that is attached to the "CROSSAM2." The 205th and 207th lines are commands that instruct the pressing of the channel button attached to the "CROSSAM2" (Fig. 1). Both of them are things that referenced what is entered into the attached sample program "Remote Control Operation Panel Example."
I shall explain for future use
used in 1B MicroScript.
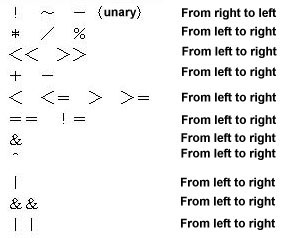
Operators
Unary Operators
The unary operators that can be used are as follows below [TN5]. The same meaning even if you use the operation symbol in ( ).
Binary Operators
The binary operators that can be used are as follows below. The same meaning even if you use the operation symbols in ( ).
The computational results of the relational operators take the numerical value of '1' when true, and the numerical value of '0' when false. Also, the logical negation of '0' becomes '1', and the logical negation of "not-zero" becomes '0'.
Priority Levels of the Operators
I will line up the operators in the order of highness of priority level. They are mostly based on C language.
System Variables
The variables below are defined in the system as "system variables." However, a portion of the system variables are left out. We use them in order to reference the various states of the system and to make settings.
In the list below, the system variables with R attached can only reference a value. They cannot set a value. PD means pointing device.
$ERR
- R: error state in the immediately preceding statement
- 0: normal
- 1: time out
- 2: BREAK
$PDX R: current X coordinate value of the PD $PDY R: current Y coordinate value of the PD Values when the upper left hand corner of the window's work area is made (0, 0) $PDB
- R: current button status of the PD
- 0: OFF 1: ON
$PDS
- Shape of the PD (0~15)
- 0: finger-for-selecting
- 1: finger-for-selecting revisions
- 2: hand-for-moving
- 3: hand-for-moving (vertical direction)
- 4: hand-for-moving (horizontal direction)
- 5: grip
- 6: grip (vertical direction)
- 7: grip (horizontal direction)
- 8: hand-for-resizing
- 9: hand-for-resizing (vertical direction)
- 10: hand-for-resizing (horizontal direction)
- 11: pinch
- 12: pinch (vertical direction)
- 13: pinch (horizontal direction)
- 14: cup (wait state)
- 15: pre-menu
$KEY R: key code pressed last With $KEY, the correct value is obtained only when it is first used following a key being pressed; from the second time, it becomes 0. $DATE
- R: current date
- Value of the (92~99) x 10000 + month (1~12) x 100 + day (1~31)
$TIME
- R: current time
- Value of hour (0~23) x 10000 + minute (0~59) x 100 + second (0~59)
$MSEC
- R: current millisecond unit counter value
- A value within the range of 0~16777215 (0xFFFFFF); because it is not absolute time, we use it only for obtaining differences.
$ARG[n]
- Local variable n=0~7
- Used also in referencing an argument given by a CALL statement; we reference arguments with n=0~7.
$WDW R: widow width $WDH R: window height $RAND
- R: false random number
- Returns a false random number in the range of 0~32767
Segment State Names
Through the form "segment name, segment state name," it is possible to know the state of a segment.
S Display state 0: not displayed 1: displayed X X coordinate value of a segment's upper left hand corner point Y Y coordinate value of a segment's upper left hand corner point Values when the upper left hand corner of the window's work area is made (0, 0) W Width of a segment H Height of a segment V Value of the numerical conversion of the text string inside a text segment Valid only when a text segment. From the beginning of a character string, looks in order until it becomes impossible to interpret as a numerical value. In a case where the beginning of a character string cannot be interpreted as a numerical value, V becomes 0.
It is not possible to set a value in a segment state name. It is only for referencing.
If you write the following MESG statement,
MESG "Ball=(%d,%d)" Ball.X Ball.Y
you will display the upper left coordinates of the segment called ball in the message area at the bottom of the screen [TN6].
Ball=(54,143)
On this occasion, we connected 1B and an infrared controller, and we tried controlling a television. Recently, there are a lot of things that can be controlled with a remote controller, audiovisual equipment it goes without saying, but also things such as air conditioners and electric lighting. Using 1B MicroScript, there is no doubt that fun control that serves a purpose is possible.
In 1B MicroScript, a sample program called "Remote Control Control Panel Example" is attached (Fig. 3). In this window, the infrared remote controller "CROSSAM2" control panel is displayed as is, and if you operate this switch, it will come about that you have operated the corresponding "CROSSAM2" switch (Fig. 1). If you revise this script, you should be able to easily create a control panel for special use.
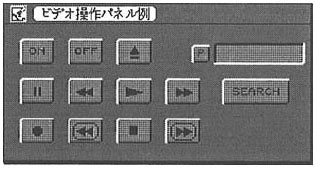
I didn't touch on it at all on this occasion, but using 1B MicroScript, you can also control VISCA equipment [3]. Through instructions from a personal computer, you you can make the video equipment do various types of operations (power ON/OFF, cue, replay, record, etc.), and you can simultaneously control various types of video equipment. Things like various types of video editing beginning with dubbing become possible. "Video Control Panel Example," a sample program for VISCA equipment control is attached (Fig. 12).
 |
|
|
|
1   ##
2   ## 1B MicroScript Program
3   ## TRONWARE Vol. 23
4   ## Television Timer:
5   ## "SCRIPT: Television Timer"
6   DEFINE TAB   9 #[TAB] key code
7   DEFINE EXEC  4 #[Execute] key code
8   DEFINE RET  10 #[Return] key code
9   DEFINE Temporary_Variable $ARG[9]
10  #
11  VARIABLE Code Active_Box Box_Number
12  VARIABLE Set_Time Current_Time Current_Time_Hour
13  VARIABLE Difference_in_Width_of_Standby_and_Set
             Difference_in_Width_of_TV_ON_and_Set
14  VARIABLE Box[3] Minimum[3] Maximum[3]
15  #
16  #
17  ACTION Initialize_"Hour"_"Minute"_"CH"
18   SET Current_Time $TIME
19   SET Current_Time_Hour Current_Time / 10000
20   TEXT Hour   "%2d" Current_Time_Hour
21   TEXT Minute "%2d" (Current_Time - Current_Time_Hour *
                   10000) / 100
22   TEXT CH     "%2d" 1
23  END
24  #
25  #
26  #
27  ACTION Calculate_Coordinate_Difference_in_X_Direction_of_Message
28   # Set Standby.W > Set.W
29   SET Difference_in_Width_of_Standby_and_Set
           (Standby.W - Set.W) / 2
30   # Set TV_ON.W > Set.W
31   SET Difference_in_Width_of_TV_ON_and_Set
           (TV_ON.W - Set.W) / 2
32  END
33  #
34  #
35  #
|
36  PROLOGUE
37   SET   Minimum[0] 0: SET
           Maximum[0] 23 # Numerical range of "Hour"
38   SET   Minimum[1] 0: SET
           Maximum[1] 59 # Numerical range of "Minute"
39   SET   Minimum[2] 0: SET
           Maximum[2] 12 # Numerical range of "CH"
40   SET   Box[0] Hour
41   SET   Box[1] Minute
42   SET   Box[2] CH
43   SCENE Background Hour Minute CH Label Set
44   CALL  Calculate_Coordinate_Difference_in_X_Direction_of_Message
45   CALL  Initialize_"Hour"_"Minute"_"CH"
46   CALL  Initialize_Remote_Control
47   CALL  Activate_Box   0
48  END
49  #
50  #
51  #
52  ACTION Activate_Box
53    SET  Active_Box   $ARG[0]
54    INPUT Box[Active_Box]
55  END
56  #
57  ACTION "Hour"_Has_Been_Clicked CLICK Hour
58    CALL Activate_Box   0
59  END
60  #
61  ACTION "Minute"_Has Been_Clicked CLICK Minute
62    CALL Activate_Box   1
63  END
64  #
65  ACTION "CH"_Has_Been_Clicked CLICK CH
66    CALL Activate_Box   2
67  END
68  #
69  ACTION "Set"_Has_Been_Pressed PRESS Set
70    SET  Code RET
71    CALL Check_Input_Value_and_Wait_Specified_Time
72  END
73  #
|
74  #
75  #
76  ACTION Indent_the_Set_Switch_and_Show_Standby_Message
77   MOVE PressSet:0  0 Set
     # Bring the indented switch right above
78   APPEAR PressSet
79   SLEEP 500
80   DISAPPEAR PressSet
     # After 0.5 second, returns to the original protruding switch
81   SLEEP 500
82   MOVE Standby : -Difference_in_the_Width_of_Standby_and_Set  0  Set
83   APPEAR Standby
84  END
85  #
86  #
87  #
88  ACTION Show_Message_Informing_Specified_Time_Has_Arrived
89   TEXT  TV_ON "It is %2dHr%2dMin.
                 Turning to channel %2d."
                 Hour.V Minute.V CH.V
90   MESG  "It is %2dHr%2dMin.
           Turning to Channel %2d."
           Hour.V Minute.V CH.V
91   BEEP
92   MOVE  TV_ON : -Difference_in_the_Width_of_Standby_and_Set  0  Set
93   APPEAR TV_ON
94  END
95  #
96  #
97  #
98  ACTION Check_Input_Value_and_Wait_Specified_Time
99   # Numerical value check if TAB, Execute, or Return are pressed
100  CALL Check_Whether_or_Not_the_Input_Value_Is_Proper 0 Hour.V
101  CALL Check_Whether_or_Not_the_Input_Value_Is_Proper 1 Minute.V
102  CALL Check_Whether_or_Not_the_Input_Value_Is_Proper 2 CH.V
103  IF Code==RET
104     # Wait until the specified time arrives
105     CALL Indent_the_Set_Switch_and_Show_Standby_Message
106     SET Set_Time Hour.V*100+Minute.V
|
107     WAIT $TIME/100  ==  Set_Time
108     CALL Show_Message_Informing_Specified_Time_Has_Arrived
109     CALL Initialize_Remote_Control
110     CALL Turn_Television_ON_and_Set_to_the_Specified_Channel CH.V
111     FINISH
112   ENDIF
113 END
114 #
115 #
116 ACTION If_ a_Key_Is_Pressed KEY
117     SET Code $KEY
118     IF  Code==TAB #If the TAB key is pressed
119         CALL Activate_Box
                 (Active_Box + 1) % 3
120     ENDIF
121     IF  Code==TAB  |  Code==EXEC  |  Code==RET
122         CALL Check_Input_Value_and_Wait_Specified_Time
123     ENDIF
124 END
125 #
126 #
127 #
128 DEFINE Input_Value $ARG[1]
129 #
130 ACTION  Check_Whether_or_Not_the_Input_Value_Is_Proper
131     SET Box_Number  $ARG[0]
132     IF  Input_Value > Maximum[Box_Number]
133         TEXT Box[Box_Number] "%2d" Maximum[Box_Number]
134     ELSE
135     IF  Input_Value < Minimum[Box_Number]
136         TEXT Box[Box_Number] "%2d" Minimum[Box_Number]
137     ENDIF
138     ENDIF
139 END
140 #
141 # Will be executed when the window is closed
|
142 #
143 EPILOGUE
144     MESG
145 ################################################
146 ##
147 ##
148 ## Television Timer:
149 ## "SCRIPT: Remote Control Control"
150 #
151 # Initialization Processing
152 # Remote control dial in location "1" TV signal has been learned
153 DEFINE Dial 0x31
154 DEFINE Transmission_Time 500
155 VARIABLE OK
156 #
157 # Command Transmission subroutine
158 #
159 ACTION SEND
160     IF $ARG[1]
161        RSPUT 0 0x0d 0x0d 0x2f 0x54
                 Dial 0x2c $ARG[0] $ARG[1] 0x0d
162     ELSE
163        RSPUT 0 0x0d 0x0d 0x2f 0x54
                 Dial 0x2c $ARG[0] 0x0d
164     ENDIF
165     SLEEP Transmission_Time
166     RSPUT 0 0x0d
167 END
168 #
169 #
170 #
171 ACTION Connection_Test
172     RSPUT 0 0x0d
173     RSPUT 0 0x0d 0x2f 0x43
174     RSPUT 0 0x0d
175     RSWAIT 0 0x4f 0x6b 0x0d 0x0a:3
176     SET OK !$ERR
177 END
178 #
179 #
|
180 #
181 ACTION Initialize_Remote_Control
182     RSINIT 0 0018 9600
183     IF $ERR
184        MESG "Cannot initialize RS232C."
185        BEEP
186        EXIT
187     ENDIF
188     CALL Connection_Test
189     IF !OK
190        MESG "Cannot connect the remote control.
                 Please terminate."
191        BEEP
192        EXIT
193     ENDIF
194     SLEEP Transmission_Time
195 END
196 #
197 #
198 #
199 ACTION Turn_Television_ON_and_Set_to_the_Specified_Channel
200     # Power supply ON
201     CALL SEND 0x34 0x30
202     SLEEP 2000
203     # Transmit the channel number
204     IF $ARG[0] < 10
205        CALL SEND 0x2F + $ARG[0]
206     ELSE
207        CALL SEND 0x31 0x2F + $ARG[0] % 10
208     ENDIF
209 END
|
|
|
01 VERSION 2
02 VARIABLE OK
03 DEFINE Port_Number 0
04
05 PROLOGUE
06  LOCAL Error
07  RSINIT Port_Number, 0018, 9600
08  Error=$ERR
09  IF Error
10   MESG "RS-232C initialization error (%d). Please close
          the window.", Error
11   BEEP
12   $GV[0]=0;EXIT
13  ELSE
14   EXECUTE Initialization
15  ENDIF
16 END
17
18 ACTION Initialization
19  MESG "Will check initialization."
20  CALL Connection_Test
21  IF OK
22   BEEP
23   MESG "Initialized. Please close the window."
24   $GV[0]=1;EXIT
25  ENDIF
26  MESG ""
27  CALL Load
28  CALL Connection_Test
29  IF OK
30   $GV[0]=1;MESG "Initialization finished. Please close the window."
31  ELSE
32   BEEP
33   $GV[0]=0;MESG "Can't initialize. Please close the window."
34  ENDIF
35 END
36
37 ACTION Connection_Test
38  RSPUTC 0, 0x0d
39  RSPUTC 0, 0x0d, 0x2f, 0x43
40  RSPUTC 0, 0x0d
41  RSPUTC 0, 0x4f, 0x6b, 0x0a:2
42  OK=!$ERR
43 END
|
44
45 ACTION Load
46  REPEAT
47   BEEP
48   RSWAIT 0, 0x47, 0x4F: 10
49   IF $ERR==0
50   RSPUT 0, 0xA2, 0x10, 0xBD, 0x23, 0x10, 0x9D, 0x00,
     0x01, 0xCA, 0x10, 0xF7, 0xA2, 0x40, 0xBD, 0x33, 0x10
51   RSPUT 0, 0x9D, 0x00, 0x0B, 0xCA, 0x10, x7F, 0x3c,
     0x00, 0x2B, 0x3c, 0x00, 0x2c, 0x3c, 0x32, 0x06, 0x58
52   RSPUT 0, 0x4C, 0x00, 0x0B, 0x7F, 0xD7, 0x3C, 0x80,
     0xDF, 0x8F, 0xDE, 0x42, 0xEA, 0x20, 0x58, 0xC4, 0x4C
53   RSPUT 0, 0x15, 0x0B, 0x00, 0x4F, 0xFE, 0x6F, 0xFF,
     0x8F, 0xFE, 0x3C, 0x00,0xDA, 0xCF, 0xDA, 0x64, 0x06
54   RSPUT 0, 0xD0, 0x05, 0x6F, 0xFE, 0x4C, 0x00, 0x01,
     0xC2, 0x9F, 0xFE, 0xFF, 0x20, 0xEE, 0xEE, 0xC0, 0x20
55   RSPUT 0, 0xC8, 0xC5, 0x9F, 0xFC, 0x20, 0x2A, 0x0B,
     0xA5, 0x25, 0xDO, 0xED, 0x80, 0xD6, 0xA7, 0x23, 0x01
56   RSPUT 0, 0x60, 0xBF, 0x23, 0x3C, 0x00, 0x2A, 0xA2,
     0x00, 0x20, 0x44, 0xCD, 0xC9, 0x2F, 0xD0, 0xF1, 0xE8
57   RSPUT 0, 0x4C, 0x9E, 0xC9, 0xFF, 0xFF, 0xFF, 0xFF,
     0xFF, 0xFF, 0xFF, 0xFF, 0xFF, 0xFF, 0xFF, 0xFF, 0xFF
58   RSPUT 0, 0xFF, 0xFF, 0xFF, 0xFF, 0xFF, 0xFF, 0xFF,
     0xFF, 0xFF, 0xFF, 0xFF, 0xFF, 0xFF, 0xFF, 0xFF, 0xFF
59   RSPUT 0, 0xFF, 0xFF, 0xFF, 0xFF, 0xFF, 0xFF, 0xFF,
     0xFF, 0xFF, 0xFF, 0xFF, 0xFF, 0xFF, 0xFF, 0xFF, 0xFF
60   RSPUT 0, 0xFF, 0xFF, 0xFF, 0xFF, 0xFF, 0xFF, 0xFF,
     0xFF, 0xFF, 0xFF, 0xFF, 0xFF, 0xFF, 0xFF, 0xFF, 0xFF
61   RSPUT 0, 0xFF, 0xFF, 0xFF, 0xFF, 0xFF, 0xFF, 0xFF,
     0xFF, 0xFF, 0xFF, 0xFF, 0xFF, 0xFF, 0xFF, 0xFF, 0xFF
62   RSPUT 0, 0xFF, 0xFF, 0xFF, 0xFF, 0xFF, 0xFF, 0xFF,
     0xFF, 0xFF, 0xFF, 0xFF, 0xFF, 0xFF, 0xFF, 0xFF, 0xFF
63   RSPUT 0, 0xFF, 0xFF, 0xFF, 0xFF, 0xFF, 0xFF, 0xFF,
     0xFF, 0xFF, 0xFF, 0xFF, 0xFF, 0xFF, 0xFF, 0xFF, 0xFF
64   RSPUT 0, 0xFF, 0xFF, 0xFF, 0xFF, 0xFF, 0xFF, 0xFF,
     0xFF, 0xFF, 0xFF, 0xFF, 0xFF, 0xFF, 0xFF, 0xFF, 0xFF
65   RSPUT 0, 0xFF, 0xFF, 0xFF, 0xFF, 0xFF, 0xFF, 0xFF,
     0xFF, 0xFF, 0xFF, 0xFF, 0xFF, 0xFF, 0xFF, 0xFF, 0xFF
66    EXIT
67   ENDIF
68  ENDREPEAT
69 END
|
____________________
[1] Necessary Equipment: 1B MicroScript is fixed price 60,000 yen, but users who have enrolled in SUS can purchase it at a special price of 20,000 yen. SUS (Software Update Service) is a system in which by having the user pay an annual fixed sum version up fee, the latest updated software arrives in his/her hands about twice a year. Refer to page 48 in Vol. 21 of this magazine.
[2] Initialization and Learning Work: Initialization and learning work is valid as long as the remote control's batteries have not been taken out. If you take out the batteries, it will be necessary to do the same work once again.
[3] VISCA: VISCA (Video System Control Architecture) is a Sony Corp. developed standard for the purpose of connecting video equipment with computers. A LANC terminal, and also a Control-S terminal, are attached to video equipment compatible with the VISCA standard. It is necessary to connect Sony's "Vbox Cl-1000" between 1B's RS-232C terminal and the VISCA compatible equipment.
____________________
[Translator's Note 1] The translator did not have access to the sample program mentioned in this article, but a CROSSAM2+ initialization script is appears on page 232 of Maikurosukuriputo nyuumon [ An Introduction to BTRON MicroScript]. That has been translated and appended to the television timer script appears at the end of this article.
[Translator's Note 2] See Fig. 10 and the script below for the translations of the parts and messages that appear in the illustrations below.
[Translator's Note 3] Inside the script, the spaces between the words of the procedures must have underscores, i.e., '_', between them so that they are interpreted as one procedure. Japanese doesn't normally have this problem, since there are no spaces between words.
[Translator's Note 4] Here's a little program that illustrates the point that the author is trying to make. Copy and paste this into a SCRIPT template, which is created automatically inside a Script Pad (Figure) template in Cho Kanji 4, and run it through the MicroScript interpreter. The expression 1+2=3 will be seen in the lower left hand corner of the screen in the control message panel.
[Translator's Note 5] The operation symbols in the three graphs that follow were cut and pasted from the Cho Kanji 4 Help Guide. There are slight differences with the original article, in addition to more operators than were listed in the original article.
[Translator's Note 6] You can confirm what the author has written simply by creating a small square inside a Cho Kanji 4 Script Pad (Figure) template, grouping it together with "@Box" inside the same window, pasting the small program below into the SCRIPT template that is automatically created inside the Cho Kanji 4 figure real object, and running it through the interpreter. The coordinates of the upper left hand corner of the square, which can be checked using the figure real object's tool panel, will be seen in the lower left hand corner of the screen in the control message panel.
If you want the square to be visible, write "APPEAR Box" below PROLOGUE. You could also add commands to move the box around, have the computer beep, and display messages with the new coordinates, as in the short program below, where the box initially starts at coordinates 118, 104. This is how you learn programming. Start with something small and then build upon it.
The above article on MicroScript appeared on pages 70-82 in Vol. 23 of TRONWARE . It was translated and loaded onto this Web page with the permission of Personal Media Corporation.
Copyright © 1993 Personal Media Corporation
Copyright © 2007 Sakamura Laboratory, University Museum, University of Tokyo