
On this occasion, in order to understand an aspect of the MicroScript programming language, we will try creating a simple shooting game. Parallel execution by means of the EXECUTE statement makes it easy to write the program.
1B MicroScript [1] is a programming language that runs on the BTRON-specification personal computer 1B series. In No. 1 of this series (Vol. 22 of this magazine), I explained in detail the basic knowledge necessary in programming, and we tried making a simple presentation system that realizes a picture story show. In No. 2 (Vol. 23 of the magazine), we created a "television timer" that turns on the television at a specified hour by connecting an infrared controller to the RS-232C terminal.
Up to here, if anything, it has been an introduction from the application side saying "you can do these types of things if you use 1B MicroScript." Accordingly, on this occasion, I would like to try to pay attention to the aspect as a programming language.
1B MicroScript is provided with functions for such things as macro definition, numerical operation, condition decision, recursion, procedures, and variables (four types: local, global, shared, and saved). Furthermore, event driven procedures and multitask descriptions also are possible. These are indispensable when constructing graphical user interfaces. As we have loaded abundant functions on top of a carefully selected simple mechanism, it is a language with depth. That you will be able to utilize it in very many applications as soon as you acquire a command of it is one of the great features of 1B MicroScript.
 |
|
|
As always, I shall first lay down an explanation of the program that we will create.
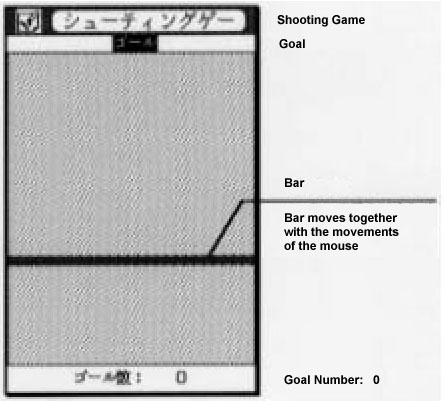
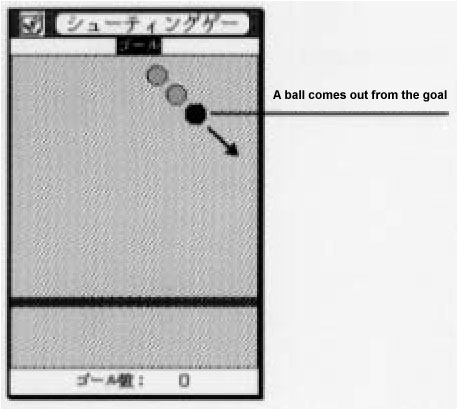
(1) When you start up MicroScript, the game board appears (Fig. 1). It is made up so that if you move the mouse up and down, the bar moves up and down together with it. (2) Immediately, one ball will appear from a place on which is written "Goal." This ball will fall to the bottom while hitting and bouncing off the left and right of the game board (Fig. 2). (3) When you move the bar up and down and make the ball hit the bar, this time the ball will bounce upward. If the ball strikes the top of the game board, it will bounce and again descend to the bottom. (4) Until the ball enters the goal, you make the ball bounce many times while moving the bar. (5) When the ball enters the goal, a sound beeps, and the display of the number of goals at the bottom of the screen increases by one. If you wait for a moment, a ball will appear from the goal again, and you can continue the game.
 |
|
|
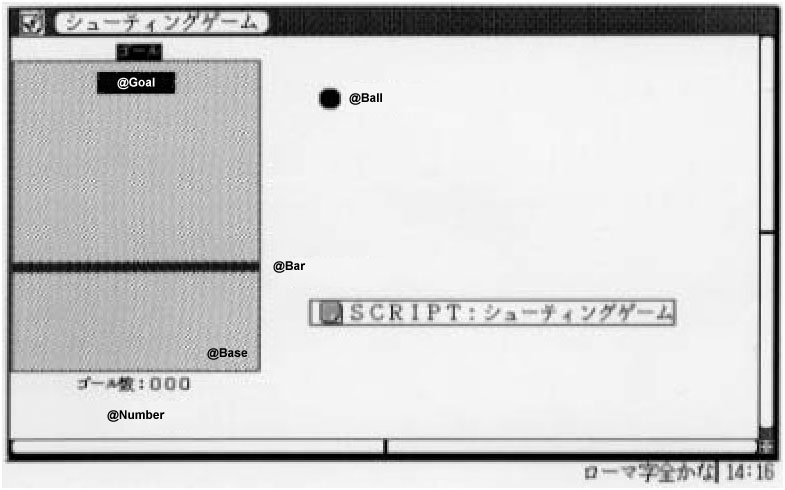
At last, let's move on to an explanation of the programming. First, in the beginning, we will create with the figure editor the segments (actors) that will appear on the game board, and then we will group them together with text frames into which we have written segment names (Fig. 3).
 |
|
|
Because 1B MicroScript is a type of visual language, the basic elements (segments) are all programmed using figures. For 1B, which possesses a graphical user interface from the beginning, this is natural, but a system in which we describe the actions for individual segments is fairly easy to understand.
Well then, let's take a look at the roles of the segments one by one.
@Base
This is the part that corresponds to the game board.
@Goal
The "Goal" is both the place from which the ball comes out in the beginning, and the place that serves as the target into which we will enter the ball.
@Ball
It is the ball that corresponds to the main actor of this game. In Fig. 3, it has been placed in a location that is slightly apart, but when we will actually use the ball, we will first move it to the location of the goal.
@Bar
The people who will play the game will move the mouse up and down, and thus they will force this bar up and down. When the ball hits this bar, it will bounce. It will thus come about that the ball won't go lower than the bar.
@Number
When the ball enters the goal, this number increases by one.
Furthermore, inside the screen editor, there is the virtual object of "SCRIPT: Shooting Game." Here, the screenplay (script) in which I have described the actions of the individual segments has been entered.
Next, let's take a look at the script that has been written inside "SCRIPT: Shooting Game" (refer to program).
First, we will take a quick look over the entire script.
7th to 19th Lines: Part Surrounded by PROLOGUE to END
This is the part that is executed just once in the very beginning after this shooting game starts up.
21st to 54th Lines: "ACTION Move_Ball"
This is the procedure that describes the ball movements.
55th to 77th Lines: ACTION Move_Bar"
This is the procedure that describes the movements of the bar.
74th to 86th Lines: "ACTION Goal"
This does the processing for when the ball has entered into the goal. It is called up from the 51st line.
87th to 101st Lines: "Emit_Ball"
This decides such things as the direction the ball will depart from the goal location.
In that case, we will now go on to look at the script in slightly more detail.
Declaration of Variables (4th to 5th Lines)
It is necessary to declare in advance in the beginning all the variables that we will use in the script.
x, y
These are the x coordinate and y coordinate values that show the location of the ball. The x coordinate expresses the left-to-right location of the ball, and the y coordinate the top-to-bottom location. The upper left hand point of the screen is 0 for both the x coordinate and the y coordinate, and the values become larger to the extent that the ball goes to the right and downward.
dx, dy
This shows the amount and the direction that the ball moves in one cycle. It shows that when dx is positive, the ball moves to the right, and when it is negative, it moves to the left. Also, when dy is positive it moves to the bottom, and when it is negative, it moves to the top.
Left_Edge, Right_Edge, Top_Edge, Bottom_Edge
These are the variables for entering the coordinate values of the edges of the game board. They are needed in order to judge the bouncing of the ball.
Mousey
This is the location of the pointer that appears inside the screen of 1B.
Bar_Top_Edge, Bar_Bottom_Edge
These are the coordinate values of the upper limits and lower limits in which the user can make the bar move.
Goal Number
This is the count of the balls that have entered the goal up to now.
PROLOGUE Statement to END Statement is Executed First (7th to 19th Lines)
When MicroScript starts up, what is executed first are the statements enclosed by the PROLOGUE statement and the END statement (7th to 19th lines).
Set the Size of the Base, etc., in the Variables (8th to 14th Lines)
In the 8th to the 14th lines, we are substituting values in the variables declared with VARIABLE. What we call "Base.X" shows the x coordinate of the upper left point of the segment "Base." When we add a character ".~" to a segment name in this manner, we can pick out various attributes of segments. For example, "Base.W" shows the width of the segment Base, and "Base.H" shows the value of the height. When, in the way that I have done here, you do things so that you set in advance values that shows the size and location of the base in the variables "Left_Edge," "Right_Edge," "Top_Edge," and "Bottom_Edge," changes to the script become unnecessary even when you have changed the size of the base later.
Furthermore, when we substitute in "Right_Edge," we are making it "- Ball.W." This is because the coordinate value that shows the location of the ball makes the ball's upper left point the reference. In other words, in judging that the ball actually struck the right edge of the base, it is necessary to approach on the left the right edge of the actual base to the extent of the width of the ball.
The variable "Bar_Top_Edge" shows the limit value of the top side of the bar. That we have set it to (Top_Edge + Bottom_Edge) / 2 is something that means that we cannot move the bar to the upper half of the base.
Making the Segments Appear on the Screen (16th Line)
Through the SCENE statement on the 16th line, we make the necessary segments appear on the screen.
Deciding the Direction in which the Ball Will First Appear (17th Line)
Through the 17th line, we call up the procedure "Emit_Ball" through which the location and the direction to which the ball will first appear is decided.
Executing in Parallel the Procedures Move_Ball and Move_Bar (18th Line)
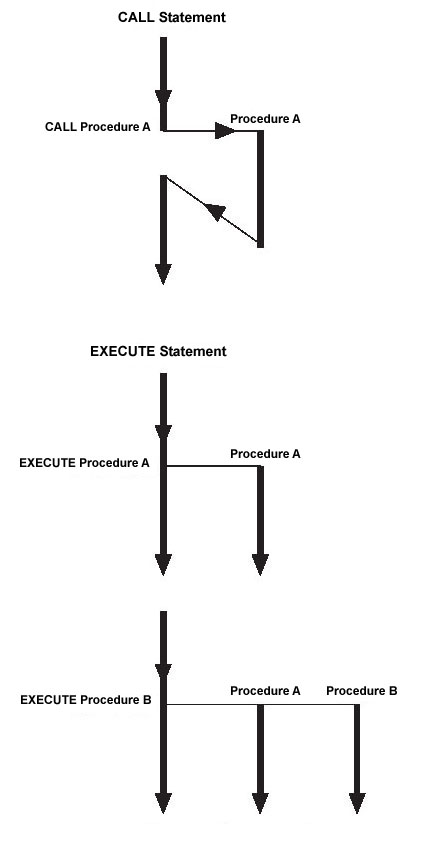
The statement EXECUTE Move_Ball Move_Bar in the 18th line, is the spot that serves as the very heart in the script on this occasion. By means of this EXECUTE statement, we simultaneously call up the two procedures "Move_Ball" and "Move_Bar," and we instruct MicroScript to run these two in parallel. The CALL statement also, which has appeared several times up to now, was, as one would think, a procedure of calling up, but this waits at the call-up spot until the called up procedure terminates. On the other hand, the EXECUTE statement can instruct multiple procedures, and from there it can begin to run in parallel. Moreover, without waiting for the termination of those executions, the call side also continues execution as is.
I show the appearance of the control flows of the CALL statement and the EXECUTE statement in Fig. 4.
 |
|
|
Describe the Movements of the Ball with the Procedure "Move_Ball" (20th to 54th Lines)
Through the procedure "Move_Ball," we describe the movements of the ball. We repeatedly execute this between REPEAT (24th line) and ENDREPEAT (53rd line).
The part that serves as the core of the procedure "Move_Ball" is as follows [TN1]:
25 SET x x + dx; 26 SET y y + dy; . . . 49 MOVE Ball: x y @ 50 IF y = Top_Edge & x >= Goal.X & x <= Goal.X + Goal.W - Ball.W 51 CALL Entered_Goal 52 ENDIF |
In other words, we increase and decrease the x, y variables that show the location of the ball just by the values displayed with dx, dy. And then, through the 49th line, we move the ball to the new x, y location. By repeating this process many times, the ball moves onward.
Furthermore, there being an @ in the 49th line shows that we are using the upper left hand corner of the screen as the base coordinates. The other method for specifying was explained on page 71 of Vol. 22 in No. 1 of this series.
In the 50th line, we judge whether or not the ball has entered the goal. If it has entered the goal, we call up the procedure "Entered_Goal."
In the 27th to 48th lines, we describe the process by which the ball bounces within the four sides. We make the dx and dy symbols invert, and by means of this the ball's direction of movement comes to change.
What I would like you to pay attention to is that we judge whether the ball has struck the bar.
This is the IF statement:
44 IF y > Bar.Y - Ball.H |
We use "Bar.Y," which shows the location of segment "Bar," but we move it on and on with the procedure "Move_Bar," which I will explain next. However, without paying attention to that, we can detect the collision of the bar and the ball by just comparing the coordinate values in the same manner as the fixed left, right, and top edges.
That it has not been made
44 IF y > Bar.Y |
here is because the base of the coordinates that express the location of the ball lie in the upper left hand corner of the ball. By making it as IF y > Bar.Y - Ball.H, we can carry out the processing in which the ball bounces when it appears that the ball slightly collided with the bar.
Moving the Bar together with the Movements of the Mouse through the Procedure "Move_Bar" (55th to 73rd Lines)
In the procedure "Move_Bar," we describe the operations in which we move the bar together with the movements of the mouse. In the same manner as the procedure "Move_Ball," we repeat many times between REPEAT (59th line) and END (79th line), and as a result of this, the bar comes to move by always following the location of the pointer.
"$PDY" in the 60th line, is a system variable, and it shows the Y coordinate of the pointer inside the screen at the point in time that we have referenced this variable.
What actually rewrites the location of the bar is the line:
70 MOVE Bar: Bar.X Mousey @ |
By means of executing inside the IF statement
68 IF Mousey != Bar.Y |
we rewrite only in a case where there is a change with the bar location written in the previous cycle. Because we finish without doing a rewrite of the excess screen by means of this, there is no screen flickering.
Processing at the Time the Ball Enters the Goal through the Procedure "Entered_Goal" (74th to 86th Lines)
We do the processing when the ball has entered to goal through the procedure "Entered_Goal." A sound beeps, a message is shown, and the number of goals display increases by one.
Release a Ball from the Goal through the Procedure "Emit_Ball" (87th to 101st Lines)
Through the procedure "Emit_Ball," we decide the direction of movement of the ball that will come out of the goal location.
"$RAND" in
91 SET x $RAND % 8 |
returns a random number between 0 and 65536. "%" is an operator that calculates the remainder. In other words, in this statement, a value in the range of 0 to 7 is entered in x.
By means of
92 SET dx 12 + x 93 SET dy 19 - x |
we decide the initial values of dx, dy. The numerals 12 and 19 are values decided through trial and error and they have no foundation in particular.
By means of doing
94 IF x % 2 95 SET dx -dx 96 ENDIF |
we make it so that the probability of the ball going out in the right direction and the probability of the ball going out in the left direction will be exactly the same.
Let's take one more look at the program in its entirety. After making the necessary initial settings, by means of the EXECUTE statement on the 18th line, we simultaneously execute in parallel the procedure "Move_Ball" and the procedure "Move_Bar." "Move_Ball" is a procedure that moves only the ball, and "Move_Bar" is a procedure that moves only the bar in unison with the mouse. However, by executing in parallel these two procedures, a real-time type of an application can be created in which we "simultaneously move both the ball and the bar."
We call a programming style in which we first imagine a thing that can be seen with the eyes and then go on to describe actions in relation to that thing "object oriented." If we explain with different words the shooting game program on this occasion, it becomes "likening the 'ball' and the 'bar' respectively to objects, we have described the descriptions for them with the procedure 'Move_Ball' and the procedure 'Move_Bar'." When describing visual actions, object-oriented thinking in particular becomes effective.
The term "object oriented" by itself does not carry the meaning of "parallel execution." However, these two keywords are well matched, and thus it's convenient if we think about them together. In other words, we make one object and the processing for that into one bundle. And then, when we want to proceed forward with overall operations while those objects mutually act among themselves, all we have to do is execute multiple objects in parallel.
If we decide to try to create the shooting game on this occasion without using object-oriented and parallel execution thinking, it would be necessary to describe at one time both the moving of the ball and the moving of the bar inside one procedure, and the outlook for the program would become bad. Moreover, even in a case where we make improvements so that not one ball, but, for example, two balls appear simultaneously on the screen, we can easily cope if it is based on object-oriented thinking.
1B possesses a multitasking function. This is a function that simultaneously carries out multiple tasks. When you use 1B ordinarily, it seems like there will be few chances to actually feel multitasking. At the most, it will probably be a setting along the lines of "continuing to edit another document while printing."
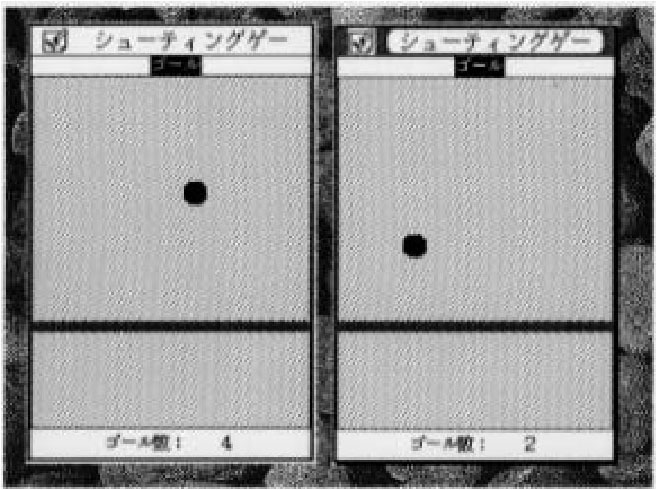
Accordingly, using the shooting game that we created on this occasion, let's try confirming 1B's multitasking function. When we copy the "Shooting Game" virtual object, we can open two shooting game windows simultaneously (Fig. 5).
 |
|
|
Balls inside two windows move simultaneously. Of course, the two bars also move simultaneously together with the movements of the mouse. Two windows that carry out completely the same functions are simply lined up and run simultaneously.
1B realizes complete multitasking at the operating system level. By just simply opening two windows, those two windows run in parallel. For example, even when you have simultaneously opened two editors and are making one do large volume search and replace in one window, you can continue editing in the other window.
At the beginning of this article, I wrote that "1B MicroScript possesses a carefully selected simple mechanism." A prime example of that is probably parallel execution based on the EXECUTE statement. I would like to have you understand that thanks to this function having been prepared, even a real-time game that seems difficult to realize at a glance can be programmed with good prospects in a very neat form.
____________________
|
1 # 2 # Shooting Game Script 3 # 4 VARIABLE x y dx dy Left_Edge Right_Edge Top_Edge Bottom_Edge 5 VARIABLE Mousey Bar_Top_Edge Bar_Bottom_Edge Goal_Number 6 # 7 PROLOGUE 8 SET Left_Edge Base.X 9 SET Right_Edge Base.X + Base.W - Ball.W 10 SET Top_Edge Base.Y 11 SET Bottom_Edge Base.Y + Base.H 12 SET Bar_Top_Edge=(Top_Edge + Bottom_Edge) / 2 13 SET Bar_Bottom_Edge Bottom_Edge 14 SET Goal_Number 0 15 TEXT Number "Goal_Number:%3d" Goal_Number 16 SCENE Base Bar Goal Number 17 CALL Emit_Ball 18 EXECUTE Move_Ball Move_Bar 19 END 20 # 21 # Processing that makes the ball move 22 # 23 ACTION Move_Ball 24 REPEAT 25 SET x x + dx; 26 SET y y + dy; 27 # Bounce processing at the time of hitting the left edge 28 IF x < Left_Edge 29 SET x Left_Edge; 30 SET dx -dy; 31 ELSE 32 # Bounce processing at the time of hitting the right edge 33 IF x > Right_Edge 34 SET x Right_Edge 35 SET dx -dx; 36 ENDIF 37 ENDIF 38 # Bounce processing at the time of hitting the top edge 39 IF y < Top_Edge 40 SET y Top_Edge; 41 SET dy -dy; 42 ELSE 43 # Bounce processing at the time of hitting the bar 44 IF y > Bar.Y - Ball.H 45 SET y Bar.Y - Ball.H; 46 SET dy -dy; 47 ENDIF 48 ENDIF 49 MOVE Ball: x y @ 50 IF y = Top_Edge & x >= Goal.X & x <= Goal.X + Goal.W - Ball.W 51 CALL Entered_Goal 52 ENDIF 53 ENDREPEAT 54 END 55 # 56 # Processing to make the bar go up and down 57 # 58 ACTION Move_Bar 59 REPEAT 60 SET Mousey $PDY 61 IF Mousey < Bar_Top_Edge 62 SET Mousey Bar_Top_Edge 63 ELSE 64 IF Mousey > Bar_Bottom_Edge 65 SET Mousey Bar_Bottom_Edge; 66 ENDIF 67 ENDIF 68 IF Mousey != Bar.Y 69 # Only when the bar location has been changed, we rewrite the bar 70 MOVE Bar: Bar.X Mousey @ 71 ENDIF 72 ENDREPEAT 73 END 74 # 75 # Goal entered processing 76 # 77 ACTION Entered_Goal 78 DISAPPEAR Ball 79 BEEP 1000 500 80 MESG "!!Congratulations Goal!!" 81 SET Goal_Number Goal_Number+1 82 TEXT Number "Goal_Number:%3d" Goal_Number 83 SLEEP 3000 84 CALL Emit_Ball 85 MESG # Erasure of message 86 END 87 # 88 # Initialize ball position, movement amt.: Show randomness via $RAND 89 # 90 ACTION Emit_Ball 91 SET x $RAND % 8 92 SET dx 12 + x 93 SET dy 19 - x 94 IF x % 2 95 SET dx -dx 96 ENDIF 97 SET x Goal.X 98 SET y Top_Edge 99 MOVE Ball: x y @ 100 APPEAR Ball 101 END 102 # 103 # Termination processing 104 # 105 EPILOGUE 106 VCLOSE # Close opened window 107 END |
____________________
[1] 1B MicroScript: 1B MicroScript is one piece of application software for use with the 1B series. It is sold from Personal Media at a list price of 60,000 yen. Users who have joined SUS can purchase it at a special price of 20,000 yen. SUS (Software Update Service) is a system in which by having the user pay an annual fixed sum version up fee, the latest updated software arrives in his/her hands about twice a year.
[Translator's Note 1] Some of the operator symbols, i.e., "greater than or equal to," "less than or equal to," and "does not equal," used in the original of this lesson on MicroScript are not part of the ISO 8859-1 character set, which this page is encoded with. Alternatives, which appear in pink, were used instead. The same color is used to show an added equals sign.
[Translator's Note 2] The translator actually transferred this program to the Cho Kanji 4 environment, created the segments, and ran the program through the MicroScript interpreter. The following problems were encountered:
|
Readers who have Cho Kanji 4 installed on their computers will be able to examine a revised version of this program, which runs slowly enough for the ball to be seen bouncing. The program is in the MicroScript "Samples Collection," and it is titled "Geemu rei [Game Example]." The translator has translated the source code for Game Example, which appears below. Please note that the yen symbol below is in HTML, and thus has to be replaced with the JIS symbol prior to running the program through the MicroScript interpreter.
|
|
#
# Game Example Script
#
Version 2
#
DEFINE Move_Ball_Cycle 30 #msec
VARIABLE x:I, y:I, dx:I, dy:I
VARIABLE Left_Edge:I, Right_Edge:I, Top_Edge:I
VARIABLE Board_Top_Edge:I, Board_Bottom_Edge:I, Goal_Number:I
#
PROLOGUE
 SET Left_Edge=Base.X
 SET Right_Edge=Base.X+Base.W-Ball.W
 SET Top_Edge=Base.Y
 SET Board_Bottom_Edge=Base.Y+Base.H
 SET Board_Top_Edge=(Top_Edge+Board_Bottom_Edge)/2
 SET Goal_Number=0
 TEXT Number, "Goal_Number:%3d", Goal_Number
 SCENE Background, Base, Board, Goal, Number
 EXECUTE Move_Ball, Move_Board
END
#
# Processing to make the ball move
#
FUNC Move_Ball()
 LOCAL t:I
 REPEAT
  SET t=$MSEC #Current time
  SET x=x+dx
  SET y=y+dy
  IF x<Left_Edge
   SET x=Left_Edge
   SET dx=-dx
  ELSEIF x>Right_Edge
   SET x=Right_Edge
   SET dx=-dx
  ENDIF
  IF y<Top_Edge
   SET y=Top_Edge
   SET dy=-dy
  ELSEIF y>Board.Y-Ball.H
   SET y=Board.Y-Ball.H
   SET dy=-dy
  ENDIF
  MOVE Ball:x,y,@
  IF y==Top_Edge&&x>Goal.X&&¥
     x<Goal.X+Goal.W-Ball.W
   CALL Goal_Win()
  ENDIF
  # Elapsed time
  SET t=($MSEC-t)&0x7FFFFFFF
  IF t<Move_Ball_Cycle
   SLEEP Move_Ball_Cycle-t
  ENDIF
 ENDREPEAT
END
#
# Processing to make the board go up and down following the PD
#
FUNC Move_Board()
 LOCAL pdy:I
 REPEAT
  SET pdy=$PDY
  IF pdy<Board_Top_Edge
    SET pdy=Board_Top_Edge
  ELSEIF pdy>Board_Bottom_Edge
    SET pdy=Board_Bottom_Edge
  ENDIF
  IF pdy!=Board.Y
    MOVE Board:Board.X,pdy,@
  ENDIF
  SLEEP 20
 ENDREPEAT
END
#
# Goal entered processing
#
FUNC Goal_Win()
 DISAPPEAR Ball
 BEEP 1000, 500
 MESG "!!Goal, Congratulations!!"
 SET Goal_Number=Goal_Number+1
 TEXT Number, "Goal_Number:%3d", Goal_Number
 SLEEP 3000
 CALL Initial_Settings()
 MESG # Erases message
END
#
# Initialize ball position, movement amt.: Show randomness via $RAND
#
FUNC Initial_Settings()
 SET x=$RAND&7
 SET dx=12+x
 SET dy=19-x
 IF x&1
  SET dx=-dx
 ENDIF
 SET x=Goal.X
 SET y=Top_Edge
 MOVE Ball:x,y,@
 APPEAR Ball
END
#
# Explanation menu processing
#
ACTION Explanation() MENU "@HExplanation"
 VOPEN Game_Explanation
END
#
# End processing
#
EPILOGUE
 VCLOSE  # Close the opened window
END
|
Note: The the translation for the explanation menu mention above is as follows:
|
When you move the pointer up and down, the underlying board moves up and down. Please enter the ball skillfully into the goal. |
The above article on MicroScript appeared on pages 70-77 in Vol. 25 of TRONWARE . It was translated and loaded onto this Web page with the permission of Personal Media Corporation.
Copyright © 1994 Personal Media Corporation
Copyright © 2007 Sakamura Laboratory, University Museum, University of Tokyo