
On this occasion and in the next installment, we will carry out parts creation using a script by taking a lighting panel as an example. You will learn how to create a selector to make choices and a volume control to set values.
1B MicroScript [1] is a programming language that runs on top of 1B series BTRON-specification personal computers. In particular, it is suited to the description of visual operations, such as the creation of screens for presentation use, and the control of external devices.
In the four installments up to here, I have finished explaining in general the main functions. Accordingly, over the next two installments, on this occasion and in the next installment, we will attempt parts creation using a script. Parts are pieces for the purpose of setting values in regard to the user. In general terms, we will create the following two parts.
Selector
This is a part for selecting one of several from among multiple choices. On this occasion, we will make it so that one cannot make multiple selections or no selection. It is by all means necessary that only one item is to be selected. When the user clicks a choice, the ON indicator moves there, and that turns into a selected state.
Moreover, a choice can set only one selector, which in particular we call a "switch," with an ON/OFF value. In this case, every time we press the switch, ON and OFF invert.
Volume Control
This is a part mainly for the purpose of setting numerical values. We can control it with the following four methods.
(1) Dragging: Directly jumping to the value we want to set by dragging a knob (2) Pressing: Moving a knob forward in that direction little by little by pressing a part outside of the knob. (3) Double Clicking: Moving a knob a great amount in that direction by double clicking (4) Clicking: Moving a knob a small amount in that direction by pressing a part outside of the knob.
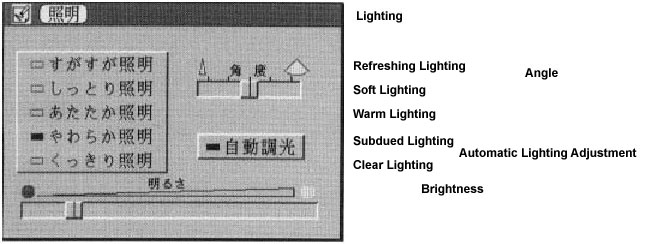
Let's now try actually making a panel for controlling lighting (Fig. 1). On the left, there is a selector for choosing one from among five types of lighting: "Refreshing Lighting," "Soft Lighting," "Warm Lighting," "Subdued Lighting," or "Clear Lighting." On the right, there is a volume control for setting the "angle" of the lighting, and below that there is a switch for specifying "Automatic Lighting Adjustment." The thing at the bottom of the panel is a volume control for setting the brightness.
 |
|
|
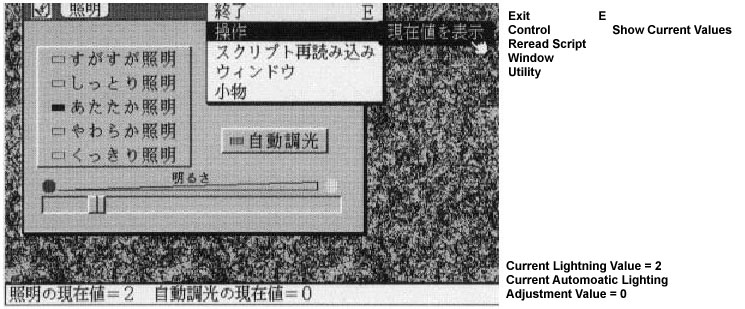
Because the main point of the programming on this occasion lies in creating parts, we will make it so that control of actual lighting equipment will not be carried out at all. We will only carry out a simple operation in which when you select [Show Current Values] from the [Control] menu, the currently set values of the parts will appear at the bottom of the screen (Fig. 2).
 |
|
|
Realized as a Library
In the programming on this occasion, I have made it so that the procedures that realize the parts are realized as a library. In other words, I precisely decided the call interfaces of the library at the time of program design. If we call up procedures in accordance with those rules, we can easily create the parts inside the screen. It is not at all necessary to worry about how that library is programmed.
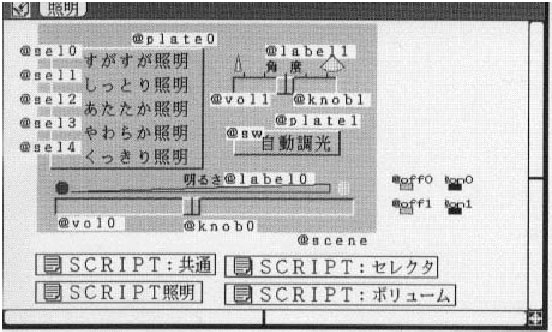
The definitions of the lighting panel segments are as in Fig. 3. Because the segments are rather packed together, I shall explain them one by one. @sel0 to @sel4 are made up from the character segments "Refreshing Lighting" to "Clear Lighting," and @sw the character segment "Automatic Lighting Adjustment." @plate0 and @plate1 are three-dimensional bases (plates) that are placed under the characters. And then, @off0/@on0 and @off1/@on1 serve as ON/OFF indicators that are respectively used in selectors and switches. Up to here are the segments for selectors (switches).
 |
|
The remainder are ones concerning volume. @vol0 and @vol1 become the hollow parts, and @knob0 and @knob1 become the handle (knob) segments. @label0 and @label1 are the label segments, such as "Brightness," "Angle," and gradations.
Well then, as usual, a script is described in a real object that begins with "SCRIPT." As in Fig. 3, one can store several script real objects inside one figure real object.
SCRIPT: Common [Upper Left]
This is a common script necessary in utilizing the parts library. The definition of constants, and so on, are carried out here.
SCRIPT: Selector [Upper Right]
This is a script that realizes the selector library. Just by entering this script, it becomes possible to utilize the selector library.
SCRIPT: Volume [Lower Right]
This is a script that realizes the volume control library in the same manner. I will take this up in the next installment.
SCRIPT: Lighting [Lower Left]
This is a script for the Lighting panel. Actually, this alone is fine for user programming. As for the three scripts "SCRIPT: Common," "SCRIPT: Selector," and "SCRIPT: Volume," simply leave them as they are; there is no need to know their contents.
Finally, one important point for caution. In MicroScript, in a case where multiple script real objects exist, MicroScript interprets through them in the order in which their virtual objects were created inside the figure real object. In the case on this occasion, the definitions necessary in order to execute the other scripts are carried out inside "SCRIPT: Common." Accordingly, it is necessary to first create and save the "SCRIPT: Common" virtual object in the "Lighting" real object. Next, we create and save the remaining virtual objects. When you make a mistake with this order, an error message stating that "variable such and such is not defined" will appear at execution time, and you cannot continue with execution.
Well then, let's finally try using a parts library. The parts are selectors for selecting one from among five lighting choices and a switch for setting the Automatic Lighting Adjustment ON/OFF. I would like you to look at Program 3 "SCRIPT: Lighting."
I shall follow through the procedures one by one in the order that they are executed. The place where execution begins first is, of course, the part enclosed with PROLOGUE~END in the 59th to 66th lines. In
63 SCENE scene Selector Switch Volume |
on the 63th line, we register all the segments that we have created. However, it is not necessary to include the @off @on segments here.
The actual selector preparations are carried out with the procedure "Prepare_Selector."
64 CALL Prepare_Selector |
Procedure "Initialize_Selector"
First, it is made up as
30 CALL Initialize_Selector |
on the 30th line. It is necessary to call "Initialize_Selector" only once in the beginning when we create the selectors.
Preparing the Lighting Selector (31st to 39th Lines)
Procedure "Register_Selector1"
Next, we register the lighting selector with
33 CALL Register_Selector1 on0 off0 (-17) (5) |
The respective arguments have the following meanings.
| No. 0 argument [2]: | <ON indicator segment> |
| No. 1 argument: | <OFF indicator segment> |
| No. 2 argument: | <indicator relative position: x coordinate> |
| No. 3 argument: | <indicator relative position: y coordinate> |
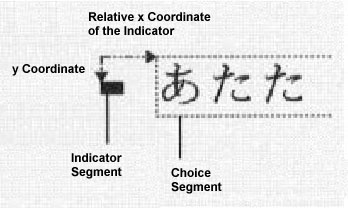
Through the indicator relative position, we display the indicator display position with the relative position of the segment of the choice (Fig. 4).
 |
|
Well then, almost all the procedures that the parts library on this occasion provides return a return value. However, MicroScript does not possess a mechanism for handling return values. Accordingly, after determining a global variable for the purpose of storing the return value, we will make it so that we use that. Immediately after we have called up a parts library procedure, a return value will enter into a variable with the name "ret." By referencing the variable ret, we come to take out the return value [3].
When we call up the procedure "Register_Selector1," the selector ID is returned as the return value. Afterward, operations concerning this selector ("Lighting Selector"), are carried out using this ID. Actually, an integer value of 0 or higher is used. In the 34th line, we store the selector ID in the variable selid with
34 SET selid ret |
In a case where registration has failed, the return value becomes negative. The error check will be omitted here.
Procedure "Register_Selector2"
After the procedure "Register_Selector1," it is necessary to register the lighting selector choices by calling up "Register_Selector2."
38 CALL Register_Selector2 selid 5 sel0 sel1 sel2 sel3 sel4 |
It comes about that we specify the choice names "Refreshing Lighting," "Soft Lighting," "Warm Lighting," "Subdued Lighting," and "Clear Lighting."
Each argument has the following meaning.
| No. 0 argument: | <selector ID> |
| No. 1 argument: | <number of the choice> |
| No. 2 argument: | <choice0 segment> |
| No. 3 argument: | <choice1 segment> |
Following no. 2 argument, we give choices as arguments one by one up to the number specified in the no. 1 argument. In other words, it comes about that the procedure ""Register_Selector2" takes a variable number of arguments. Here, we have specified character segments, but, of course, it is all right even if we register figures as choices. Furthermore, choices are possible up to a maximum of six [4].
In a case where registration fails, the return value becomes negative, but here also I am omitting the error check.
Procedure "Set_Selector"
We specify the initial value of the lighting selector with the 39th line.
39 CALL Set_Selector selid 3 |
| No. 0 argument: | <selector ID> |
| No. 1 argument: | <setting value> 0~of the choice number |
What we call the choice number is the number when 0 is made the first choice given in no. 2 argument of "Register_Selector2." Because we have specified "3" here, it comes about that the ON indicator turns on at "Subdued Lighting."
Preparing the Automatic Lighting Adjustment Switch (41st to 46th Lines)
Lighting selector preparation is finished by up to the 39th line. Next, we prepare the switch ("Automatic Lighting Adjustment"). A switch corresponds to a case in which there is no more than one selector choice. Where it differs is only on the point that a switch allows a case in which an ON indicator does not exist. Accordingly, as to switches, we handle them as the same parts as selectors, and as to procedures for registering, we also use the same ones.
42 CALL Register_Selector1 on1 off1 (-17) (5) 43 SET swid ret 44 CALL Register_Selector2 swid 1 sw 45 CALL Set_Selector swid ON |
In the case of a switch, we specify ON (=1) or OFF (=0) as the value of the switch in the no. 1 argument of the procedure "Set_Selector."
Furthermore, as for the indicator segments (@on, @off), even in a case where we use ones of the same design among several selectors, it is necessary to respectively prepare them separately. We cannot share among the selectors themselves.
In the 4th to 26th lines, we have described the processing when each segment is clicked. In making it so that we can use the selector, outside of registering, it is necessary to describe the processing when each segment is clicked in this manner [5].
Among these procedures, of course, no matter what description is carried out is all right. However, when we are using the parts library, in order to set a new value, it is by all means necessary to call up the procedure "Set_Selector" and modify the setting values. In concrete terms, in the case of the selector, we call
39 CALL Set_Selector (Selector ID) TOGGLE |
TOGGLE has the meaning of "turning from side to side," and it is set with the value -1.
Inside these procedures, a method of use in which we call up the procedure "Set_Selector" in regard to other parts and make settings is possible. For example, it is all right to set in the manner below an operation in which we always set "Automatic Lighting Adjustment" to OFF only when "Clear Lighting" has been selected.
ACTION Clear_Lighting_Clicked CLICK selid 4 CALL Set_Selector selid 4 CALL Selector swid OFF END |
The operation for when we have selected [Display Current Values] from the [Control] menu, is described in the 49th to 56th lines [6]. In the 52nd line and 54th line
52 CALL Acquire_Selector selid 54 CALL Acquire_Selector swid |
by means of calling up the procedure "Acquire_Selector," we can acquire the current value of the specified selector ID. By means
55 MESG "Current Lighting Values=%d
         Current Automatic Lighting Adjustment Values=%d"
        Lighting_Values ret
|
in the 55th line, we display the current value in the message area at the bottom of the 1B screen.
As of up to here, the explanation of "SCRIPT: Lighting" is finished. In "SCRIPT: Common" and "SCRIPT: Selector," the selector parts library below used in "SCRIPT: Lighting" is programmed.
| Procedure "Initialize_Selector" |
| Procedure "Register_Selector1" |
| Procedure "Register_Selector2" |
| Procedure "Set_Selector" |
| Procedure "Acquire_Selector" |
Because I have relatively thoroughly attached comments to Program 1 and Program 2, I shall forego explaining these in detail in this article.
I would like to explain only the main points below.
"SCRIPT: Common" (Program 1)
In the beginning, we show the number of parts that can be registered.
| 1 DEFINE MAXVOL 3 |
| 2 DEFINE MAXSEL 3 |
| 3 DEFINE MAXELM 18 |
If we make MAXVOL and MAXSEL large, then we can increase the maximum number of volume controls and selectors that can be registered.
In MAXELM, we describe a value in which we have calculated MAXSEL x MAXCHOICE. MAXCHOICE is the maximum number of choices that can be registered in regard to one selector, and this is fixed at "6," which is defined in the 1st line of "SCRIPT: Selector."
"SCRIPT: Selector" (Program 2)
One point about this program is that we draw and move the indicators by means of the MOVE statement, APPEAR statement, and DISAPPEAR statement. Concerning the MOVE statement, I would like you to reference No. 1 in this series (Vol. 22, page 71 of this magazine).
In the installment on this occasion, we created selector and switch parts using MicroScript. If we just store "SCRIPT: Common" and "SCRIPT: Selector" inside a figure real object, then selectors and switches can easily be realized merely by calling up the procedures "Initialize_Selector," "Register_Selector1," "Register_Selection2," "Set_Selector," and "Acquire_Selector."
Moreover, in designing the parts as well, the fact that MicroScript can completely separate the design of segments and their operations also becomes a great advantage. In other words, without modifying the script whatsoever, we can afterward freely change such things as the names of choices, the designs of the indicators/switches, and the arrangement of the choices (e.g., vertical line-up or horizontal line-up).
In the next installment, we will make it our business to create the volume controls for "Angle" and "Brightness" inside the lighting panel to make the lighting panel complete.
____________________
|
|
1 DEFINE MAXVOL 3 # Maximum number of volume controls 2 DEFINE MAXSEL 3 # Maximum number of selectors (switches) 3 DEFINE MAXELM 18 # MAXSEL x MAXCHOICE 4 5 DEFINE pid $ARG[0] # Use the first argument as the PID 6 7 VARIABLE ret # Variable that enters the return value of a procedure |
|
|
  1 DEFINE MAXCHOICE 6 # Maximum number of choices
  2 DEFINE ON (1)
  3 DEFINE OFF (0)
  4 DEFINE TOGGLE (-1)
  5
  6 # Variables we use in selector parts
  7 # In variables we store segments in, we attach _ at the beginning
  8 VARIABLE _s_I # Counter
  9 VARIABLE _s_nsel # Number of registered selectors
 10 VARIABLE _choice[MAXELM] # Choice segments
 11                          # Utilized as two-dimension array
 12 VARIABLE _s_nchoice[MAXSEL] # Number of choices
 13 VARIABLE _s_selval[MAXSEL]  # Current value of the selector
 14 VARIABLE __s_on[MAXSEL]   # ON indicator segment
 15 VARIABLE __s_off[MAXSEL]  # OFF indicator segment
 16 VARIABLE _s_xofs[MAXSEL] # Indicator relative position: x coordinate
 17 VARIABLE _s_yofs[MAXSEL] # Indicator relative position: y coordinate
 18
 19 #--------------------------------------------------------------------
 20 ACTION Initialize_Selector
 21   SET _s_nsel 0
 22 END
 23
 24 #--------------------------------------------------------------------
 25 # Selector Registration Part 1
 26 #   Selector_Registration1
 27 #     $ARG[0]: (ON  indicator segment)
 28 #     $ARG[1]: (OFF indicator segment)
 29 #     $ARG[2]: (Indicator relative position: x coordinate)
 30 #     $ARG[3]: (Indicator relative position: y coordinate)
 31 #   Return value <0 error
 32 #                >=0 Selector ID (0~)
 33 #
 34 ACTION Selector_Registration1
 35 IF _s_nsel >= MAXSEL
 36   SET ret -1
 37   EXIT
 38 ENDIF
 39 SET __s_on[_s_nsel] $ARG[0]
 40 SET __s_off[_s_nsel] $ARG[1]
 41 SET _s_xofs[_s_nsel] $ARG[2]
 42 SET _s_yofs[_s_nsel] $ARG[3]
 43 SET _s_selval[_s_nsel] 0
 44 SET ret _s_nsel
 45 SET _s_nsel _s_nsel +1
 46ýEND
 47
 48 #--------------------------------------------------------------------
 49 #
 50 # Displaying OFF indicator beside a choice
 51 #
 52 ACTION _s_showIndicators
 53 SET _s_I 0
 54 APPEAR __s_off[pid]
 55 REPEAT
 56   IF _s_I >= _s_nchoice[pid]
 57     BREAK
 58   ENDIF
 59   # Display OFF indicator in a position shifted only with _s_xofs,
 60   # _s_yofs from upper left corner of the choice segment (_choice)
 61   MOVE __s_off[pid]: _s_xofs[pid]
           _s_yofs[pid]_choice[pid*MAXCHOICE+_s_I] : DUP
 62   SET _s_I _s_I + 1
 63 ENDREPEAT
 64 END
 65
 66 #--------------------------------------------------------------------
 67 # Selector Registration Part 2
 68 #   Selector_Registration2
 69 #     $ARG[0]: (Selector ID) pid(0~)
 70 #     $ARG[1]: (Number of choices)
 71 #     $ARG[2]: (Choice 0 segment)
 72 #     $ARG[3]: (Choice 1 segment)
 73 #           :   :   :  :
 74 #   Specify choice segments up to a maximum of 6
 75 #   Return value <0 error
 76 #                =0 Terminate Registration
 77 #
 78 ACTION Selector_Registration2
 79 IF $ARG[1] > MAXCHOICE
 80   # Maximum registration number has been exceeded
 81   SET ret -1
 82   EXIT
 83 END
 84
 85 # Store one each of the choice segments inside _choice
 86 SET _s_I 0
 87 REPEAT
 88   IF _s_I >= $ARG[1]
 89     BREAK
 90   ENDIF
 91   SET _choice[pid*MAXCHOICE+_s_I] $ARG[_s_I+2]
 92   SET _s_I _s_I+1
 93 ENDREPEAT
 94 # Store number of choices inside _s_nchoice
 95 SET _s_nchoice[pid] _s_I
 96 # Display OFF indicator
 97 CALL _s_showIndicators pid
 98 SET ret 0
 99 END
100
101 #--------------------------------------------------------------------
102 # Set value in the selector
103 #   Set_Selector
104 #     $ARG[0]: (Selector ID) :pid(0~)
105 #     $ARG[1]: (Set value)
106 #         Selector use = 0~ of the choice numbers
107 #         Switch use   = ON(1) / OFF(0)
108 #                      = TOGGLE(-1)
109 #    No return value
110 DEFINE _appear $ARG[7] # Local variable
111 DEFINE _disap  $ARG[6] # Local variable
112 ACTION Set_Selector
113 IF _s_nchoice[pid] == 1
114 # Use switch
115   IF $ARG[1] != TOGGLE
116     # Set another value for the value you would like to set
117     SET _s_selval[pid] ($ARG[1] + 1) % 2
118   ENDIF
119   # Display the current value of the inverted indicator
120   # If current value is OFF, to ON; if ON, to OFF
121   IF _s_selval[pid] == ON # When current value is ON
122     SET _appear __s_off[pid]; SET _disap __s_on[pid]
123   ELSE # When current value is OFF
124     SET _appear __s_on[pid]; SET _disap __s_off[pid]
125   ENDIF
126   MOVE _disap; MOVE _appear :_s_xofs[pid]
           _s_yofs[pid] _choice[pid*MAXCHOICE];
127   APPEAR _appear
128   # Inverts the current value
129   SET _s_selval[pid] (_s_selval[pid] + 1) % 2
130 ELSE
131 # Use Selector
132   # In clicked choice ($ARG[1])
133   # Move the ON indicator
134   MOVE __s_on[pid] :_s_xofs[pid] _s_yofs[pid]
           _choice[pid*MAXCHOICE+$ARG[1];
135   APPEAR __s_on[pid]
136   # Set the current value
137   SET _s_selval[pid] $ARG[1]
138 ENDIF
139 END
140
141 #--------------------------------------------------------------------
142 # Acquire current value of the selector
143 #   Acquire_Selector
144 #     $ARG[0]: (Selector ID) pid(0~)
145 #   Return value 0~
146 ACTION Acquire_Selector
147 SET ret _s_selvol[pid]
148 END
|
|
|
 1 VARIABLE selid # Lighting Selector Parts ID
 2 VARIABLE swid  # Automatic Lighting Adjustment Switch Parts ID
 3 ######################################################################
 4 ACTION Refreshing_Lighting_Clicked CLICK sel0
 5 CALL Set_Selector selid 0
 6 END
 7
 8 ACTION Soft_Lighting_Clicked CLICK sel1
 9 CALL Set_Selector selid 1
10 END
11
12 ACTION Warm_Lighting_Clicked CLICK sel2
13 CALL Set_Selector selid 2
14 END
15
16 ACTION Subdued_Lighting_Clicked CLICK sel3
17 CALL Set_Selector selid 3
18 END
19
20 ACTION Clear_Lighting_Clicked CLICK sel4
21 CALL Set_Selector selid 4
22 END
23
24 ACTION Automatic_Lighting_Adjustment_Clicked CLICK sw
25 CALL Set_Selector swid TOGGLE
26 END
27
28 ######################################################################
29 ACTION Prepare_Selector
30 CALL Initialize_Selector
31 # Display ON and OFF indicators in a position 17 dots from the left
32 # 5 dots down from the upper left hand corner of the choice segment
33 CALL Register_Selector1 on0 off0 (-17) (5)
34 SET selid ret # Parts ID is stored in return value ret
35
36 # Register the lighting choice: "Refreshing," "Soft," "Warm,"
37 # "Subdued," "Clear"
38 CALL Register_Selector2 selid 5 sel0 sel1 sel2 sel3 sel4
39 CALL Set_Selector selid 3 # Set initial value
40 #---------------------------------------------------------------------
41 # Register the "Automatic Lightning Adjustment" Switch
42 CALL Register_Selector1 on1 off1 (-17) (5)
43 SET swid ret
44 CALL Register_Selector2  swid 1 sw
45 CALL Set_Selector swid ON # Set initial value
46 END
47
48 ######################################################################
49 DEFINE Lightning_Values $ARG[7]
50 # When you select [Display Current Values] menu, it displays current
51 ACTION Display_Current_Values MENU "Display Current Values"
52 CALL Acquire_Selector selid
53 SET Lighting_Values ret
54 CALL Acquire_Selector swid
55 MESG "Current Lighting Values=%d
         Current Automatic Lighting Adjustment Values=%d"
        Lighting_Values ret
56 END
57
58 ######################################################################
59 PROLOGUE
60 DEFINE Selector plate0 sel0 sel1 sel2 sel3 sel4
61 DEFINE Switch plate1 sw
62 DEFINE Volume label0 vol0 knob0 label1 vol1 knob1
63 SCENE scene Selector Switch Volume
64 CALL Prepare_Selector
65 # CALL Prepare_Vol_Cntrl # To be explained in the next installment
66 END
|
____________________
[1] 1B MicroScript: As a result of the March 1994 1B version upgrade (SUS9312, R1.060), MicroScript has become standard equipment in 1B basic software. However, no explanatory materials necessary for programming are attached. Basically, you use it as a player for replaying scripts that other people have created. For example, lots of scripts have been uploaded to personal computer communications provider NIFTY-Serve's Personal Media Forum (FPMC). You can replay these on your 1B at hand by downloading them. Furthermore, the explanatory materials necessary for development and a sample collection are sold separately as "1B MicroScript Development Kit" (standard price 30,000 yen, SUS discount price 10,000 yen; both prices tax not included).
[2] No. 0 Argument: We make it so that we call the first argument the No. 0 Argument. Thereafter, we continue with No. 1 Argument, No. 2 Argument . . .
[3] ret that stores the return value: Pay attention to the fact just one ret variable exists. For example, if we call separate library procedure B after we have called procedure A of one of the libraries, we end up losing the return value of procedure A.
[4] Number of choices, maximum of six: With the current 1B MicroScript, the maximum number of arguments that can be given to an procedure is a maximum of eight. In "Register_Selector2," because we have made it so that we give all the choices in one procedure call, this limit comes to appear. Of course, if we design a separate interface procedure, it is also possible to eliminate this kind of limit.
[5] Processing when a segment has been clicked: Please refer to the first installment (p. 70 in Vol. 22 of this magazine) concerning a description for when an event such as CLICK has occurred on a segment.
[6] Registering the Menu: Please refer to the first installment (p. 70 in Vol. 22 of this magazine) concerning the method for newly creating a menu in MicroScript.
The above article on MicroScript appeared on pages 38-45 in Vol. 27 of TRONWARE . It was translated and loaded onto this Web page with the permission of Personal Media Corporation.
Copyright © 1994 Personal Media Corporation
Copyright © 2008 Sakamura Laboratory, University Museum, University of Tokyo