From the previous installment, we have been creating parts for a user interface; on this occasion, we will create a volume control using 1B MicroScript.
From the previous installment, we have been creating an interface system using 1B MicroScript. In concrete terms, we are programming the movements of such things as an ON/OFF switch, a selector, and volume controls using MicroScript. Also, we are devising the program interfaces of script procedures at the time of program design, and we are implementing them by making them in the form of a parts library. In other words, if we call up procedures in accordance with interfaces that have been decided upon, it will come about that we will be able to easily create parts inside the screen. There is no need whatsoever to worry about in what manner that parts library has been programmed.
What we are creating are, broadly speaking, two parts. Among these, we took up the selector in the previous installment. On this occasion, we will try creating a volume control.
Selector (Previous Installment Explanation Part)
This is a part for choosing whichever one from several choices. Also, in particular, we call a thing for which there is only one choice a "switch," and we can set it with an ON/OFF value.
Volume Control (This Occasion Explanation Part)
This is a part mainly for setting numerical values. It can be operated with the following four methods.
|
|
Drag: Drag the knob and directly jump to the value you wish to set |
|
|
Press: Press a part other than the knob, and you will move the knob little by little in that direction |
|
|
Double Click: Double click a part other than the knob, and you will move the knob a considerable amount in that direction |
|
|
Click: Click a part other than the knob, and you will move the knob a little in that direction |
 |
|
|
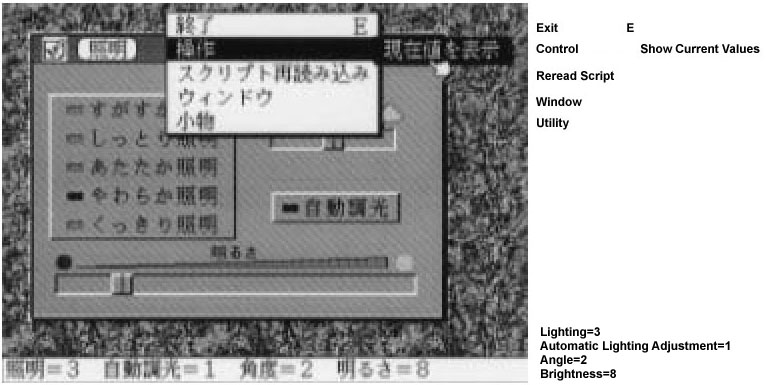
The subject is a panel to control lighting (Fig. 1). On the left, there is a selector for choosing one from among five lighting types: "Refreshing Lighting," "Soft Lighting," "Warm Lighting," "Subdued Lighting," and "Clear Lighting." On the right, there is a volume control for setting the "Angle" of the lighting, and beneath that there is a switch for specifying "Automatic Lighting Adjustment." The thing at the bottom of the panel is a volume control for setting the brightness.
However, because the main point of the programming lies in the creation of a user interface, as with the previous installment, we will make it so that actual control of lighting equipment is not carried out at all. In order to confirm the setting values of the parts, we will attach only a function through which the current setting values of the parts appear at the bottom of the screen when the user selects [Show Current Values] from the [Control] menu (Fig. 2).
 |
|
|
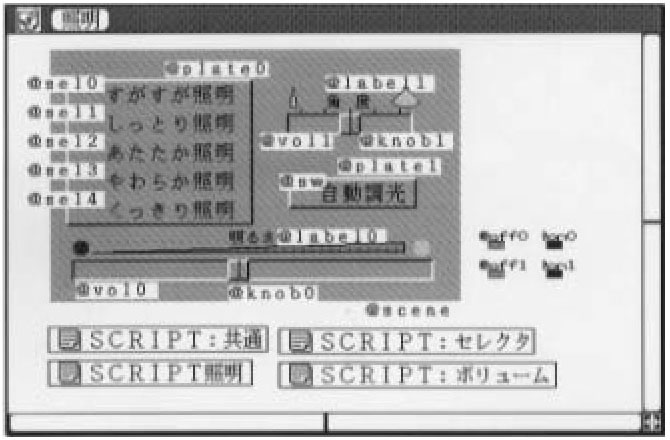
The definitions of the lighting panel segments (the actors) are as in Fig. 3. Let's explain only the ones that concern the volume control. @vol0 and @vol1 are segments of the depressed parts in which we make the knob slide, and @knob0 and @knob1 are the segments of the button (knob) parts. @label0 and @label1 are the segments of the labels, such as "Brightness" and "Angle" plus the gradations.
Scripts are described in real objects that begin with "SCRIPT." As in Fig. 3, we can store multiple script real objects inside one figure real object.
 |
|
|
SCRIPT: Common [Upper Left]
This is a common script necessary in utilizing the parts library. Things such as the definition of constants are carried out.
SCRIPT: Selector [Upper Right]
This is a script for realizing the selector library. This was explained in the previous installment.
SCRIPT: Volume [Lower Right]
This is a script for realizing the volume control library. Just by inserting this script in place, it comes about that the volume control library can be used. We will take this up on this occasion.
SCRIPT: Lighting [Lower Left]
This is the script for the lighting panel. For something that the user actually programs, this alone is fine. As for the three scripts "SCRIPT: Common," "SCRIPT: Selector," and "SCRIPT: Volume," it is fine just to leave their virtual objects alone, and it is not necessary to know their contents.
Well then, let's at last try creating volume controls. These are the two volume controls "Angle" and "Brightness." I would like you to have a look at Program 3 ("SCRIPT: Lighting").
I will follow through it one by one in the order of execution. The place where execution starts in the beginning is, of course, the part enclosed by PROLOGUE~END on the 70th to 77th lines. By means of the 73rd line's
73 DEFINE Volume label0 vol0 knob0 label1 vol1 knob1 |
we carry out macro definition for registering all the segments that concern the volume controls. The actual preparation of the volume controls is carried out with the procedure "Prepare_Vol_Cntrl."
76 CALL Prepare_Vol_Cntrl |
Procedure "Initialize_Vol_Cntrl"
Inside the procedure "Prepare_Vol_Cntrl," first, it made up as
40 CALL Initialize_Vol_Cntrl BIAS |
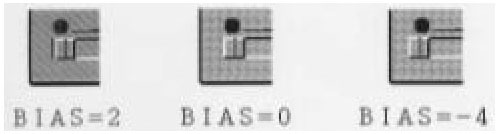
on the 40th line. It is necessary to call "Initialize_Vol_Cntrl" only once in the beginning when creating the volume controls. As the argument, we give the BIAS (defined here with 2 [using DEFINE]). This specifies with a number of dots how much space we will take when we have closed the knob fully to the edge of the volume control. When you have attached shadow and show a three-dimensional feel to the knobs and volume controls, you can make it so that the knobs do not overlap on that shadow part (Fig. 4).
 |
|
|
Prepare_Vol_Cntrl (42nd to 50th Lines)
We register the Brightness volume control with the 43rd to 45th lines, and the Angle volume control with the 48th to 50th lines. Let's take a look through in order of the one for the Brightness volume control. We register the volume control with
43 CALL Register_Vol_Cntrl 0 50 knob0 vol0.W knob0.W vol0.X knob0.X knob0.Y |
on the 43rd line. The respective arguments have the following meanings.
| No. 0 argument [1]: | <volume minimum value> |
| No. 1 argument: | <volume maximum value> |
| No. 2 argument: | <knob segment> |
| No. 3 argument: | <volume width> |
| No. 4 argument: | <knob width> |
| No. 5 argument: | <volume x coordinate> |
| No. 6 argument: | <knob x coordinate> |
| No. 7 argument: | <knob y coordinate> |
You will probably immediately understand the meaning of the no. 2 argument to the no. 7 argument when you actually look at the 43rd line. In the no. 0 argument and no. 1 argument, we specify the range of values that volume control takes. In the case of this volume control, it comes about that we take the minimum value of "0" when the knob has closed fully to the left most point, and it takes the maximum value of "50" when the knob has closed to the right most point.
When we call up the procedure "Register_Vol_Cntrl," the volume control ID is returned as the return value [2]. Afterward, operations concerning this volume control ("Brightness volume control") are carried out using this ID. Actually, an integer value of 0 or greater is used. On the 44th line, with
44 SET volid0 ret |
we store the volume control ID in the variable volid0. In a case where registration has failed, the return value becomes negative, but I am omitting the error check here.
Procedure "Set_Vol_Cntrl"
We specify the initial value of the volume control on the 45th line.
45 CALL Set_Vol_Cntrl volid0 8 |
| No. 0 argument | <volume control ID> |
| No. 1 argument | <setting value> |
It is, of course, necessary for the setting value to be kept within the range of the minimum value (=0) and the maximum value (=50) specified on the 43rd line.
With this, the preparation of the Brightness volume control is finished. Because the Angle volume control is completely the same, I will omit the explanation.
In the 6th to the 36th lines, we have described the processing for when the volume control and/or knob has been clicked, double clicked, or dragged. In making it so that we can use the volume control, outside of registration, it is necessary to describe the processing when each segment is mouse operated in this manner [3].
Among these procedures, of course, no matter what type of description is carried out is fine. However, when we are using a parts library, it is necessary without fail to call up the following library procedure and change the setting values. In the library of the volume controls that we are creating on this occasion, we are supporting all three types of operations that can be used with BTRON: "jump scroll," "area scroll," and "zoom scroll." I show below the library that must be called up corresponding to each operation method.
Jump Scroll
This is an operation in which we press the knob and drag it as is. We can jump to the target value all at once.
CALL Jump_Scroll <volume control ID>
Area Scroll
When you double click or click a part outside of the knob, the knob moves up to a decided amount in that direction.
When the volume control has been DCLICK-ed:
CALL Area_Scroll <volume control ID> <increase/decrease value>
When the volume control has been CLICK-ed:
CALL Area_Scroll <volume control ID> <increase/decrease value>
Zoom Scroll
When you leave pressed as is a part outside the knob, the knob moves little by little in that direction.
When the volume control has been PRESS-ed:
CALL Zoom_Scroll <volume control ID> <increase/decrease value>
Here things are made up as "when the volume control is ~ed," but actually it means "when a part outside of the knob has been -ed." Even if we try operating a volume control part hidden by the knob, the knob segment ends up picking up the mouse control beforehand, and thus ultimately parts hidden by the knob cannot be operated.
In the case of the area scroll, we specify how far we will move the knob in one operation. In the case of the zoom scroll, we specify by how much of a notch the knob will move while pressing.
The operations for when you select [Show Current Values] from the [Control] menu are described on the 54th to 67th lines. On the 63rd and 65th lines,
63 CALL Acquire_Vol_Cntrl volid1 65 CALL Acquire_Vol_Cntrl volid0 |
we obtain the current values of the specified volume controls by means of calling up the procedure "Acquire_Vol_Cntrl."
As of up to here, the explanation of "SCRIPT: Lighting" stored in Fig. 3 is finished. In "SCRIPT: Common" and "SCRIPT: Volume," the volume control parts library below used in "SCRIPT: Lighting" have been programmed.
Procedure "Initialize_Vol_Cntrl" Procedure "Register_Vol_Cntrl" Procedure "Set_Vol_Cntrl" Procedure "Acquire_Vol_Cntrl"
Because I have relatively thoroughly attached comments to "SCRIPT: Common" and "SCRIPT: Volume," I shall forego explaining these in detail in this article.
Divided across two installments, the previous one and the one on this occasion, we have created selector, switch, and volume control parts using MicroScript. Since we have implemented the procedures for realizing the parts in the form of a library, if only we store inside a figure real object the three scripts SCRIPT: Common," SCRIPT: Selector," and "SCRIPT: Volume," then even without knowing their contents, we can create the parts inside the screen by just calling up the procedures below.
Selector, Switch Procedure "Initialize_Selector" Procedure "Register_Selector1" Procedure "Register_Selector2" Procedure "Set_Selector" Procedure "Acquire_Selector"
Volume Control Procedure "Initialize_Vol_Cntrl" Procedure "Register_Vol_Cntrl" Procedure "Set_Vol_Cntrl" Procedure "Acquire_Vol_Cntrl"
I have repeatedly mentioned this in every installment of this series, but being able to completely separate and define the design of actors (segments) and their actions is one great feature in MicroScript. In other words, without touching in any way the script (screenplay) in which we have described the action of the parts, we can afterwards freely change such things as the design of the knobs and the volume controls with the figure editor.
In interface systems such as control panels, there are cases where such trifling things as the arrangement, size, and design of parts greatly influence their ease of use. Accordingly, a mechanism in which we can easily repeat trial and error and go on to carefully create a system in its entirety in the manner of MicroScript becomes important.
____________________
|
|
1 DEFINE MAXVOL 3  # Maximum number of volume controls
2 DEFINE MAXSEL 3  # Maximum number of selectors (switches)
3 DEFINE MAXELM 18 # MAXSEL x MAXCHOICE
4
5 DEFINE pid $ARG[0] # Use the first argument as the PID
6
7 VARIABLE ret # Variable in which we enter the return value of a
               # procedure
|
|
|
|||||||||
1 # Double RATIO to guarantee operation precision of division
# even with integer calculation
2 DEFINE RATIO 100
3
4 VARIABLE _v_nvol # Registered number of volume controls
5 VARIABLE _v_bias # Adjustment of limits when the user closes the
6 # the knob to the edge of the volume control
7 VARIABLE __v_knob[MAXVOL] # Knob segment
8 VARIABLE _v_volmin[MAXVOL] # Minimum value
9 VARIABLE _v_volmax[MAXVOL] # Maximum value
10 VARIABLE _v_vxpos[MAXVOL] # Volume control x coordinate value
11 VARIABLE _v_vwidth[MAXVOL] # Range through which the knob can move
12 VARIABLE _v_knobx[MAXVOL] # Knob's x coordinate value
13 VARIABLE _v_knoby[MAXVOL] # Knob's y coordinate value
14 VARIABLE _v_volval[MAXVOL] # Volume value
15 VARIABLE _v_grid[MAXVOL] # (Dot number for each volume value) x
16 # RATIO
17 #-------------------------------------------------------------------
18 ACTION Initialize_Vol_Cntrl
19 SET _v_nvol 0
20 SET _v_bias $ARG[0]
21 END
22
23 #-------------------------------------------------------------------
24 # Registering the volume control
25 # Register_Vol_Cntrl
26 # $ARG[0]: <Volume minimum value>
27 # $ARG[1]: <Volume maximum value>
28 # $ARG[2]: <Knob segment>
29 # $ARG[3]: <Width of volume control>
30 # $ARG[4]: <Width of knob>
31 # $ARG[5]: <Volume control x coordinate>
32 # $ARG[6]: <Knob x coordinate>
33 # $ARG[7]: <Knob y coordinate>
34 # Return value <0 Error
35 # >=0 Volume control ID(0~)
36 #
37 ACTION Register_Vol_Cntrl
38 SET _v_volmin[_v_nvol] $ARG[0]
39 SET _v_volmax[_v_nvol] $ARG[1]
40 SET __v_knob[_v_nvol] $ARG[2]
41 SET _v_vwidth[_v_nvol] $ARG[3]-(_v_bias*2+$ARG[4])
42 SET _v_vxpos[_v_nvol] $ARG[5]+_v_bias
43 SET _v_knobx[_v_nvol] $ARG[6]
44 SET _v_knoby[_v_nvol] $ARG[7]
45 SET _v_grid[_v_nvol] _v_width[_v_nvol]*RATIO/($ARG[1]-$ARG[0])
46 IF _v_grid[_v_nvol] == 0
47 BEEP
48 MESG "Make (volume control width-knob width)%d dots or more"
($ARG[2]-$ARG[1]) # Link with the above line before executing
49 SET ret -1
50 EXIT
51 ENDIF
52 SET ret _v_nvol
53 SET _v_nvol _v_nvol + 1
54 END
55
56 #-------------------------------------------------------------------
57 # Setting the volume control value
58 # Set_Vol_Cntrl
59 # $ARG[0]: <volume ID> :pid(0~)
60 # $ARG[1]: <setting value>
61 # No return value
62 #
63 ACTION Set_Vol_Cntrl
64 DEFINE newval $ARG[1]
65 # Recalculate the x coordinate of the knob
66 SET _v_knobx[pid] _v_vxpos[pid]+(newval-_v_volmin[pid])
*_v_grid[pid]/RATIO #Link with the above line before executing
67 # Move the knob to that position
68 # @ shows the moving to coordinate values when the upper left hand
69 # corner of the window has been made (0,0)
70 MOVE __v_knob[pid]: _v_knobx[pid] _v_knoby[pid @
71 SET _v_volval[pid] newval
72 END
73
74 #-------------------------------------------------------------------
75 #
76 # Controlling jump scrolling
77 # (movement of the knob by means of dragging)
78 #
79 ACTION Jump_Scroll
80 # Local variables
81 DEFINE max_min $ARG[1]
82 DEFINE _k $ARG[2]
83 DEFINE gr $ARG[3]
84 DEFINE wid $ARG[4]
85 DEFINE newx $ARG[5]
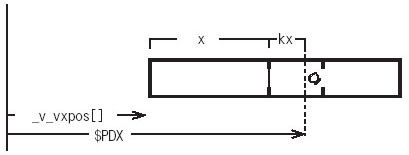
86 DEFINE x $ARG[6]
87 DEFINE kx $ARG[7]
88
89 # max_min: difference between the maximum and minimum volume value
90 SET max_min _v_volmax[pid]-_v_volmin[pid]
91 SET _k __v_knob[pid]
92 # gr: dot number x RATIO for each volume value
93 SET gr _v_grid[pid]
94 # wid: range the knob can possibly move through
95 SET wid _v_vwidth[pid]
96 # x: Volume control left edge and volume control left edge range
97 SET x _v_knobx[pid]-_v_vxpos[pid]
98 # kx: knob left edge and press position range
99 SET kx $PDX - _v_knobx[pid]
|
|
|
 1 VARIABLE volid0 # Parts ID of brightness volume
 2 VARIABLE volid1 # Parts ID of angle volume
 3
#########################################################################
 4 DEFINE BIAS (2)
 5
 6 ACTION Volume0k PRESS knob0
 7  CALL Jump_Scroll volid0
 8 END
 9
10 ACTION Volume0vd DCLICK vol0
11  CALL Area_Scroll volid 5
12 END
13
14 ACTION Volume0vp PRESS vol0
15  CALL Smooth_Scroll volid0 1
16 END
17
18 ACTION Volume0vc CLICK vol0
19  CALL Area_Scroll volid0 1
20 END
21 #------------------------------------------------------
22 ACTION Volume1k PRESS knob1
23  CALL Jump_Scroll  volid1
24 END
25
26 ACTION Volume1vd DCLICK vol1
27  CALL Area_Scroll volid1 1
28 END
29
30 ACTION Volume1vp PRESS vol1
31  CALL Smooth_Scroll volid1 1
32 END
33
34 ACTION Volume1vc CLICK vol1
35  CALL Area_Scroll volid1 1
36 END
37
38
#########################################################################
39 ACTION Prepare_Vol_Cntrl
40 CALL Initialize_Vol_Cntrl BIAS
41 #----------------------------
42 # Brightness volume: Min. value=0, Max. value=50, Initial value=8
43 CALL Register_Vol_Cntrl 0 50 knob0 vol0.W knob0.W vol0.X knob0.X knob0.Y
44 SET volid0 ret
45 CALL Set_Vol_Cntrl volid0 8
46 #------------------
47 # Angle volume: Min. value=0, Max. value=4, Initial value=2
48 CALL Register_Vol_Cntrl 0 4 knob1 vol1.W knob1.W vol1.X knob1.X knob1.Y
49 SET volid1 ret
50 CALL Set_Vol_Cntrl volid1 2
51 END
52
53 ######################################################################
54 # When [Show Current Values] Menu selected, it shows current values
55 DEFINE Selector_Value $ARG[7]
56 DEFINE Switch_Value   $ARG[6]
57 DEFINE Volume1_Value  $ARG[5]
58 ACTION Show_Current_Values MENU "Show Current Values"
59 CALL Acquire_Selector selid
60 SET Selector_Value ret
61 CALL Acquire_Selector swid
62 SET Switch_Value ret
63 CALL Acquire_Vol_Cntrl volid1
64 SET Volume1_Value ret
65 CALL Acquire_Vol_Cntrl volid0
66 MESG "Lighting=%d Auto Lighting Adjustment=%d Angle=%d Brightness=%d"
         Selector_Value Switch_Value Volume_Value ret
67 END
68
69 ######################################################################
70 PROLOGUE
71 DEFINE Selector plate0 sel0 sel1 sel2 sel3 sel4
72 DEFINE Switch plate1 sw
73 DEFINE Volume label0 vol0 knob0 label1 vol1 knob1
74 SCENE scene Selector Switch Volume
75 # CALL Prepare_Selector # Explained in previous installment
76 CALL Prepare_Vol_Cntrl
77 END
|
____________________
[1] No. 0 Argument: We make it so that we call the first argument the no. 0 argument. Thereafter, we continue with no. 1 argument, no. 2 argument . . .
[2] Return Value: The MicroScript language specification itself does not possess a mechanism for handling return values. Accordingly, we decide upon the global variable "ret" for the purpose of storing the return value, and make it our business to use this (definition in "SCRIPT: Common"). Of course, we cannot use this variable for another purpose. Also, pay attention to the fact that just one ret variable exists. For example, if after we have called one procedure A of the parts library we call another library procedure B, then we end up losing the return value of procedure A
[3] Concerning the description of a procedure when an event such as CLICK has occurred on top of a segment, please refer to installment No. 1 (Vol. 22, p. 70).
The above article on MicroScript appeared on pages 62-69 in Vol. 28 of TRONWARE. It was translated and loaded onto this Web page with the permission of Personal Media Corporation.
Copyright © 1994 Personal Media Corporation
Copyright © 2008 Sakamura Laboratory, University Museum, University of Tokyo