
How to create a parts library that we can call up from 1B MicroScript will be continued. On this occasion, we will create a text box in which we can input numerical values.
In the previous installment and the installment prior that in this series, we took up a parts library that can be used from MicroScript. The parts that were made the subject are an ON/OFF switch, selectors, and volume controls. A settings screen that uses these parts on the screen was easily created just by calling up a few procedures. Accordingly, on this occasion, we will take up a text box as the third part in our discussion of parts libraries.
In BTRON, we call parts in which we can input characters a "text box" or a "character box." Even in MicroScript, we can realize this box using the INPUT statement. Actually, I already explained this INPUT statement in the second installment (Vol. 23 of this magazine). However, this statement was prepared for the purpose of controlling in a detailed manner input from the keyboard, and thus it possesses aspects that are a little difficult in employing it in text box use.
For that reason, covering one more layer on top of this and making a library is the subject of this installment.
Furthermore, that which can be handled in the current version of MicroScript are only numerical values. Although we can use character strings in a portion of the output formats, we cannot do such things as store them in variable or control character strings. Accordingly, the text box that we will create on this occasion, strictly speaking, will be a "numerical value box."
 |
|
|
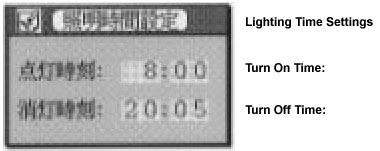
Let's create the Lighting Time Setting control panel in Fig.
1 using a text box library. In this text box, four text boxes
are arranged. Characters input from the keyboard are entered at
the location of the cursor (![]() ).
Because we cannot input anything other than numerals, the displays
are all are right justified. Corrections are possible with the
[Backspace] key. When you push the
[TAB] key, the cursor moves to the
next text box. The cursor moves there even if you directly click
the text box.
).
Because we cannot input anything other than numerals, the displays
are all are right justified. Corrections are possible with the
[Backspace] key. When you push the
[TAB] key, the cursor moves to the
next text box. The cursor moves there even if you directly click
the text box.
 |
|
|
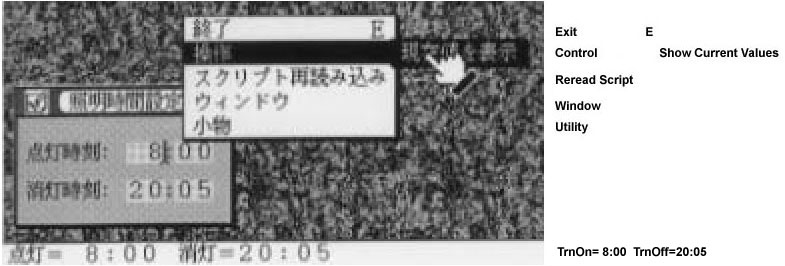
As we have done up to here, because the main point of the programming lies in the creation of a user interface, actual lighting control will not be carried out at all. In order to confirm the setting values, we will attach only a function through which the current settings appear in the message area when the user selects [Show Current Values] from the [Control] menu (Fig. 2).
 |
|
|
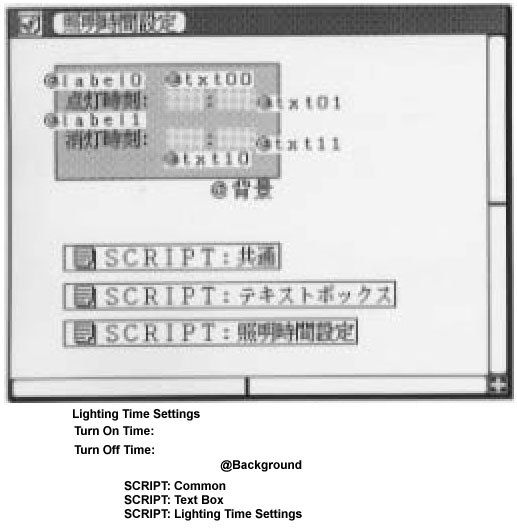
As for defining the segments, we create them as in Fig. 3 using the figure editor. Because they are rather packed together, I shall go through and explain them one by one.
The segment label0 is something in which we have grouped together the "Turn On Time:" label with the ":" that connects the hours and minutes. The segment txt00 forms a text box for inputting the "hour" of the turn on time. Two spaces have been entered so that two place numerals can be entered. The segment txt01 is for use in the input of the "minutes." The segments label1, txt10, and txt11 form the same segment organization concerning the turn off time.
SCRIPT: Common
This is a common script necessary in the utilization of a parts library for selectors (including switches), volume controls, and text boxes. The definition of such things as integers are carried out here.
SCRIPT: Text Box
This is the script that realizes the text box library. Just by entering this script, it comes about that the text box library can be used. If you just understand the method of calling up the library, it is not necessary to understand the contents of this script.
SCRIPT: Lighting Time Settings
This is a script for the lighting time settings panel. Actually, this alone is fine for what the user will program with.
Well then, let's try doing the programming that calls up the text library. I would like you to look at Program 3 "SCRIPT: Lighting Time Settings."
Procedure "Initialize_TxtBx"
As always, I will follow through the procedure one by one in the order in which things are executed. When you open this MicroScript window, the very first thing that is executed is the part enclosed with PROLOGUE and END on the 56th to 78th lines. Through the 57th to the 59th lines, we make the program display all the segments on the screen. Next, through the 60th line, we execute the following statement.
60 CALL Initialize_TxtBx |
Before we use the text box library, it is necessary, without fail, to call up the procedure "Initialize_TxtBx" just once.
Procedure "Register_TxtBx"
Through the 61st line, we call up the procedure "Register_TxtBx," and we register a text box. Within the turn on time, this is the registration of the text box side in which we enter the "hour."
61 CALL Register_TxtBx txt00 0 23 TrnOn_Time_Hr |
The respective arguments possess the following meanings.
| No. 0 argument: | <text box segment> |
| No. 1 argument: | <text box minimum value> |
| No. 2 argument: | <text box maximum value> |
| No. 3 argument: | <execution procedure when input ends> |
| No. 4 argument: |
|
Because the "hour" is entered into the segment txt00, we specify "0" and "23" respectively for the minimum value and the maximum value. In the no. 3 argument, we specify the name of a procedure that is called up at the time character input into this segment ends. In this case, because we have specified the procedure "TrnOn_Time_Hr," we come to separately prepare and put in place a procedure of this name.
What we call the end of input actually means when one key among the [TAB] key, [Return] key, or [Execute] key has been pressed. In the text box specification of BTRON, when these keys are pressed, input becomes fixed, and that value passes to the system. It exactly matches with the operations that fix kana-to-kanji conversion results. Once input has been fixed, control returns to the procedure that is specified with the no. 3 argument.
Through <execution procedure when input ends> (here, "TrnOn_Time_Hr"), we carry out a check as to whether the value that has been fixed falls within the minimum value and the maximum value. For the actual check, we call up the the library procedure "TxtBx_Value_Check" (described below).
When we specify "fill in zero to the left" in the no. 4 argument, the left side of the right-aligned numerical value gets filled with a "0." "Fill in zero to the left" is defined with "1" in "SCRIPT: Common."
When we call up the procedure "Register_TxtBx," the text box ID is returned as the return value. Actually, an integer value of 0 or greater is used; in line 62nd line, with
62 SET txtid00 ret |
we store the text box ID in the variable txtid00. In a case where registration fails, the return value becomes negative, but here the error check is omitted.
Procedure "Set_TxtBx"
We set the value that enters the text box with the 63rd line.
63 CALL Set_TxtBx txtid00 8 |
The arguments of the procedure "Set_TxtBx" are as follows:
| No. 0 argument: | <text box ID> |
| No. 1 argument: | <setting value> |
Of course, it is necessary for the <setting value> to be kept in the range of the minimum value and the maximum value specified with "Register_TxtBx."
In the 61st to the 63rd lines, the registration of the "hour" part of the "turn on time" and the setting of the initial value are finished. In the 65th through 75th lines, we carrying out the settings concerning the remaining three text boxes. As the initial settings, we have set "8:00" in the turn on time, and "20:05" in the turn off time. In the no. 4 argument of the procedure "Register_TxtBx," I want you to pay attention to notice whether or not we have set "fill in zero to the left." It is not specified in the "hour" text box, rather it is specified in the "minute."
Procedure "TxtBx_Active"
In the 77th line, we call up the procedure "TxtBx_Active."
77 CALL TxtBx_Active txtid00 |
| No. 0 argument: | <text box ID> |
What we call active means a state in which the cursor exists there, and in which we can input numerical values. When we use the procedure "TxtBx_Active," the specified text box becomes active. Here, the cursor appears in txtid00, in other words, in the "hour" text box of the "turn on time."
After this, by pressing the [TAB] key or directly clicking on a text box, we make the text box active. The order in which the cursor moves when we have pressed the [TAB] key is the order in which we have called up the procedure "Register_TxtBx."
In the 8th to 49th lines, I have described the processing for when a text box has been clicked, or a value has been fixed by means of the [TAB] key, etc. In using the text boxes, outside of registering them, this type of procedure description becomes necessary.
Processing When the Text Box Has Been Clicked (15th to 49th Lines)
In the 15th to the 49th lines, almost the same processing is being carried out in regard to the four text boxes. Accordingly, for the actual explanation, I will give it only for the 15th to 22nd lines of the processing in regard to the "hour" text box of the "turn on time."
When the "hour" text box of the "turn on time" is clicked, control moves to the procedure "TrnOn_Time_Hr_Clicked." First, with
16 CALL All_Values_Check |
we investigate whether the input values for all the text boxes have been kept within the proper range. Actually, we call up the library procedure "TxtBx_Value_Check."
CALL TxtBx_Value_Check txtid00 txt00.V |
| No. 0 argument: | <text box ID> |
| No. 1 argument: | <current value> |
When we attach the state name (refer to Vol. 23 of this magazine) ".V" to a text segment name, the current value that is stored in that text box is obtained. We give this as the no. 1 argument of "TxtBx_Value_Check." In this procedure, we check whether the value of the no. 1 argument has been kept within the range of the minimum value and the maximum value specified with "Register_TxtBx." If it hasn't been kept within these, it ends up being forcibly rewritten into either the minimum value or the maximum value.
For example, because we have specified the range of "hour" from 0 to 23 (61st, 69th lines), if someone inputs 25, then the program will forcibly set to the maximum value of 23.
The procedure "All_Values_Check" investigates whether all the values of the text boxes have been kept within their ranges. However, in actuality, it is fine if it only checks just the value of the text box that was active just before. In order to realize that, the following library procedure has also been prepared.
|
|
|
| No. 0 argument: | <text box ID> |
| Return value | Current active text box ID (0~) |
If we use this, we can check only the necessary text box using the library procedure "TxtBx_Value_Check." However, because the processing for that becomes a little complicated, here I have adopted the simple method of calling up the procedure "All_Values_Check."
Well then, in the 17th line, we specify the active text box in the line itself. By doing this, the cursor moves to the segment txt00. In other words, the text segment that has been clicked becomes active.
17 CALL TxtBx_Active txtid00 |
Processing When the Text Box Input Has Been Fixed (20th to 22nd Lines)
When you press the [TAB] key, [Return] key, or [Execute] key, control moves to the procedure specified in the no. 3 argument of the procedure "Register_TxtBx" in regard to the currently active text box. For example, in a case where the "hour" of the "turn on time" was active, it would come about that control would move to the procedure "TrnOn_Time_Hr" [Note].
20 ACTION TrnOn_Time_Hr 21 TrnOn_Time_HrCheck 22 END |
"TrnOn_Time_HrCheck" is defined in a DEFINE statement, and in the end it calls up the procedure "TxtBx_Value_Check," and then it investigates whether or not the values of the text boxes have been kept within their ranges.
EPILOGUE (80th to 82nd Lines)
80 EPILOGUE 81 CALL Exit_TxtBx 82 END |
Between EPILOGUE and END is a statement that is executed when the MicroScript window has been closed. Here, we execute the procedure "Exit_TxtBx." This procedure is solely for calling up <execution procedure when input ends> in regard to the text box that was last active. The reason we call this up is for the purpose of making it so that a check of values is properly carried out even when the user ends up closing the window without pressing either the [TAB] key, [Return] key, or [Execute] key, after he/she has changed the contents of the text box.
As of up to here, the explanation of "SCRIPT: Lighting Time Settings" is finished." In "SCRIPT: Common" and "SCRIPT: Text Box," the text box library below that was used has been programmed.
Procedure "Initialize_TxtBx" Procedure "Register_TxtBx" Procedure "Set_TxtBx" Procedure "TxtBx_Active" Procedure "Acquire_Active_TxtBx" Procedure "TxtBx_Value_Check" Procedure "Exit_TxtBx"
Because I have relatively thoroughly attached comments to "SCRIPT: Text Box," I shall forego explaining this in detail in this article.
The TEXT statement that is used inside this is explained in the second installment of this series (Vol. 23 of this magazine).
I would like to mention only one thing for future reference. In displaying numerical values right aligned in a text box, it is necessary to know the number of places of the numerical values. For example, in displaying at a maximum a three-place numerical value, we prepare and put in place beforehand a text segment in which we have entered three places. And then, it is necessary to make the expression specification of the TEXT statement as
"%3d"
in displaying the numerical values right aligned here. In the text box library, by searching for the number of places of the maximum value, we obtain the information required in the expression specification of the TEXT statement. However, that which supports the right-aligned display of a numerical values display is up to four places. Numerical values that exceed that are displayed left aligned.
Over three installments, we have created a parts library of selectors (including switches), volume controls, and text boxes, and I have described in detail the procedures for calling up this library. I think that you will be able to create a fair number of settings screens, if you use these three parts.
____________________
|
|
1 DEFINE MAXVOL 4 # Maximum number of volume controls 2 DEFINE MAXSEL 4 # Maximum number of selectors (switches) 3 DEFINE MAXTXT 4 # Maximum number of text boxes 4 DEFINE MAXELM 24 # MAXSEL x MAXCHOICE (=6) 5 6 DEFINE pid $ARG[0] # Use first argument as PID 7 8 DEFINE Zero_Right_Justified 1 9 10 VARIABLE ret # Variable into which we enter a procedure's return value |
|
|
  1 DEFINE _t_TAB 9   # TAB key
  2 DEFINE _t_EXEC 4  # Execute key
  3 DEFINE _RET   10  # Return key
  4 #
  5 # Variables used in text box parts
  6 # We attach _ at the beginning to variables in which we store segments
  7 VARIABLE _t_l                 # Counter
  8 VARIABLE _t_ntxt              # Number of registered text boxes
  9 VARIABLE __t_txt [MAXTXT]     # Text box segment
 10 VARIABLE _t_func [MAXTXT]     # Function executed at time input ends
 11 VARIABLE _t_min [MAXTXT]      # Minimum value
 12 VARIABLE _t_max [MAXTXT]      # Maximum value
 13 VARIABLE _t_dig [MAXTXT]      # Maximum number of places
 14 VARIABLE _t_fillzero [MAXTXT] # Fill in 0 to left of numerical value?
 15 VARIABLE _t_active            # Active box
 16
 17 #--------------------------------------------------------------------
 18 ACTION Initialize_TxtBx
 19  SET _t_ntxt 0
 20  SET _t_active 0
 21 END
 22
 23 #--------------------------------------------------------------------
 24 # Registering the text box
 25 #   Register_TxtBx
 26 #   $ARG[0]:<text box segment>
 27 #   $ARG[1]:<text box minimum value>
 28 #   $ARG[2]:<text box maximum value>
 29 #   $ARG[3]:<function executed at time input ends>
 30 #   $ARG[4]:<fill in 0 to left of numerical value?>
    #           1=fill in; 0 or not specified=don't fill in
 31 #   Return value <0 error
 32 #               >=0 TxtBx ID (0~)
 33 #
 34 DEFINE _t_tmp $ARG[7]
 35 ACTION Register_TxtBx
 36  IF _t_ntxt >= MAXTXT
 37   SET ret -1
 38   EXIT
 39  ENDIF
 40  SET __t_txt [_t_ntxt] $ARG[0]
 41  SET _t_min [_t_ntxt] $ARG[1]
 42  SET _t_max [_t_ntxt] $ARG[2]
 43  SET _t_func [_t_ntxt] $ARG[3]
 44  SET _t_fillzero [_t_ntxt] $ARG[4]
 45
 46  # Find number of places of maximum value and enter in _t_dig
 47  SET _t_tmp 1
 48  REPEAT
 49   SET $ARG[2] $ARG[2]/10
 50   IF $ARG[2] == 0;BREAK;ENDIF
 51   SET _t_tmp _t_tmp +1
 52  ENDREPEAT
 53  SET _t_dig [_t_ntxt] _t_tmp
 54
 55  SET ret _t_ntxt
 56  SET _t_ntxt _t_ntxt +1
 57 END
 58
 59 DEFINE _t_newval $ARG[7]
 60 DEFINE TEXTOUT
    IF _t_dig [_pid]== 2;
     IF _t_fillzero [_pid] ==1;
       TEXT __t_txt [_pid]"%02d" $ARG[7];
        ELSE;
       TEXT __t_txt [_pid]"%2d" $ARG[7];
     ENDIF;
     ELSE;
     IF _t_dig [_pid]== 3;
      IF _t_fillzero [_pid] ==1;
        TEXT __t_txt [_pid]"%03d" $ARG[7];
         ELSE;
        TEXT __t_txt [_pid]"%3d" $ARG[7];
     ENDIF;
     ELSE;
     IF _t_dig [_pid]== 4;
      IF _t_fillzero [_pid] ==1;
        TEXT __t_txt [_pid]"%04d" $ARG[7];
         ELSE;
        TEXT __t_txt [_pid]"%4d" $ARG[7];
     ENDIF
     ELSE;
        TEXT __t_txt [_pid]"%d" $ARG[7];
     ENDIF;
     ENDIF;
    ENDIF
 61 #--------------------------------------------------------------------
 62 # Setting a value in the text box
 63 #   Set_TxtBx
 64 #      $ARG[0]:<text box ID>:pid(0~)
 65 #      $ARG[1]:<text box value>
 66 #   No return value
 67 ACTION Set_TxtBx
 68   SET _t_newval $ARG[1]
 69   TEXTOUT
 70 END
 71 #--------------------------------------------------------------------
 72 # Making the text box active
 73 #   TxtBx_Active
 74 #     $ARG[0]:<text box ID>:pid(0~)
 75 #   No return value
 76 ACTION TxtBx_Active
 77   SET _t_active $ARG[0]
 78   INPUT __t_txt [_t_active]
 79 END
 80 #--------------------------------------------------------------------
 81 # Acquiring the active text box ID
 82 #   Acquire_Active_TxtBx
 83 #   Return value  ID of the text box
 84 ACTION Acquire_Active_TxtBx
 85  SET ret _t_active
 86 END
 87 #--------------------------------------------------------------------
 88 # Exiting the text box
 89 #   Exit_TxtBx
 90 #   No return value
 91 ACTION Exit_TxtBx
 92  CALL _t_func [_t_active]
 93 END
 94 #--------------------------------------------------------------------
 95 # Text box value check
 96 #   TxtBx_Value_Check
 97 #     $ARG[0]:<text box ID>:pid (0~)
 98 #     $ARG[1]: current value
 99 #   No return value
100 DEFINE _t_value $ARG[1]
101 ACTION TxtBx_Value_Check
102   IF _t_value == 0
103   SET _t_newval 0
104   TEXTOUT
105   EXIT
106   ENDIF
107   IF _t_value > _t_max [_pid]
108     # When maximum value is exceeded, restrain to maximum value
109     SET _t_newval _t_max [_pid]
110     TEXTOUT
111   ELSE
112   IF _t_value < _t_min [_pid]
113     # When value is below minimum value, restrain to minimum value
114     SET _t_newval _t_min [_pid]
115     TEXTOUT
116   ELSE
117     # Basically, this TEXTOUT is not necessary, but
118     # because there are cases when 0 is filled into the left
119     # we execute TEXTOUT
120     SET _t_newval _t_value
121     TEXTOUT
122   ENDIF
123   ENDIF
124 END
125 #--------------------------------------------------------------------
126 DEFINE _t_key $ARG[7]
127 ACTION _t_whenKeyIsPressed KEY
128   SET _t_key $KEY
129   IF _t_key==_t_TAB | _t_key==_t_EXEC | _t_key==_t_RET
130     # When these three keys are pushed,
131     # jump to the user specified input value check routine
132     CALL _t_func [_t_active] _t_key
133   ENDIF
134   IF _t_key == _t_TAB
135     # In the case of the TAB key, we move the caret to the next box
136   CALL TxtBx_Active (_t_active+1) %_t_ntxt
137   ENDIF
138 END
|
|
|
1 VARIABLE txtid00 txtid01 txtid10 txtid11 2 #--------------------------------------------------------------------- 3 DEFINE TrnOn_Time_HrCheck CALL TxtBx_Value_Check txtid00 txt00.V 4 DEFINE TrnOn_Time_MinCheck CALL TxtBx_Value_Check txtid01 txt01.V 5 DEFINE TrnOff_Time_HrCheck CALL TxtBx_Value_Check txtid10 txt10.V 6 DEFINE TrnOff_Time_MinCheck CALL TxtBx_Value_Check txtid11 txt11.V 7 8 ACTION All_Values_Check 9 TrnOn_Time_HrCheck 10 TrnOn_Time_MinCheck 11 TrnOff_Time_HrCheck 12 TrnOff_Time_MinCheck 13 END 14 #--------------------------------------------------------------------- 15 ACTION TrnOn_Time_Hr_Clicked CLICK txt00 16 CALL All_Values_Check 17 CALL TxtBx_Active txtid00 18 END 19 20 ACTION TrnOn_Time_Hr 21 TrnOn_Time_HrCheck 22 END 23 #--------------------------------------------------------------------- 24 ACTION TrnOn_Time_Min_Clicked CLICK txt01 25 CALL All_Values_Check 26 CALL TxtBx_Active txtid01 27 END 28 29 ACTION TrnOn_Time_Min 30 TrnOn_Time_MinCheck 31 END 32 #--------------------------------------------------------------------- 33 ACTION TrnOff_Time_Hr_Clicked CLICK txt10 34 CALL All_Values_Check 35 CALL TxtBx_Active txtid10 36 END 37 38 ACTION TrnOff_Time_Hr 39 TrnOff_Time_HrCheck 40 END 41 #--------------------------------------------------------------------- 42 ACTION TrnOff_Time_Min_Clicked CLICK txt11 43 CALL All_Values_Check 44 CALL TxtBx_Active txtid11 45 END 46 47 ACTION TrnOff_Time_Min 48 TrnOff_Time_MinCheck 49 END 50 ###################################################################### 51 ACTION Show_Current_Values MENU "Show Current Values" 52 MESG "TrnOn=%2d:%2d TrnOff=%2d:%2d" txt00.V txt01.V txt10.V txt11.V 53 END 54 55 ###################################################################### 56 PROLOGUE 57 DEFINE TrnOn_Time_Segment label0 txt00 txt01 58 DEFINE TrnOff_Time_Segment label1 txt10 txt11 59 SCENE BACK TrnOn_Time_Segment TrnOff_Time_Segment 60 CALL Initialize_TxtBx 61 CALL Register_TxtBx txt00 0 23 TrnOn_Time_Hr 62 SET txtid00 ret 63 CALL Set_TxtBx txtid00 8 64 #--------------------------------------------------------------------- 65 CALL Register_TxtBx txt01 0 59 TrnOn_Time_Min Zero_Right_Justified 66 SET txtid01 ret 67 CALL Set_TxtBx txtid01 0 # Turn on time initial value=8:00 68 #--------------------------------------------------------------------- 69 CALL Register_TxtBx txt10 0 23 TrnOff_Time_Hr 70 SET txtid10 ret 71 CALL Set_TxtBx txtid10 20 72 #--------------------------------------------------------------------- 73 CALL Register_TxtBx txt11 0 59 TrnOff_Time_Min Zero_Right_Justified 74 SET txtid11 ret 75 CALL Set_TxtBx txtid11 5 # Turn off time initial value=20:05 76 #--------------------------------------------------------------------- 77 CALL TxtBx_Active txtid00 78 END 79 ###################################################################### 80 EPILOGUE 81 CALL Exit_TxtBx 82 END 83 ###################################################################### |
____________________
[Note] Procedure that Executes at the Time Input Terminates: There might be readers who think that a mechanism in which control deliberately returns to a user procedure for a check of fixed values is unnatural. This is the cry of those who say, "in spite of it being fine if you just check for them automatically inside a library."
Certainly, I wanted to design the library in that manner, but in the current specification of the MicroScript language, there are the following limitations, and unavoidably things ended up like this.
For example, suppose that there is a segment with the name txt. In displaying in the message area the numerical values entered inside this, we attach the state name ".V" and make it in the following manner (refer to Vol. 23 of this magazine).
MESG "%d" txt.V |
However, after substituting the segment txt temporarily in another variable, we cannot attach the state name .V to this variable and access it.
SET T txt MESG "%d" T.V # ← not possible |
Accordingly, in the design of a text library, whether one likes it or not, the need arises to have the check of the numerical values range carried out in a user procedure. In other words, beyond making it so that a library can handle whichever text boxes that possess names, there is nothing other than a user procedure in which the specifications txt00.V, txt01.V, txt10.V, and txt11.V are possible.
The above article on MicroScript appeared on pages 94-101 in Vol. 29 of TRONWARE . It was translated and loaded onto this Web page with the permission of Personal Media Corporation.
Copyright © 1994 Personal Media Corporation
Copyright © 2008 Sakamura Laboratory, University Museum, University of Tokyo