
Discussion of a parts library that can be used from MicroScript will continue. On this occasion is the method of creating "heading tabs" that imitate the tabs of a filing system.
In this series, up to this point, we have take up a parts library that can be used from MicroScript over three installments. By just calling up a few procedures, it came about that we could easily use various parts: a "selector," a "switch," a "volume control," and a "numerical values box."
- TRONWARE Vol. 27
Selector, switch
- TRONWARE Vol. 28
Volume control
- TRONWARE Vol. 29
Numerical values box
These parts libraries are described with the MicroScript language itself. For this reason, it has become possible also to customize by adding revisions to the source programs in accordance with need.
On this occasion, as the fourth part of parts libraries, we will take up "heading tab" parts.
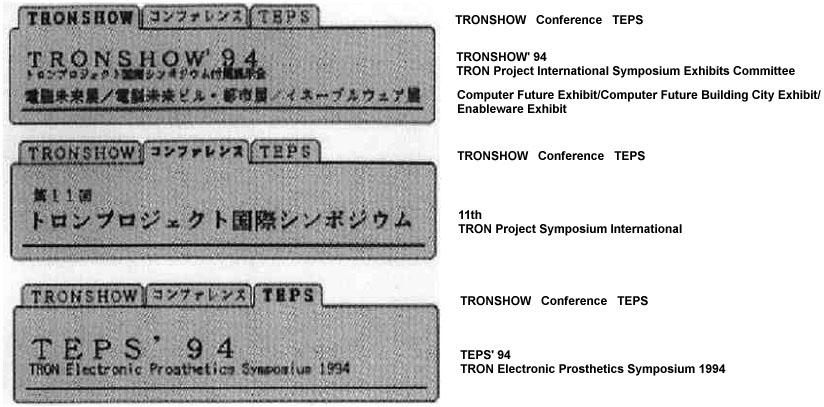
A heading tab is a part of the type shown in Fig. 1. The parts "TRONSHOW," "Conference," and "TEPS" form the headings, and when we click them, the screen changes.
 |
|
|
A heading tab is a part that is introduced in order to effectively utilize a narrow screen. In a case where the contents of the settings are wide ranging, rather than putting those parts in one screen, classifying them and putting them into separate screens is neater. Heading tabs are used to switch through those so-called classifications.
Recently, even in Windows and the like, this technique is being adopted, but in BTRON it forms one of the parts that importance was attached to from around the initial stage.
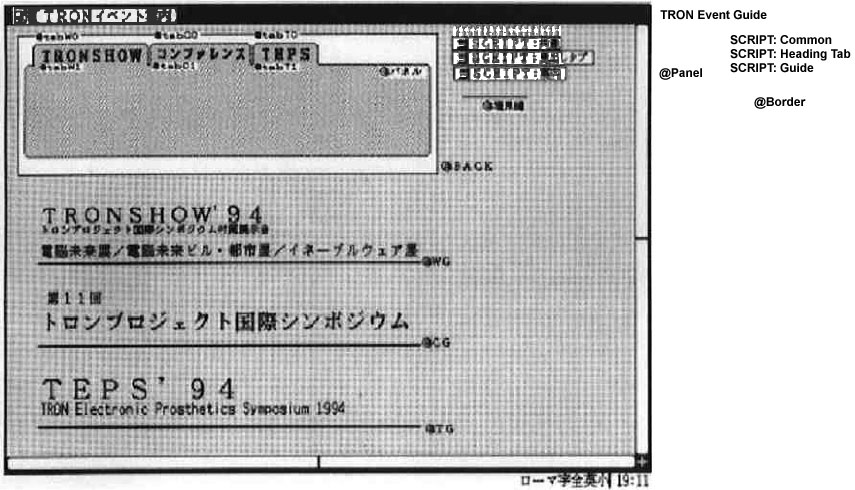
Well then, without delay, let us get down to creating the heading tabs that carry out the actions of Fig. 1. As for the segment definitions, we create them in the manner of Fig. 2, using the figure editor.
 |
|
|
The segment "Panel" is a rectangle with rounded corners that forms the "base." The segments WG, CG, and TG are individual event titles.
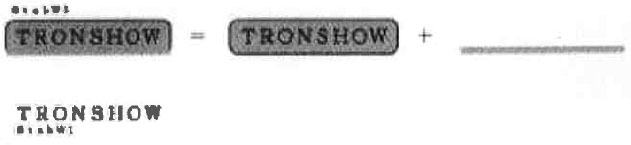
Because the segments tabW0, tabC0, tabT0 and tabW1, tabC1, and tabT1 are jammed together, I have disassembled one heading tab segment and shown it in Fig. 3.
 |
|
|
The segments tabW0, tabC0, and tabT0 are the heading tabs themselves. The segments tabW1, tabC1, and tabT1 are emphasized characters that are displayed when that heading tab has been selected.
The segments tabW0, tabC0, and tabT0 are ones that are grouped by combining them together with figures in the manner of Fig. 3.
The segment "Border" is prepared for the purpose of drawing a border line between the heading tab and the main region. Because there is no function that draws lines in MicroScript, we draw lines by means of performing MOVE while reproducing a line prepared beforehand.
However, there is the necessity for "Border" to be a line segment shorter than the shortest drawing distance. For example, in the case of Fig. 1, it is necessary to be shorter than the space between the left edge of the segment "Panel" and the right edge of the segment tabC0.
A script is described in a real object that begins with "SCRIPT" (a script real object). In a case where there are multiple ones, they are interpreted in order from the script real objects that have been placed inner most (rear most).
SCRIPT: Common
Common scripts, the definition of integers, etc., necessary for utilization in parts libraries of selectors (including switches), volume controls, numerical value boxes, and heading tabs are carried out with this.
SCRIPT: Heading Tab
This is the script that realizes the heading tab library. Just by entering and putting in place this script real object, it comes about that the heading tab parts library can be used. As long as you understand the method of calling up the libraries, it is not necessary to understand the contents of this script.
SCRIPT: Guide
This is the script for the "TRON Event Guide" panel. Actually, it is fine with just this here for user programming.
In that case, let's try doing the programming that calls up the heading tab library. I would like you to take a look at Program 3 "SCRIPT: Guide."
Procedure "Initialize_Text_Box"
As always, we will follow through this one by one in the order in which things are executed. When we open this MicroScript window, the very first thing that is executed is the part enclosed with PROLOGUE to END on the 45th to 49th lines. By means of the 46th line, we display all the segments on the screen. Next, we call up the procedure "Prepare_Heading_Tab" on the 47th line, and then we call up
29 CALL Initialize_Heading_Tab |
on the 29th line.
Before we use the heading tab library, it is necessary without fail to call up the procedure "Initialize_Heading_Tab" one time only.
Procedure "Register_Heading_Tab1"
On the 30th line, we call up the procedure "Register_Heading_Tab1."
30  CALL Register_Heading_Tab1 tabW1.Y+tabW1.H+BIAS Panel.X
     +BIAS Panel.X+Panel.W-BIAS Border Border.W
|
The respective arguments have the following meanings.
| No. 0 argument: | <heading tab Y coordinate> |
| No. 1 argument: | <left edge X coordinate> |
| No. 2 argument | <right edge X coordinate> |
| No. 3 argument | <border line segment between the heading tab and the main region> |
| No. 4 argument | <width of that line> |
Actually, <heading tab Y coordinate> means the Y coordinate value of the border line. In this library, because the heading tabs are premised on lining up in the horizontal direction, things end up fine even if you use the Y coordinate value and height of any one of the the three heading tabs. BIAS is used for the fine tuning of the coordinate position.
As for <left edge X coordinate> and <right edge X coordinate>, they are the X coordinate values of the left edge and right edge of the main region panel. However, because the corners of the segment "Panel" here are rounded, we adjust with BIAS. If we express these two coordinate values in different terms, they become the left edge and right edge of the border line.
When we call up the procedure "Register_Heading_Tab1," the heading tab ID is returned. It comes about that we specify this ID when we make the settings concerning these heading tab parts.
Procedure "Register_Heading_Tab2"
In the procedure "Register_Heading_Tab1," we made settings concerning the heading tabs overall. On the other hand, in the procedure "Register_Heading_Tab2," we carry out settings concerning the individual heading tabs.
32 CALL Register_Heading_Tab2 tabid tabW0 tabW1 tabW0.X tabW0.W 33 CALL Register_Heading_Tab2 tabid tabC0 tabC1 tabC0.X tabC0.W 34 CALL Register_Heading_Tab2 tabid tabT0 tabT1 tabT0.X tabT0.W |
The respective arguments have the following meanings.
| No. 0 argument: | <heading tab ID> |
| No. 1 argument: | <heading segment> |
| No. 2 argument | <segment to display when the heading has been selected> |
| No. 3 argument | <heading X coordinate> |
| No. 4 argument | <heading width> |
In <heading tab ID>, we specify the ID that is returned when we have called the procedure "Register_Heading_Tab1."
The <heading segment> is the heading tab itself, and in <segment to display when the heading has been selected>, we specify the boldface character segment here.
As for <heading X coordinate> and <heading width>, both are utilized when determining the location to draw the border line.
Movement of the Display Main Text Segment
In the 36th to 42nd lines, we move into the display location the guidance text of each event. In a manner that matches to the upper left hand corner of the segment "Panel," we move the segments WG, CG, and TG. In these three segments, the respective transparent rectangles are actually grouped together. When the upper left hand corner of that rectangle and the upper left hand corner of the segment panel are matched, the location is adjusted so that the guidance text appears in the precise location.
Procedure "Set_Heading_Tab"
We set the initial value by calling up
48 CALL Show_Tab SHOW |
in the 48th line. This calls up
12 CALL Set_Heading_Tab tabid $ARG[0] |
in the end. "Set_Heading_Tab" takes the following arguments.
| No. 0 argument: | <heading tab ID> |
| No. 1 argument: | <setting value 0~> |
The procedure "Set_Heading_Tab" is a procedure that sets the heading tab value. The values of 0~ become the settings values in the order in which we call up the procedure "Set_Heading_Tab2." In this case, "TRONSHOW" becomes 0, "Conference" becomes 1, and "TEPS" 2.
Processing When a Heading Tab Has Been Clicked
In the 8th to the 25th lines, we describe the processing when a heading tab has been clicked. In using a heading tab, outside of registering, a procedural description of this type becomes necessary.
The library procedure that we are calling up here is the one line
12 CALL Set_Heading_Tab tabid $ARG[0] |
in the end. It is necessary to give the number of your heading that has been clicked, and to call up the procedure"Set_Heading_Tab."
"SCRIPT: Common," "SCRIPT: Guide"
As of up to here, the explanation of "SCRIPT: Guide" stored in Fig. 2 is finished. In "SCRIPT: Common" and "SCRIPT: Heading Tab," the heading tab library below that was used has been programmed.
Procedure "Initialize_Heading_Tab" Procedure "Register_Heading_Tab1" Procedure "Register_Heading_Tab2" Procedure "Set_Heading_Tab" Procedure "Acquire_Heading_Tab" [Note]
Because I have relatively thoroughly attached comments to "SCRIPT: Text Box," I shall forego explaining these programs in this article.
In this article, we have created a heading tab library that uses MicroScript, and I have explained its method of use. Because a "heading tab" is a type of selector, the overall method of calling up the library is similar to the "selector" we took up in Vol. 27 of this magazine.
With this library, things are set up so that you can use a set of up to four heading tabs in total. The further arranging of heading tabs that make small classifications inside heading tabs that make large classifications is also possible.
____________________
|
|
1 DEFINE MAXVOL 4 # Maximum number of volume controls 2 DEFINE MAXSEL 4 # Maximum number of selectors (switches) 3 DEFINE MAXTXT 4 # Maximum number of text boxes 4 DEFINE MAXTAB 4 # Maximum number of heading tabs 5 DEFINE MAXELM 24 # MAXSEL x MAXCHOICE (=6) 6 DEFINE MAXTABELM 24 # MAXTAB*MAXCHOICE (=6) 7 8 DEFINE _pid $ARG[0] # Use first argument as PID 9 10 DEFINE Zero_Right_Justified 1 11 12 VARIABLE ret # Variable into which we enter a procedure's return value |
|
|
1 DEFINE MAXCHOICE 6 # Maximum number of choices 2 3 # Variables we use in the heading parts 4 # We attach _ at the beginning to variables in which we store segments 5 VARIABLE _b_I # Counter 6 VARIABLE _b_ntab # Number of heading tab selectors registered 7 VARIABLE _b_nitem # Number of tabs per selector 8 VARIABLE _b_choice[MAXTABELM] # Heading segment 9 # Utilized as two-dimensional array 10 VARIABLE _b_choice2[MAXTABELM] # Heading tab shows ON 11 VARIABLE _b_nchoice[MAXTAB] # Number of choices 12 VARIABLE _b_tabval[MAXTAB] # Current value of the selector 13 VARIABLE _b_lwidth[MAXTAB] # Width of the border line 14 VARIABLE __b_bline[MAXTAB] # Border line 15 VARIABLE _b_llimit[MAXTAB] # X coordinate of the left edge 16 VARIABLE _b_rlimit[MAXTAB] # X coordinate of the right edge 17 VARIABLE _b_x[MAXTABELM] # X coordinate of each heading 18 VARIABLE _b_w[MAXTABELM] # Width of each heading 19 VARIABLE _b_y[MAXTAB] # Y coordinate of the heading 20 21 22 23 #-------------------------------------------------------------------- 24 ACTION Initialize_Heading_Tab 25 SET _b_ntab 0 26 SET _b_I 0 27 REPEAT MAXTAB 28 SET _b_nchoice[_b_I] 0 29 SET _b_I _b_I+1 30 ENDREPEAT 31 END 32 33 34 #-------------------------------------------------------------------- 35 # Registering Heading Tabs Part 1 36 # Register_Heading_Tab1 37 # $ARG[0]:<heading tab Y coordinate> 38 # $ARG[1]:<left limit> 39 # $ARG[2]:<right limit> 40 # $ARG[3]:<line forming border of heading tab and main region> 41 # $ARG[4]:<width of that line> 42 # Return value <0 error 43 # >=0 heading tab ID(0~) 44 # 45 ACTION Register_Heading_Tab1 46 IF _b_ntab >= MAXTAB 47 SET ret -1 48 EXIT 49 ENDIF 50 SET _b_y[_b_ntab] $ARG[0] 51 SET _b_llimit[_b_ntab] $ARG[1] 52 SET _b_rlimit[_b_ntab] $ARG[2] 53 SET __b_bline[_b_ntab] $ARG[3] 54 SET _b_lwidth[_b_ntab] $ARG[4] 55 SET ret _b_ntab 56 SET _b_ntab _b_ntab+1 57 END 58 59 60 #-------------------------------------------------------------------- 61 # Registering Heading Tabs Part 2 62 # Register_Heading_Tab2 63 # $ARG[0]:<heading tab ID> pid (0~) 64 # $ARG[1]:<heading> 65 # $ARG[2]:<heading when ON> 66 # $ARG[3]:<X coordinate> 67 # $ARG[4]:<width> 68 # Return value <0 error 69 # =0 registration completed 70 # 71 DEFINE _b_NDX $ARG[6] 72 ACTION Register_Heading_Tab2 73 IF _b_nchoice[_pid] >= MAXCHOICE 74 # The maximum registration number has been exceeded 75 SET ret -1 76 EXIT 77 ENDIF 78 SET _b_NDX_pid*MAXCHOICE+_b_nchoice[_pid] 79 SET _b_choice[_b_NDX] $ARG[1] 80 SET _b_choice2[_b_NDX] $ARG[2] 81 SET _b_x[_b_NDX] $ARG[3] 82 SET _b_w[_b_NDX] $ARG[4] 83 # Store choice number inside _b_nchoice 84 SET _b_nchoice[_pid] _b_nchoice[_pid]+1 85 SET ret 0 86 END 87 88 #-------------------------------------------------------------------- 89 # Setting the value in the selector 90 # Set_Heading_Tab 91 # $ARG[0]:<heading tab ID> pid (0~) 92 # $ARG[1]:<setting value> 93 # No return value 94 ACTION Set_Heading_Tab 95 SET _b_I 0 96 # Erase boundary that existed up to now 97 DISAPPEAR __b_bline[_pid]; 98 MOVE __b_bline[pid]; 99 SET _b_NDX_pid*MAXCHOICE+$ARG[1]; 100 # Erase emphasized characters that existed up to now 101 DISAPPEAR _b_choice2[_pid*MAXCHOICE+_b_tabval[_pid]; 102 CALL Draw_Border < _pid _b_llimit[_pid] _b_x[_b_NDX]; 103 CALL Draw_Border < _pid _b_x[_b_NDX]+_b_w[_b_NDX] _b_rlimit[_pid]; 104 # Show border line and emphasized characters 105 APPEAR __b_bline[_pid] _b_choice2[_b_NDX]; 106 SET _b_tabval[_pid] $ARG[1] 107 END 108 109 #-------------------------------------------------------------------- 110 # Draw __b_line border line in space from $ARG[1] to $ARG[2] 111 DEFINE _b_xx $ARG[7] 112 ACTION Draw_Border 113 SET _b_xx $ARG[1]; 114 IF _b_xx + _b_lwidth[_pid} <= $ARG[2] 115 MOVE __b_bline[_pid] :$ARG[1] _b_y[_pid]@:DUP; 116 REPEAT 117 SET _b_xx _b_xx + _b_lwidth[_pid]; 118 IF _b_xx + _b_lwidth[_pid] > $ARG[2] 119 MOVE __b_bline[_pid]:$ARG[2]-_b_lwidth[_pid]_b_y[_pid]@:DUP; 120 BREAK; 121 ENDIF 122 MOVE __b_bline[_pid]:_b_xx _b_y[_pid]@:DUP; 123 ENDREPEAT 124 ENDIF 125 END 126 127 #-------------------------------------------------------------------- 128 # Acquire the current value of the selector 129 # Acquire_Heading_Tab 130 # $ARG[0]:<heading tab ID> pid (0~) 131 # Return value 0~ 132 ACTION Acquire_Heading_Tab 133 SET ret _b_tabval[_pid] 134 END |
|
|
 1 DEFINE SHOW 0
 2 DEFINE CONF 1
 3 DEFINE TEPS 2
 4
 5 VARIABLE Bcurr I
 6 VARIABLE MESG[3] tabid
 7
 8 ACTION Show_Tab
 9 DISAPPEAR MESG[Bcurr];
10  SET Bcurr $ARG[0];
11  APPEAR MESG[Bcurr]
12  CALL Set_Heading_Tab tabid $ARG[0]
13 END
14
15 ACTION tw CLICK tabW0
16  CALL Show_Tab SHOW
17 END
18
19 ACTION tc CLICK tabC0
20  CALL Show_Tab CONF
21 END
22
23 ACTION tt CLICK tabT0
24  CALL Show_Tab TEPS
25 END
26
27 DEFINE BIAS 2
28 ACTION Prepare_Heading_Tab
29  CALL Initialize_Heading_Tab
30  CALL Register_Heading_Tab1 tabW1.Y+tabW1.H+BIAS Panel.X
     +BIAS Panel.X+Panel.W-BIAS Border Border.W
31  SET tabid ret
32  CALL Register_Heading_Tab2 tabid tabW0 tabW1 tabW0.X tabW0.W
33  CALL Register_Heading_Tab2 tabid tabC0 tabC1 tabC0.X tabC0.W
34  CALL Register_Heading_Tab2 tabid tabT0 tabT1 tabT0.X tabT0.W
35
36  SET Bcurr 0; SET MESG[0]WG; SET MESG[1]CG; SET MESG[2]TG
37  SET I 0
38  REPEAT 3
39   MOVE MESG[1]:00 Panel
40   SET I I+1
41  ENDREPEAT
42 END
43
44 DEFINE Heading_Tab Panel tabW0 tabCo tabT0
45 PROLOGUE
46  SCENE BACK Heading_Tab
47  CALL Prepare_Heading_Tab
48  CALL Show_Tab SHOW
49 END
|
____________________
[Note] The procedure "Acquire_Heading_Tab" is not used in "SCRIPT: Guide," but by giving <heading tab ID> to the no. 0 argument, the current heading tab value (0~) returns to the variable ret.
The above article on MicroScript appeared on pages 82-87 in Vol. 31 of TRONWARE . It was translated and loaded onto this Web page with the permission of Personal Media Corporation.
Copyright © 1995 Personal Media Corporation
Copyright © 2008 Sakamura Laboratory, University Museum, University of Tokyo