|
Here, we will explain the method for developing applications on top of BrainPad TiPO (hereafter TiPO) using MicroScript. Because TiPO is a handheld terminal without a keyboard and the screen also is confined, it is, sorry to say, not suited to full-blown programming. Therefore, we make it a habit to carry out the development, debugging, and testing of applications on 1B/V3 (hereafter 1B), and then run those on top of TiPO. If we do things in a manner in which, after making it so that applications run completely on 1B, we bring them to TiPO, and then carry out fine adjustments in accordance with need, development becomes very efficient. Here, we will first explain the method in which we do development by combining 1B and TiPO, and then we will introduce 1B techniques that will become necessary in development. Concerning the individual operating techniques of 1B, please refer to the 1B manual. In doing development by combining 1B and TiPO, it is necessary to share between 1B and TiPO data and scripts that are in the process of being created. A PC Card (ATA card) is simple and convenient for this. By storing all the scripts in the process of being created and the related data on a PC Card, it becomes possible to edit and execute just by inserting the PC Card in either 1B or TiPO. Moreover, backup can easily be realized by doing real object copying of the contents of the PC Card onto the hard disk on 1B. There is a PC Card slot in many of the notebook-type machines, and thus you can connect the just mentioned PC Card. With a desktop machine, it is necessary to make it so that you can connect the PC card by adding a PC card adaptor. For TiPO, there is nothing in particular to add. In accordance with need, you can also use a serial cable, an AC adaptor, and a keyboard adaptor. For the PC Card, we use the so-called ATA card. Because an SRAM card cannot be used on 1B and a hard disk cannot be used on TiPO, please be careful. A capacity of 4Å`8 MB is sufficient. Because the empty capacity of the TiPO Flash disk is only on the order of 3 MB, it is necessary to hold down to this capacity to store scripts on the TiPO main unit in the end. PC Card formatting is necessary to use a PC Card that's in a state of having just been bought. When we turn on the power supply after having inserted the PC Card in TiPO, a panel asking "Will you format?" is displayed. Input a disk title, and then format the PC Card (for the detailed operation method, please refer to the TiPO manual). By storing scripts in the process of being created on this PC Card, we come to edit and execute them. Script development based on cooperation between 1B and TiPO becomes like the flow below.
What's important here is the point that with MicroScript the exact same things operate on top of 1B and on top of TiPO. Accordingly, carrying out testing and debugging as much as possible on the 1B side, and finishing up with just confirmation of operation on the TiPO side is ideal (for the window size and parts locations, and the speed of animation, it is necessary to confirm with TiPO). Furthermore, if necessary, you can also maintain a temporarily completed script with just TiPO (it is possible to freely make revisions using TiPO's figure editor and text editor). First, we create on the PC Card all the real objects we will use in the scripts. Then, we copy to the hard disk on the 1B side only the virtual objects (these virtual objects are on top of the hard disk, but they point to real objects on the PC Card). Because contents revised on the 1B side have been entered into the PC Card, you can execute by just taking out the PC card and inserting it in TiPO. Among the real objects we will use in scripts, there are the following items.
Because the "figure real object in which we will store scripts" is started up from both the Basic Figure Editor and MicroScript, it is convenient to prepare and put in place two virtual objects: a virtual object for starting up the Basic Figure Editor, and a virtual object for starting up MicroScript (it will come about that two virtual objects will exist for one real object on the PC Card). For the "text real objects in which we will store scripts" also, we prepare and put in place virtual objects. As for virtual objects outside of these, it should be fine if you prepare them in accordance with need. Incidentally, taking out virtual objects is easy when we use "Real-object--Virtual-object Network" for the "figure real object in which we will store scripts." Because the "text real objects in which we will store scripts" are the real objects in which we will work most frequently, we leave them in a opened state in the window (you can take out the PC Card even in a state in which things are opened in the window). On the other hand, since the "figure real object in which we will store segments" will not change much once it has been created, we will open the window when necessary. Since these real objects will not be changed much, no problems will occur even if they are opened as is in the window (however, when editing real objects on the TiPO side, please close the windows on the 1B side). Because it is necessary to test all sorts of data with real objects that scripts read in, it is more convenient leaving them opened when testing. On the other hand, caution is necessary in a case where you will execute scripts of the type that directly edit real objects. When you open a real object that is written into in a window, and then when you do not open once more after having exited that window once, you cannot see the written-in results. Also, when you select "Update and Exit" with the window opened as is, the contents that are written in by means of the script end up being written over. As an example in which we use several virtual objects, we will introduce the appearance of editing and debugging of a script we have used to make and output the reference section of this book (there are approximately 1,600 lines). This script only operates on top of 1B, but under the assumption that we are creating an application on TiPO, we have created a real object on top of a PC Card.
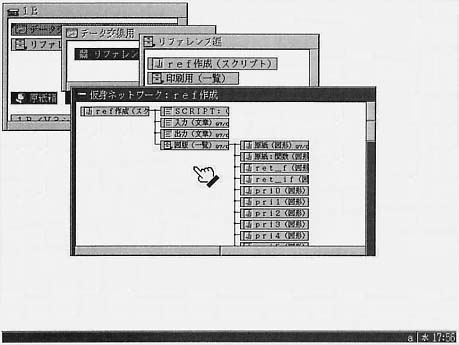
Fig. 1 is a script real object that has been stored on a PC Card. When we take a look in the virtual object network, it is made up as in Fig. 2. "SCRIPT:" is the text real object of the script main body. The script reads in from the "Input" text real object, and it outputs to the "Output" text real object. Also, the illustrations that serve as subject matter are stored below "Illustrations."
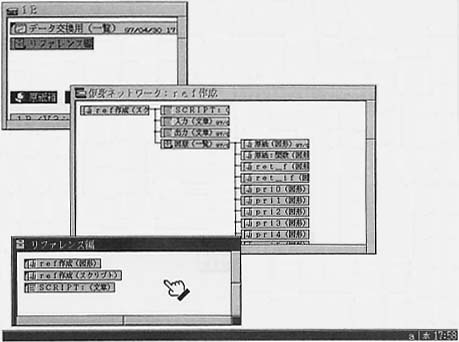
We create a cabinet for work use on the hard disk, and then first we copy the virtual objects of the figure real objects into the window of the hard disk. We copy one more time, preparing two virtual objects that point to the same figure real object. We make one side for MicroScript startup use, and the other side for figure editor startup use (by selecting from the execution menu, the selected application will be will be remembered in the virtual object). We also copy to the hard disk the virtual objects of the script text real objects. Things become as in Fig. 3. Through this, it has come about that the editing and execution of scripts can be carried out freely.
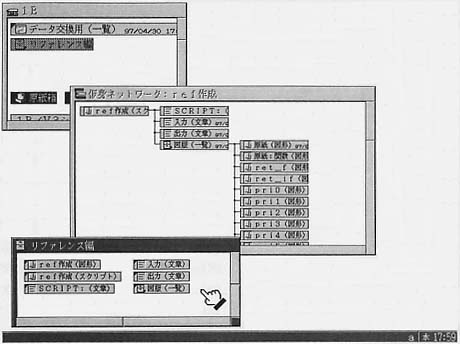
In a case where there is a real object related to work, its virtual object also is copied and put into place on the hard disk. As for a test of this script, we carrying it out by rewriting in various ways the Input real object and executing the script, and then confirming whether or not things have been written in normally in the Output real object. Accordingly, because the Input, Output, and Illustration real objects are operated frequently, we put virtual objects that correspond to these on the hard disk (Fig. 4).
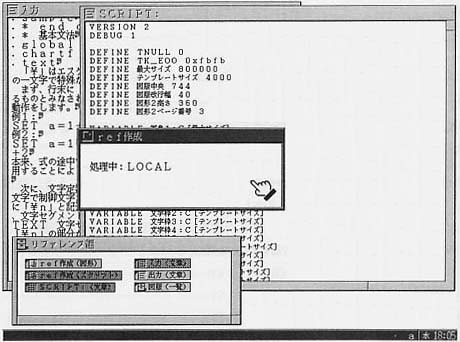
During testing, we work in the manner of Fig. 5. Script and input virtual objects are left open, and they are made up so that they can be revised at any time. The execution of a script is carried out by double clicking the virtual object set in MicroScript. The results are implemented by applying Basic Print to the output virtual object (Fig. 6). If there is some problem, we revise the script, execute it again, and then confirm the results.
Finally, we would like to introduce two points that easily lead to problems in MicroScript. After revising, even if you operate MicroScript's "Reread Script," segments in which contents and attributes have been modified do not return to the source. It is necessary to start up once again, after terminating MicroScript once. What you must be careful with in TiPO is electrical power consumption, and when there is a problem in the way a script is written, the battery life becomes shortened, because the machine ends up operating continuously. Please avoid script writing methods of the type that come to leave the machine operating. At the present time, there doesn't seem to be anything other than directly measuring the electrical current to check the electrical power consumption of TiPO. |
||||||||||||||||||||||||
| 312-318 |
The above contents of BTRON MicroScript Reference Manual were translated and loaded onto this Web page with the permission of Personal Media Corporation.
Copyright (c) 1997 Personal Media Corporation
Copyright (c) 2010 Sakamura Laboratory, University Museum, University of Tokyo