
This article gives an explanation of a case where the user installs the development environment and MP T-Kernel in /usr/local/te of Cygwin. Work procedures based on the above are as follows:
(1) Obtaining MP T-Kernel (2) Obtaining the development environment (3) Obtaining the sample program (4) Obtaining Cygwin (5) Installing the development environment (6) Installing MP T-Kernel (7) Preparing the sample program (8) Building (9) Executing
The MP T-Kernel specifications can be obtained free of charge from the T-Engine Forum's Web page [Note 1].
As the AMP T-Kernel Specification and the MP T-Kernel Specification have been released to the public on the specifications page, download them.
 |
|
|
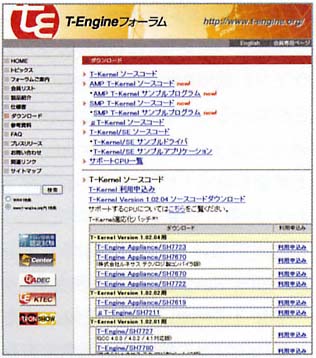
The MP T-Kernel source code also can be obtained free of charge from the T-Engine Forum's Web page (Fig. 1) [TN 1].
 |
|
|
To download the source code, a subscription is necessary; you can easily subscribe by just clicking Subscription on the Download page, and then inputting the necessary items.
In the case of downloading the source code of AMP T-Kernel, click on AMP T-Kernel Subscription (Fig. 2 [1]), and then input the necessary items. As an ID and password for downloading will be sent by e-mail shortly after subscribing, if you click "AMP T-Kernel Version 1.00.00 Source Code Download" (Fig. 2 [2]) and input the ID and password that were sent, you can download the AMP T-Kernel source code.
In the case of SMP T-Kernel also, after subscribing with "SMP T-Kernel Subscription" (Fig. 2 [5]) in the same manner, download from "SMP T-Kernel Version 1.00.00 Source Code Download" (Fig. 2 [6]).
The development tools (GNU tools) for T-Engine/NaviEngine can be obtained free of charge from the T-Engine Forum's Web page.
For the development tools, two types, binary and source code, have been released to the public.
Because the binaries for Cygwin environment use have been built beforehand, you can use them immediately just by downloading them.
The source code is utilized in a case where we will build development tools in an environment other than Cygwin.
Because we will utilize the Cygwin environment in this article, download the binaries (devenv_arm11mpcore.tar.gz).
On the T-Engine Forum's Web page, sample programs for MP T-Kernel use have been released to the public, and they can be obtained free of charge (Fig. 2).
Because a boot program and simple user program for use with T-Engine/NaviEngine use are included in the sample program, things are made up so that you can immediately execute MP T-Kernel.
To download the sample program, it is necessary to subscribe in the same manner as in the case where you downloaded the MP T-Kernel source code.
In a case where you will download the sample program for AMP T-Kernel use, click "AMP T-Kernel Sample Program Subscription" (Fig. 2 [3]), and then input the necessary items. Once an ID and password have been sent to you from the T-Engine Forum's secretariat, download it from "AMP T-Kernel Sample Program Download" (Fig. 2 [4]).
In the case of that for SMP T-Kernel use also, after subscribing in the same manner with "SMP T-Kernel Sample Program Subscription" (Fig. 2 [7]), download from "SMP T-Kernel Sample Program Download" (Fig 2 [8]).
When you download and execute the setup.exe from the Cygwin Web page [Note 2], Cygwin installation begins. Because the package is insufficient with the default settings, we add the packages that are in Table 1.
|
|
|
| Category | Package |
| Devel | gcc, make |
| Interpreters | perl |
| Libs | libgmp-devel, libmpfr-devel |
| Utils | file, patch |
Once installation is finished, we create symbolic links. After starting up Cygwin, you can create the necessary symbolic links by inputting the commands in the manner of Fig. 3.
$ ln -s make /usr/bin/gmake $ ln -s /usr/bin/perl /usr/local/bin/perl |
|
|
Following this, because we get down to work on top of Cygwin, we start up Cygwin beforehand and leave it like that.
First, we copy the development tool archive (devenv_arm11mpcore.tar.gz) into the directory into which we install development tools (/usr/local/te). Once the copying is finished, if we input the commands in the manner of Fig. 4, the archive will be expanded.
$ cd /usr/local/te $ tar zxf devenv_arm11mpcore.tar.gz |
|
|
Next, we set the environment variables for development tool use. When we input commands in the manner of Fig. 5, the environment variables necessary for the development tools are set.
export GNUs=/usr export GNU_BD=/usr/local/te/arm11mpcore export GNUarm=$GNU_BD/arm-elf export GCC_EXEC_PREFIX=$GNU_BD/lib/gcc/ export PATH=$GNU_BD/bin:$PATH |
|
|
Because it is necessary to set the environment variables each time when Cygwin has been started up, we add the commands in Fig. 5 to .bashrc.
Installation finishes just by expanding the archive.
In the case of AMP T-Kernel, after copying the archive (amp_tkernel.1.00.00.tar.gz) into /usr/local/te, if we input commands in the manner of Fig. 6, installation will finish.
$ cd /usr/local/te $ tar zxf amp_tkernel.1.00.00.tar.gz |
|
|
In the case of SMP T-Kernel also, after we have copied the archive (smp_tkernel.1.00.00.tar.gz) into /usr/local/te, we input commands in the manner of Fig. 7.
$ cd /usr/local/te $ tar zxf smp_tkernel.1.00.00.tar.gz |
|
|
In regard to the build method for MP T-Kernel, because the details are written in "AMP T-Kernel Source Code Manual Rev.1.00.00" (amp_tkernel.txt) and "SMP T-Kernel Source Code Manual Rev.1.00.00" (smp_tkernel.txt), we want you to refer here also.
The sample program is made up from a boot program and a user program. The boot program can be used as is just by building it, but in a case where one will utilize the user program, it is necessary to modify a portion of the source code.
First, it is necessary to expand the sample program archive, and then copy the expanded files into the directory in which MP T-Kernel has been installed.
In the case of AMP T-Kernel, in the directory that the archive (amp_sample.1.00.00.tar.gz) has been placed, expansion and copying are executed if we input commands in the manner of Fig. 8.
$ tar zxf amp_sample.1.00.00.tar.gz $ cp amp_sample/amp_appl/* /usr/local/te/amp_tkernel_source/kernel/usermain $ cp -r amp_sample/amp_boot /usr/local/te/amp_tkernel_source |
|
|
In the case of SMP T-Kernel also, in the directory that the archive (smp_sample.1.00.00.tar.gz) has been placed, we input commands in the manner of Fig. 9.
$ tar zxf smp_sample.1.00.00.tar.gz $ cp smp_sample/smp_appl/* /usr/local/te/smp_tkernel_source/kernel/usermain $ cp -r smp_sample/smp_boot /usr/local/te/smp_tkernel_source |
|
|
Once the file copying terminates, we do the modification work in order to start up the user program.
In the case of AMP T-Kernel, it is necessary to modify the files shown in Table 2.
|
|
|
| File | Directory |
| usermain.c | /usr/local/te/amp_tkernel_source/kernel/usermain/ |
| Makefile.usermain | /usr/local/te/amp_tkernel_source/kernel/usermain/ |
| rominfo_conf0.h | /usr/local/te/amp_tkernel_source/config/src/sysdepend/std_amp_naviengine/ |
| rominfo_conf1.h | /usr/local/te/amp_tkernel_source/config/src/sysdepend/std_amp_naviengine/ |
| rominfo_conf2.h | /usr/local/te/amp_tkernel_source/config/src/sysdepend/std_amp_naviengine/ |
| rominfo_conf3.h | /usr/local/te/amp_tkernel_source/config/src/sysdepend/std_amp_naviengine/ |
For usermain.c, modify the usermain() function in the manner of Fig. 10. By means of this modification, it will come about that the function that serves as the main body of the user program will be called up.
EXPORT        INT       usermain( void )
{
IMPORT void amp_sample( void );

      amp_sample();
      tk_slp_tsk(TMO_FEVR);

      return 0;
}
|
|
|
For Makefile.usermain, we add a source file name in the manner of Fig. 11.
SRC += usermain.c amp_sample.c
                       ↑
                   [Add file]
|
|
|
We modify rominfo_conf0.h in the manner of Fig. 12 for the purpose of setting the initialization handler address. We also make the same revision to rominfo_conf1.h, rominfo_conf2.h, and rominfo_conf3.h.
#define RI_INITHDR     (FP)0x000403e8  /* Initialization handler routine*/
                                ↑
                         [Set address]
|
|
|
Furthermore, in regard to the initialization handler, we would like you to refer to the AMP T-Kernel specification.
In the case of SMP T-Kernel, it is necessary to modify the files shown in Table 3.
|
|
|
| File | Directory |
| usermain.c | /usr/local/te/smp_tkernel_source/kernel/usermain/ |
| Makefile.usermain | /usr/local/te/smp_tkernel_source/kernel/usermain/ |
For usermain.c, we modify the usermain() function in the manner of Fig. 13.
EXPORT        INT       usermain( void )
{
IMPORT void smp_sample( void );

      smp_sample();
      tk_slp_tsk(TMO_FEVR);

      return 0;
}
|
|
|
For Makefile.usermain, we add a source file name in the manner of Fig. 14.
SRC += usermain.c smp_sample.c
                       ↑
                   [Add file]
|
|
|
Once the sample program preparations are finished, we build the kernel and the boot program.
In the case of AMP T-Kernel, we input the make command at four places in the manner of Fig. 15.
$ export BD=/usr/local/te/amp_tkernel_source $ cd $BD/lib/build/std_amp_naviengine /* First, */ $ make /* build the library */ $ cd $BD/kernel/sysmain/build/std_amp_naviengine /* Second, */ $ make /* build the kernel */ $ cd $BD/config/build/std_amp_naviengine /* Third, */ $ make /* build the settings file */ $ cd $BD/amp_boot/build/std_amp_naviengine /* Fourth, */ $ make /* build the boot program */ |
|
|
As for the messages that will be displayed during building, as long as an error message isn't displayed, there is no need to pay attention to them.
If the files shown in Table 4 have been generated, then the building has terminated normally.
|
|
||
| File | Contents | Directory |
| rominfo.mot | ROM information | /usr/local/te/amp_tkernel_source/config/build/std_amp_naviengine/ |
| kernel-rom.mot | AMP T-Kernel main body | /usr/local/te/amp_tkernel_source/kernel/sysmain/build/std_amp_naviengine/ |
| boot.bin | Boot program | /usr/local/te/amp_tkernel_source/amp_boot/build/std_amp_naviengine/ |
In the case of building SMP T-Kernel also , we input commands in the same manner as in Fig. 16. If the files shown in Table 5 have been generated, then the building has terminated normally.
$ export BD=/usr/local/te/smp_tkernel_source $ cd $BD/lib/build/std_smp_naviengine /* First, */ $ make /* build the library */ $ cd $BD/kernel/sysmain/build/std_smp_naviengine /* Second, */ $ make /* build the kernel */ $ cd $BD/config/build/std_smp_naviengine /* Third, */ $ make /* build the settings file */ $ cd $BD/smp_boot/build/std_smp_naviengine /* Fourth, */ $ make /* build the boot program */ |
|
|
|
|
||
| File | Contents | Directory |
| rominfo.mot | ROM information | /usr/local/te/smp_tkernel_source/config/build/std_smp_naviengine/ |
| kernel-rom.mot | SMP T-Kernel main body | /usr/local/te/smp_tkernel_source/kernel/sysmain/build/std_smp_naviengine/ |
| boot.bin | Boot program | /usr/local/te/smp_tkernel_source/smp_boot/build/std_smp_naviengine/ |
In a case where we will execute the sample program, it is necessary to connect T-Engine and the Windows development machine with a serial cable, and then start up the terminal software on top of MS Windows. The terminal software is set as in Table 6.
|
|
|
| Communications speed | 38,400 bps |
| Data length | 8 bits |
| Stop bit | 1 bit |
| Parity | None |
In regard to the method for writing into flash, we would like you to refer to the hardware manual.
After you have confirmed normal operation, it might be good to try writing a program on your own based on the sample program.
As for the AMP T-Kernel sample program, things such as the way it uses the initialization handler and the way it deals with synchronization will probably serve as a reference.
However, in a case where you will modify the AMP T-Kernel sample program, it is necessary to be careful about the initialization handler. In a case where you have changed the source code that has been released to the public, there is the possibility that the address of the initialization handler will become another value. In this case, you must change the address value of the initialization handler that has been set in the ROM information to the proper value. For details, we would like you to refer to the sample program's explanatory text.
SMP T-Kernel simultaneously executes tasks up to the maximum number of processors. The SMP T-Kernel sample program is made up into a program in which this operation is utilized.
The priority level of tasks that output messages is the lowest among the tasks that are in an executable state, but because the number of tasks and the number of processors are the same, the messages are output. As the number of tasks and their priority can be adjusted by modifying the processing of the smp_sample() function, we would like you to try various arrangements. For example, you can confirm that messages come not to be output by increasing the number of dummy tasks by one.
In this article, we have explained, following an order, the methods of using MP T-Kernel.
The adoption of multicore processors in high performance embedded systems is expected to move forward, but, on the other hand, we also hear talk that multicore processors are difficult, and thus designers keep their hands off them.
Because MP T-Kernel makes high compatibility with T-Kernel one of its features, if one has experiencing using T-Kernel, then one can probably use MP T-Kernel comparatively easily.
Moreover, in a case where one has no experience using T-Kernel, it would probably be best to try beginning from AMP T-Kernel.
In AMP T-Kernel, the kernel operations assigned to each processor become almost the same as those of single processor T-Kernel. Programming also is possible without being conscious of the fact that it is a multicore processor.
If you begin from AMP T-Kernel, you should be able to smoothly migrate in a case where it comes about that you will use MP T-Kernel in earnest.
We would like you to by all means take this opportunity to try using MP T-Kernel.
____________________
[Note 1] http://www.t-engine.org/
[Note 2] http://www.cygwin.com/
____________________
[Translator's Note 1] At the time this translation was prepared, the T-Engine Forum's English language download page did not have the items mentioned in this article available for downloading. However, once they are available, they will probably be in the same order as shown in the figures that appear here.
The above article on MP T-Kernel appeared on pages 39-45 in Vol. 116 of TRONWARE. It was translated and loaded onto this Web page with the permission of Personal Media Corporation.
Copyright © 2009 Personal Media Corporation
Copyright © 2009 Sakamura Laboratory, University Museum, University of Tokyo