
There is a tradition in the world of programming that has been around since the time that Brian W. Kernighan and Dennis M. Ritchie published their seminal work, The C Programming Language, which first appeared in 1978. That tradition is to use a simple program that displays the words "hello, world" on the screen as the first example of a program, as was done in The C Programming Language to introduce students to programming in C language. Since C language has changed over the last 33 years, becoming standardized into ANSI C and even morphing into new languages such as C++ and C#, there are many versions of this simple program. Here, we'll give you the original version, which is the shortest and easiest to understand.
| Original C language version |
main()
{
printf("hello, world\n");
}
|
In this version, there are only two lines of programming code, and there are two symbols, { and }, called curly brackets, which are used to show the beginning and the end of a function. In the first line, main(), which has to appear in every C language program, shows the software that will actually execute the program from where to begin execution. Don't worry about the ( and ) next to main; things are placed inside them, but exactly what goes inside them will lead us into a detailed description of C language. Since this is a program that displays "hello, world" on the screen, it's pretty obvious that printf is the statement used to do the displaying, and it is equally obvious that what is to be displayed is wrapped in (" and "). The \n means start a new line after printing on the screen.
| Execution results of C language program "hello, world" |
|
As we will see below, there are some parallels with MicroScript, but, first, let's describe how a MicroScript program is created.
 |
|
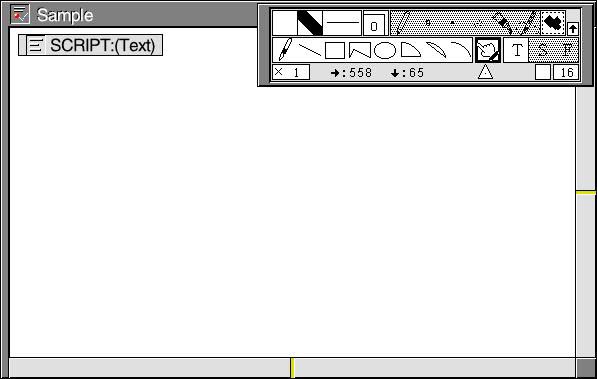
Because MicroScript is a visual programming language, the real object (file) in which you create a MicroScript program is a Basic Figure Editor (graphics) real object (Fig. 1), although you can create a program that doesn't do anything graphically as we will see below. Inside the figure real object, you can place up to eight Basic Text Editor (text) real objects, which are where you write one or more scripts to manipulate things on the screen. Since interpreting begins from the first text real object placed in the figure real object, you have to plan a program hierarchy beforehand if you intend to use more than one text real object for program code [1].
 |
|
|
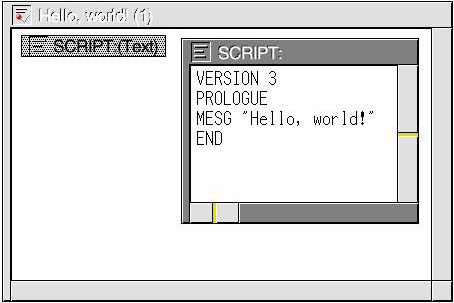
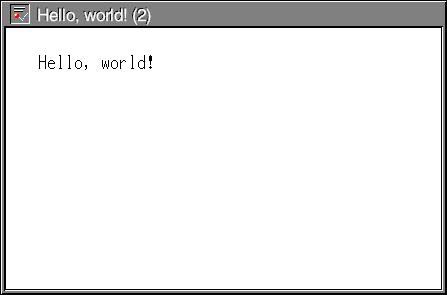
Now, let's create our first MicroScript script, a script that will output "Hello, world!" Believe it or not, since MicroScript is a visual programming language, there are three basic ways of doing this: (1) using the MESG statement [2], (2) using a character segment, and (3) using a virtual object linked to a text real object. The first method outputs "Hello, world!" (without quotation marks) in the lower left hand corner of the screen inside the system message panel (Fig. 2). The source code for this program is as follows:
| MicroScript script "Hello, world!" (1) |
VERSION 3 PROLOGUE MESG "Hello, world!" END |
All MicroScript scripts must include VERSION, PROLOGUE, and END. The VERSION statement doesn't do anything except tell the interpreter what version of the language the script is written in. Accordingly, the PROLOGUE statement is where the execution begins, which makes it similar to the main() above in C language. Between PROLOGUE and END, the procedures used for initial processing are executed. In longer scripts, declarative statements such as SEGMENT, VARIABLE, and DEFINE, can come between VERSION and PROLOGUE. There is also an EPILOGUE statement for longer scripts that comes between PROLOGUE and END. It is used for shutting down processes that the main program started up. If they are not shut down, they will continue operating, which will slow down the processor, and drain battery power in a portable device.
 |
|
|
The second MicroScript version of "Hello, world!" is recycled from the TRON Web article titled "More on MicroScript Segments." [3] All that was changed was the TEXT1 segment. In other words, the original message segment was deleted, "Hello. world!" and "@TEXT1" were input with the text editor, after which they were selected, and then "grouped together" by selecting the appropriate menu item from the pop-up menu. This is one of the big advantages of a visual programming language, such as MicroScript. Without any changes to the source code (actually, the version number was changed, but it didn't have to be), you can create new interface elements (text or graphics), and as long as they are labeled the same as the old interface elements, no programming changes are necessary.
| MicroScript script "Hello, world!" (2) |
VERSION 3 PROLOGUE SLEEP 1000 APPEAR TEXT1 SLEEP 1000 MOVE TEXT1: 31,131 @ SLEEP 1000 DISAPPEAR TEXT1 END |
In this script, we have have introduced the SLEEP statement, which stops execution in units of milliseconds, and the APPEAR and DISAPPEAR statements, which make things, i.e., segments, appear and disappear inside the MicroScript window. This second version of "Hello, world!" shows a character segment with "Hello, world!" in it at the top of the window, and then down below after a one second pause.
 |
|
|
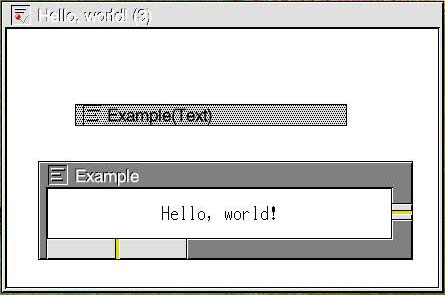
The third and final MicroScript version of "Hello, world!" is also recycled from the TRON Web article titled "More on MicroScript Segments." It makes a virtual object appear, opens a real object linked to it in which "Hello, world!" has been written, flashes it on the screen for four seconds, closes the window within the window, and then makes the virtual object disappear from the screen. The important thing to remember here is that these operations are very easy to carry out, because the BTRON operating system is based on a hypertext file system. Accordingly, placing one file inside another file is easy even for beginners. In the above illustration, "Hello, world!" is written into a text file, but a graphics file with the same message painted into it could just as easily have been made to appear.
| MicroScript script "Hello, world!" (3) |
VERSION 3 PROLOGUE SLEEP 1000 APPEAR Example SLEEP 1000 VOPEN Example SLEEP 4000 VCLOSE Example SLEEP 1000 DISAPPEAR Example END |
Please note that in this version, we have introduced the VOPEN and VCLOSE statements. These open and close virtual objects that are linked to various real objects, which are called files in other operating systems. In the Cho Kanji operating system, in addition to word processing and graphics applications, there is also a Web browser, a card database, and a spreadsheet.
Now that we have introduced the customary first program that all programming courses have in common, let's expand on it a little and introduce some more things that MicroScript can do. In fact, let's try to create a practical script, but first, let's go back and expand on the first "Hello, world!" script with our newly acquired knowledge and a slight twist on it. Let's also introduce some good programming habits.
| MicroScript script "Hello, world!" (4) |
# This script flashes "Hello, world!" in the control message # panel for two seconds and then makes it disappear. VERSION 3 PROLOGUE MESG "Hello, world!" SLEEP 2000 MESG END |
In "Hello, world!" (4), we have added descriptive remarks above the script using the # symbol. This tells the interpreter to ignore everything that follows. This symbol can also be added on the same line as an executable statement, if necessary, just make sure that it comes after what is to be executed. In longer scripts, the preliminary remarks would begin with a script title, followed by the name of the person who created it and a copyright statement, which could either claim exclusive copyright privileges or extend them free of charge to others. The script itself would have remarks throughout it, which, if well written, would enable other programmers to easily understand, maintain, and even expand the functionality of the script.
As for new functionality, in "Hello, world!" (4), we have given the means through which one can erase a message in the system message panel. Simply write MESG with nothing next to it, and the system message panel will be cleared. When learning a new programming language, it is best to learn statements in pairs. That will allow you to turn off things. Never forget, a computer is a machine, and if you don't tell it to stop doing something, it will continue doing it until the power is turned off.
| MicroScript script "Window Size" |
# Window Size # # This script flashes "Dimensions (W x H):" plus the actual # window width and height dimensions in the control message # panel for three seconds and then makes them disappear. VERSION 3 PROLOGUE MESG "%s %d, %d" "Dimensions (W x H):" $WDW, $WDH SLEEP 3000 MESG END |
In the next MicroScript script, "Window Size," we have at last introduced a script that can do something useful, i.e., it informs us of the width and height of the work area inside the MicroScript program window. It is almost the same as the previous script, except for some new things that appear after the MESG statement. Even to the untrained eye, it is obvious that %s and %d are some sort of place holders, which makes "%s %d, %d" something like a formula. Indeed, it is, and the elements that go into this formula are the character string (%s) "Dimensions (W x H):" and the decimal values (%d) of two "system variables," which stand for window width and window height, respectively.
What's important here is that by using these place holders on the left, we can change the things that go into them, which are placed on the right. For example, we can change "Dimensions (W x H): " to "Window Size (W x H)." We can also place height first, and width second. No changes have to be made to what's on the left.
| MicroScript script "Pointer Coordinates" |
# Pointer Coordinates # # This script continually flashes the x and y coordinates of # the tip of the pointer in the system message panel. VERSION 3 PROLOGUE REPEAT MESG "%s %d, %d" "Coordinates (W x H):" $PDX, $PDY SLEEP 200 ENDREPEAT END |
In MicroScript script "Pointer Coordinates," we again use the formula on the left, but this time we have changed the character string to be shown in the system message panel, plus the "system variables." Instead of screen width and height, we are going to show the x and y coordinates of the tip of the pointer, and since this changes as the pointer moves, we are going to have to continually repeat this process. Accordingly, we have surrounded the MESG statement with the REPEAT and ENDREPEAT statements to accomplish this constant updating of the x and y coordinates of the pointer tip. The SLEEP 200 (stop for 200 milliseconds) is there to reduce flickering of the constantly updated coordinates in the system message panel. If you don't believe there will be flickering, erase SLEEP 200 and see what happens. Furthermore, if you are using a computer with a powerful processor, you might actually have to increase the SLEEP time.
Once you write and execute this program, you will notice that the x and y coordinates of the pointer outside the window can also be seen. This is something that cannot easily be rectified. That's because the system variables in MicroScript can only be referenced, and we cannot use a system variable as a variable in a function that would make the coordinates in the system message panel disappear when the pointer exceeds the dimensions of the MicroScript window. On the other hand, this could be a useful feature if you want to center a MicroScript window in the exact center of your screen. However, since we might not know when the pointer has overshot the dimensions of the MicroScript window, let's combine the previous script with this script into a new, larger and more functional script.
| MicroScript script "Window Surveyor" |
# Window Surveyor # # This script flashes "Dimensions (W x H):" plus the actual # window width and height dimensions in the control message # panel for three seconds and then makes them disappear. It # then continually flashes the x and y coordinates of the tip # of the pointer in the system message panel. VERSION 3 PROLOGUE MESG "%s %d, %d" "Dimensions (W x H):" $WDW, $WDH SLEEP 3000 MESG REPEAT MESG "%s %d, %d" "Coordinates (W x H):" $PDX, $PDY SLEEP 200 ENDREPEAT END |
Our final script in this chapter, MicroScript script "Window Surveyor," a combination of the two previous scripts, is a demonstration of the important point that was made at the end of the previous chapter--a big program is made up of small programs. On the other hand, it isn't a good program. A good program would not only stop flashing the coordinates of the pointer once it has passed beyond the work area of the MicroScript window, but it would also stop the repeating of the MESG statement, which uses uses up precious processor cycles, and even precious energy in a battery powered device. The above MicroScript script only stops the repeating of the MESG statement when it is doubled clicked and, as a result, terminated. So what we have here is an example of a useful, but less than perfect script.
Now, before going on to the next chapter, let's review the things that we have learn in this introductory MicroScript lesson.
|
|
A program can and should be preceded by a title, name of the programmer, a copyright statement, and comments that explain what the program does. These are written after the symbol #. In longer scripts, this symbol can also be used beside lines of script code, and between blocks of script code to explain to others what a particular portion of the script is doing. |
|
|
|
|
|
|
|
|
|
|
|
The APPEAR and DISAPPEAR statements make things (character segments, figure segments, and virtual object segments) appear and disappear in the MicroScript window. If you want something to stay in the window for some time, you can execute the SLEEP statement, which measures time in milliseconds (1000 milliseconds = 1 second). |
|
|
The MOVE statement moves things (character segments, figure segments, and virtual object segments) around on the screen. There are two types of movement: (1) movement to a relative position from a base segment, and (2) movement to a position calculated from the upper left hand corner of the MicroScript window, which means from 0, 0. The latter is specified with @ following the coordinates. |
|
|
The VOPEN and VCLOSE statements are used to open and close virtual objects, which can be embedded inside a MicroScript window. |
|
|
$WDW and $WDH are system variables that give the width and height of the work area of the MicroScript window, which does not include the frame. They can only be referenced. |
|
|
$PDX and $PDY are system variables that give the x and y coordinates of the tip of the pointing device. They can only be referenced. |
|
|
The REPEAT and ENDREPEAT statements are used to surround another statement that is to be executed for a specified number of times, or until termination of the procedure or script. In the case of the former, the number of times is placed immediately after the REPEAT statement. |
____________________
[1] For more advanced students, here's the description of how to use multiple scripts from Personal Media Corporation's Maikurosukuriputo nyuumon [An Introduction to BTRON MicroScript] (p. 370).
- Virtual object at the very rear: Here we describe the VERSION statement and variables, macro names, and procedure name definitions and declarations
- Virtual object second from the rear: Here we describe the initial processing (PROLOGUE statement) and the termination processing (EPILOGUE statement)
- Virtual object third from the rear: Here we describe the procedures that will realize the main actions of the microscript
- Virtual object fourth from the rear: Here we describe procedures that will carry out general processing that will be utilized inside other procedures; for example, processing utilized in common in multiple scenes can be conceived, such as numerical value operations that search for absolute values and the like, or such effects as a button appearing to plunge in momentarily when a button has been pressed in on the screen.
[2] On some platforms, such as BrainPad TiPO, the MESG statement cannot be used, as there is no system message panel. In such cases, we can use a character segment, named OUTPUT here, and the TEXT statement.
| MicroScript script "Hello, world!" (1a) |
VERSION 3 PROLOGUE APPEAR OUTPUT MOVE OUTPUT: 0,322 @ TEXT OUTPUT, "Hello, world!" END |
This above script outputs "Hello, world!" in the lower left hand corner of a 576 x 340 MicroScript window (notice the difference in the Basic Figure Editor and MicroScript window frame widths). To make the OUTPUT character segment, select character input from the tool panel, type the space bar about 20 times, and then group that character field together with @OUTPUT to make a character segment.
The final script above, "Window Surveyor," would be as follows if one were to use a character segment named OUTPUT, plus the TEXT statement.
| MicroScript script "Window Surveyor" |
VERSION 3 PROLOGUE APPEAR OUTPUT MOVE OUTPUT: 0,322 @ TEXT OUTPUT, "%s %d, %d" "Dimensions (W x H):" $WDW, $WDH SLEEP 3000 REPEAT TEXT OUTPUT, "%s %d, %d" "Coordinates (W x H):" $PDX, $PDY SLEEP 200 ENDREPEAT END |
Incidentally, if you would like OUTPUT to appear in the upper left hand corner, you use the SCENE statement, instead of the APPEAR and MOVE statements.
[3] If you haven't read this article, please do so. Also, please read the article titled "A Taste of MicroScript," which precedes it.
Copyright © 2011 Sakamura Laboratory, University Museum, University of Tokyo