
In this "Put into Practice," after the reader first obtains a T-Engine development kit, I shall explain following in order the things to prepare for program development. After that, we will create a very simple program to run on top of T-Engine, and then try to actually make it run. When this is done, the reader will become able to attempt in various ways multitask programming using the functions of T-Kernel.
T-Engine development kits use the products of Personal Media Corporation. Furthermore, as a condition for the explanations, I am assuming that the reader is using standard T-Engine.
As for the preparations to be carried out, they are:
Before beginning the preparations, please prepare a work disk that we use by installing it on T-Engine (an ATA card or a Compact Flash card plus a PC card adapter). I shall explain the method for using this later.
Preparing a Linux PC
For people who have been developing embedded systems up to now using a Windows personal computer, telling them to first use a Linux PC might become a barrier. I would like you to persevere here, and ask you to please make yourself capable with file operations and editors (we use editors called vi, emacs and gedit). Although it is a little off topic, if one asks if the T-Engine development environment definitely has to be Linux, this is not so. Various development environments have already been announced from each vendor. However, it has been planned to use GNU tools and a UNIX-type operating system as the standard development environment. We are doing this in this manner from the realization that a development environment that will serve as a reference is necessary in order to achieve the T-Engine goal of distributing middleware.
Linux is being offered from various distributors, but because it has been confirmed that Personal Media's T-Engine developments kits run with "Red Hat Linux 7.1," it would probably be good for people who are going to install Linux in a PC after this and for people who don't have much experience using Linux to use the Red Hat line.
And then, please be careful when selecting a PC, because it is necessary to have a serial port attached to the PC in order to run programs on a board using a development kit.
Installation of the Development Environment in a Linux PC
The procedure is as follows:
(1) Create a directory in which to install the development environment.
% mkdir /usr/local/te
We make /usr/local/te the directory name. This is in order to combine it with the script contents we will use when we build a program.
(2) Copy the necessary files from the CD-ROM.
We copy the following the following three files into /usr/local/te. These files are located inside the soft directory in the CD-ROM. (In the explanations hereafter, please read them after appropriately replacing sh with vr5, in the case of the VR5500 version, sh with arm, in the case of the ARM version, etc.)
Copying of the files from the CD-ROM is carried out either by using the GUI, or by copying with the cp command after mounting the CD-ROM.
Ex.:
(3) Expand the files.
We expand the package in the /usr/local/te directory.
Ex.:
(4) Copying of the tools
We copy the contents of /usr/local/te/tool/etc into /usr/local/te/etc.
% cp -r /usr/local/te/tool/etc /usr/local/te
(5) Upgrading the version of the software
Version upgrade information is listed at http://www.personal-media.co.jp/te/support/welcome.html, which is Personal Media's user support page. If there is a newer release than the release number on the CD-ROM of the development kit you obtained, download it and update. However, because there is also rather difficult work, such as updating the flash memory on the board, in updating the version, I don't mind if you postpone the version upgrade and move ahead here.
(6) Confirmation of GNU make (gmake) and perl
The tools listed below are needed in order to utilize the development environment. The version need not necessarily be the same. Normally, when we install Linux in a PC, these are installed simultaneously.
Incidentally, we use GNU make (the gmake command) to build a program. Perl is used in executing a script at build time.
(7) Creating a perl symbolic link
In a case where perl is not in the /usr/local/bin directory, we create a symbolic link to perl from /usr/local/bin.
This is because we describe the perl path as /usr/local/bin/perl inside the scripts we use at build time.
(8) Communication port permission
We set the permission of the serial port we use to communicate with the board. Normally, COM port 1 is made into a device called dev/ttyS0 in Linux.
Ex.:
% chmod 666 /dev/ttyS0
Setting the Linux PC Environment Variables
We set the environment variables by matching them to the shell we use. If we use "echo $SHELL," we can tell the shell that exists after login.
Ex. in the case of csh (tcsh):
% setenv BD /usr/local/te
% setenv GNUs /usr
% setenv GNU_BD $BD/tool/Linux-i686
(in the case of the SH7727 version)
% setenv GNUsh $GNU_BD/sh-unknown-tkernel
(in the case of the VR5500 version)
% setenv GNUvr $GNU_BD/mipsvr5el-unknown-tkernel
(in the case of the ARM version)
% setenv GNUarm $GNU_BD/arm-unknown-tkernel
It is convenient to describe this for later use in .cshrc (.tcshrc).
Ex. in the case of bash:
% export BD=/usr/local/te
% export GNUs=/usr
% export GNU_BD=$BD/tool/Linux-i686
(in the case of the SH7727 version)
% export GNUsh=$GNU_BD/sh-unknown-tkernel
(in the case of the VR5500 version)
% export GNUvr=$GNU_BD/mipsvr5el-unknown-tkernel
(in the case of the ARM version)
% export GNUarm=$GNU_BD/arm-unknown-tkernel
It is convenient to describe this for later use in .bashrc.
Confirmation of Build Operations
By means of the operations up to here, an environment to build execution programs on top of Linux PC will have been prepared. Let's try to build and confirm the running of a program once here.
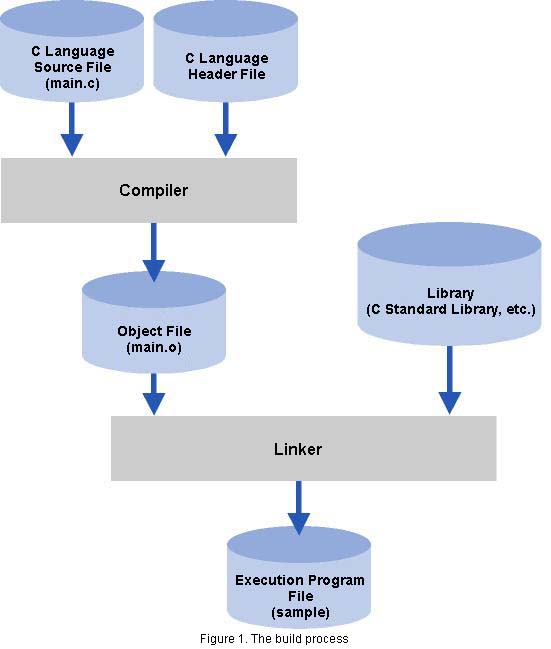
If you ask what build is, it is the compiling and linking of a program that the user created and the creation of code that the CPU can execute. In Figure 1, I show the build flow. We compile the source code the user created (here, main.c), and we generate an object file (main.o). And then, we link the necessary library functions and generate an execution file.
In the development kits, it has been arranged so that this is automatically executed with the command called "gmake." In regard to the message displays at build time, please refer to the column "Build in Practice."
(1) Copy the T-Kernel base sample program in each directory.
% cp -r /usr/local/te/kappl/sample /usr/local/te/kappl/test
Note: In case you are using the CD-ROM of the SH7727 version Rel1.01, there is no directory called kappl/sample. Please carry out the version upgrade explained a little while ago, or please copy and use the kappl/drawsamp directory instead.
(2) Move to the build directory of the copy destination.
% cd /usr/local/te/kappl/test/sh7727 (SH7727 version)
% cd /usr/local/te/kappl/test/vr5500 (VR5500 version)
% cd /usr/local/te/kappl/test/slc38k (ARM version)
(3) Build.
% gmake
The gmake command carries out compiling and linking of the specified program in accordance with the contents of "Makefile" (actually, made into a link to ../src/Makefile) in the build directory.
(4) If the main.o, sample.map, and sample files have been made, it's okay.
If it was not possible to generate these files, please try confirming the operations from the initial point of installing the development environment. In case you have copied and used the kappl/drawsamp directory in Note (1), the files drawsamp.map and drawsamp will be be made.
Build in PracticeThe gmake command, in accordance with the specified contents of 'Makefile', carries out the necessary processing to generate an execution program while checking the date and time of modifications to files. Below, I show (a portion of) the messages displayed at build time, and I briefly introduce their processing.
Furthermore, by adding
in the place for options in 'Makefile', one can see the detailed execution process when carrying out build. In a case where we will build a second time, we do it in the manner in which we execute 'gmake' after executing 'gmake clean' and deleting the object files. |
Connecting T-Engine and the Linux PC
Next, we shall set of the T-Engine board's DIP-SW, and connect the board and the Linux PC.
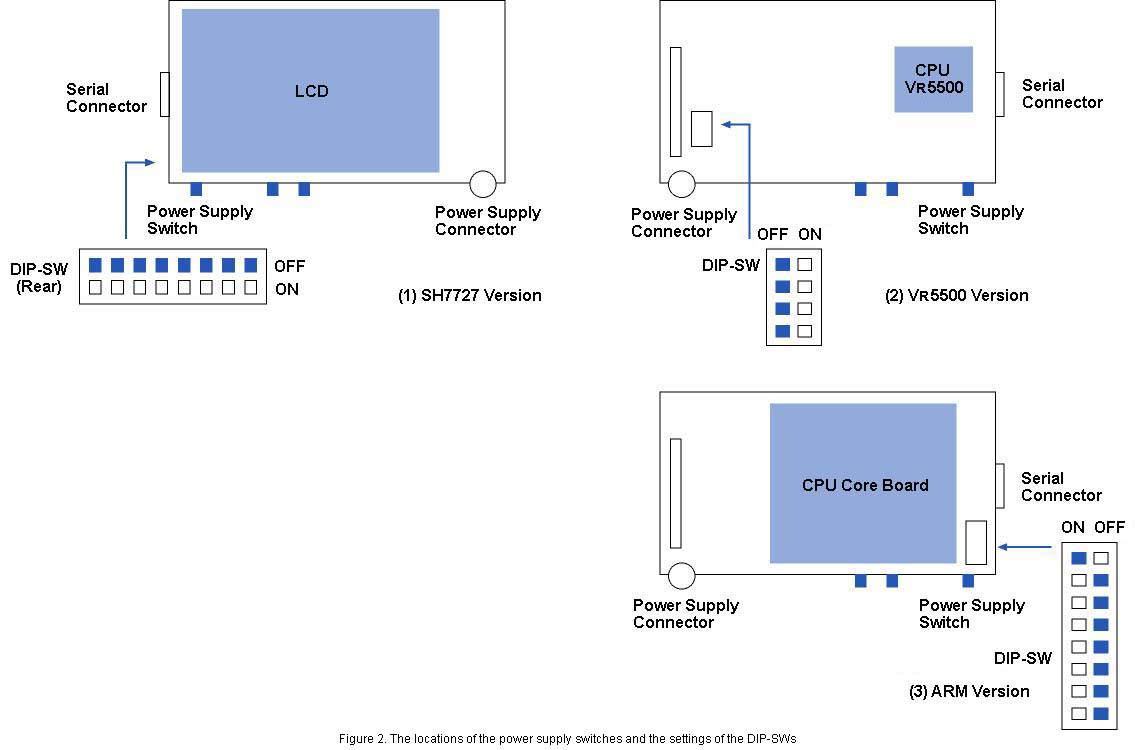
(1) Setting the DIP-SW (DIP switch) on the board.
The settings we will carry out here are "automatic startup from the disk" and "serial communication speed 38,400 bps." I show the DIP-SW locations and settings on each board in Figure 2.
Note: For the serial communication speed, there isn't necessarily any need for 38,400 bps, but in order to carry out later explanations smoothly, we will set it to 38,400 bps here.
(2) Connecting the serial cable and the power supply cable
Connect the board and the Linux PC with the serial cable. Also, using the power supply cable, connect the board to an AC electrical outlet.
(3) Start up "gterm" on the Linux PC
Specify the parameters for the serial device name that will be used with the Linux PC (COM port) plus the communication speed, and then start up "gterm." Specify 38,400 bps for the communications speed.
Ex.:
% /usr/local/te/etc/gterm -1/dev/ttyS0 -3
<< Gterm ver 2.07:020806>>
Notes: "gterm" is software that carries out things such as command input and file transmission to T-Engine.
The COM1 port normally becomes /dev/ttyS0. The -3 indicates the communication speed of 38,400 bps.
In the parameters, no space is inserted between "-1" and "/dev/ttyS0."
In (3), we make it so that we start up gterm in the directory where we executed gmake for when we execute a sample program later.
(4) Turn on the T-Engine power supply switch.
Push the power supply switch continuously for 0.5 second or longer. Please refer to Figure 2 for the location of the power supply switch. When the power supply comes on, various startup messages are output in the window where we started up "gterm," and T-Engine enters a status in which the
[/SYS]%
prompt is displayed. This is the command input wait status of a program called the Command Line Interpreter (CLI). If the messages haven't been displayed, then please check the following.
- Is the cable securely connected?
- Does the serial device name match when you start up gterm?
- Hasn't the serial port been disabled in the the Linux PC BIOS settings?
- Hasn't a memory card been entered into the PC card slot? There are cases where it doesn't start up if the inserted card has been created as a startup disk, and also if there is an error or the like in the contents.
(5) Creation of a work disk to be used with T-Engine (using an ATA card or CF card)
A work disk is needed to store execution programs that we have built with the Linux PC. Insert a work card in the PC card socket of the T-Engine board, and create a partition and format using the following procedures. Furthermore, because the contents of the card are cleared with this operation, please be careful.
Creating a partition
[/SYS]% hdpart pca ← Input command
pca [C:249 H:4 S:16 B:16000 (7MB)]
(Display omitted)
**Create/Delete/Boot/Edit/Quit?c ← Input 'c'
Create PartNo(1-4)?1 ← Input '1'
Size[MB] (<8MB)? ← Return key only
No System Boot StartCHS End CHS SecNo SecCnt MB
(Display omitted)
**Create/Delete/Boot/Edit/Update/Quit?b ← Input 'b'
Boot PartNo(1-4)?1 ← Input '1'
No System Boot StartCHS End CHS SecNo SecCnt MB
(Display omitted)
**Create/Delete/Boot/Edit/Update/Quit?u ← Input 'u'
**pca:Update Master Boot Block
Format
[/SYS]% format pca0 WORK ← Input command
(Display omitted)
[/SYS]%
Note: In a case where the system is started up from a card that was created as a startup disk, there are instances when commands such as hdpart cannot be executed. In a case where the card is reformatted, we do things in a manner in which we insert the card in the board after turning on the power supply switch in a state in which the card has been removed.
Executing a Sample Program
By means of everything up to here, the preparations are complete. Here, for a test, let's try downloading to T-Engine and executing the sample program we built a while ago.
(1) Downloading of the sample program
Transfer the execution program built on the Linux PC to the ATA card or CF card on T-Engine. Use the work disk that we created a while ago. First, connect the work disk as the file system with the att command.
[/SYS]% att pca0 A
'A' shows the connection name.
Change the current directory to the work disk.
[/SYS]% cd /A
[/A]% ← Prompt changes
Download the sample program using the recv command.
[/A]% recv -d sample
Target:sample
. . [sample: bytes]
The -d option of the recv command is an overwrite option in case there's a file with the same name.
Note: In case you have used kappl/drawsamp directory instead of kappl/sample when you built the sample program, you input "recv -d drawsamp."
(2) Starting up and terminating of the sample program
Start up the downloaded program using the lodspg command.
[/A]% lodspg sample
hello(ac=1)
av[0]= 'sample'
SYSPRG sample[5]xxxxxxxx-xxxxxxxx
lodspg is a CLI command that executes a program created on a T-Kernel base.
In case you have used kappl/drawsamp directory instead of kapple/sample, input "lodspg drawsamp."
The display of hello (ac=1) , etc., show the program of "kappl/sample/src/main.c."
Terminate the program using the unlspg command
[/A]% unlspg 5
hello(ac=-1)
[/A]%
The argument '5' specifies the number inside the [ ] of 'SYSPRG . . [5]' that was displayed at the time of the execution of the lodspg command. This is a different number from other programs that we have executed previously.
The lodspg command loads a program into memory and executes it, and the unlspg command unloads a program and releases the memory. For details, please refer to "The lodspg Command and the unlspg Command" column.
The lodspg Command and the unlspg CommandT-Engine supports the dynamic loading (dynamic load) of middleware and applications as a scheme to realize middleware distribution. In many embedded systems up to now, the memory location on the target board in which the progam is to be placed has been decided at the build time of the execution program. In this case, when later adding middleware to the system, or when changing to middleware with higher level functions, it is necessary to build the program over again. In addition, things such loading new middleware via the network and using them are also difficult. T-Engine handles each middleware as one subsystem, and it provides as a function a framework that makes its loading and unloading possible. In T-Engine, normally, we create a subsystem as a program that runs on T-Kernel. And then, what loads the subsystem from a disk, etc., into resident memory and makes it commence execution is the lodspg command. Conversely, the unlspg command makes the subsystem process termination, and it carries out processing that releases the memory in which the subsystem was resident. The specific processing details of the lodspg command and the unlspg command are as follows. If you look at these, I think you will be able to understand the messages that are displayed at the startup and termination of sample programs.
|
Cleaning Up
With this, normal operations are finished. I wonder if you were able to make it run smoothly.
Input .q and terminate "gterm," which was used in communicating with T-Engine.
[/A]% .q
<<exit gterm>>
% ← Returns to Linux shell
Cut the power supply by continuously pressing for two seconds or longer the power supply switch of T-Engine.
Finally, for safety, let's pull out the power supply plug for safe keeping.
The next time when the system is restarted, commence from att command execution (there is no need to recreate a work disk).
Up to here, I have explained the program development environment preparations and their methods for execution. Continuing on, I shall give a simple program example that utilizes the functions of T-Kernel, and I shall explain the typical structure of a program that runs on T-Kernel and the ways of using the related development kit.
Program 1#include <stdio.h>
#include <basic.h>
#include <tk/tkernel.h>
IMPORT void task1( INT, VP );
ID tskid1 = -1;
/*
* main
*/
EXPORT ER main( INT ac, UB *AV[] )
{
T_CTSK ctsk; /*task creation information*/
ER err;
printf("main: ac=%d\n", ac);
if ( ac < 0 ) {
if (tskid1 >= 0) {
tk_ter_tsk(tskid1);
tk_del_tsk(tskid1);
}
goto ext; /*at the time of unload unlspg*/
}
/*task 1 creation, startup*/
ctsk.exinf = 0x74736574; /*extended information*/
ctsk.tskatr = TA_HLNG | TA_RNG0; /*task attributes*/
ctsk.task = task1; /*task startup address*/
ctsk.itskpri = 80; /*priority at time of task startup*/
ctsk.stksz = 1024 * 4; /*stack size*/
tskid1 = tk_cre_tsk( &ctsk ); /*task creation*/
printf("tk_cre_tsk: tskid=%d\n",tskid1);
if (tskid1 < E_OK) goto ext; /*task creation failure*/
tk_sta_tsk(tskid1, 0); /*task startup*/
/*end*/
ext:
return 0; }
/*
* task1 wake up every 10 seconds and display print
*/
EXPORT void task1( INT stacd, VP exinf )
{
} |
The Structure of a Program that Runs on T-Engine
Program 1 is a program that displays a message every 10 seconds. It consists of program startup, a main function that carries out termination processing, and a task that forms the execution main body (function name: task1).
The structure of the main function is basically as follows:
EXPORT ER main( INT ac, UB *AV[ ] )
{
if(ac<0) { /*call at the time of inlspg*/
Program termination processing
} else { /*call at the time of lodspg*/
Program startup processing
}
return 0;
}
If you read "The lodspg Command and the unlspg Command" column, I think that you will understand the relation with the structure of the main function. For example, all we need do is write a description so that program startup processing creates the resources required in program execution, and program termination processing deletes and releases those resources. In Program 1, the startup processing portion creates and starts up the task, and the termination portion deletes the task.
Incidentally, in Program 1, among the T-Kernel system calls,
are used. I will not explain the system calls here, but, as an item related to the development kit, I will put down a supplemental explanation of the tk_cre_tsk parameters.
ctsk.exinf = 0x74736574; /*extended information*/
When we execute the ref_tsk command of the IMS, ASCII characters (in this case 'test') are displayed. I will explain the method of using the IMS later.
ctsk.itskpri=80; /*priority level at time of task starup*/
There is no particular reason for the value to be 80.
Program Build and Execution
Now then, let's try executing the program shown in Program 1. In the same manner as previously explained, we first copy the kappl/sample directory in each directory (make the copy address as kappl/test2). And then, rewrite the contents of kappl/test2//src/main.c into Program 1. When we execute gmake in the kappl/test/sh7727 directory, an execution program can be built.
The program downloading and execution is also carried out as previously explained. What's different is the point that even after lodspg command execution, the task wakes up every 10 seconds, and the printf contents are displayed. This is because in the main function the task that is created and started up is continuing to run. And then, by means of executing the unsplg command, the the termination processing portion of the main function is executed, and this task can be forcefully terminated/deleted.
Furthermore, after execution commences with the lodspg command, by continuously executing the lodspg command over again, we can also make the same program run multiple times. I show below how this appears (an example).
[/A]% lodspg sample ← Program started up with the lodspg command
main:ac=1
tk_cre_tsk:tskid=28
This is task 1
SYSPRG sample[5] 402a8000-402ac000
[/A]% task28:cnt=0 ← System (ID=5) displays every 10 seconds
task28:cnt=1
[/A]% lodspg sample ← Continuing on, the program is started up one more time with the lodspg command
main ac=1
tk_cre_tsk:tskid=29
This is task 1
SYSPRG sample[6]402ac000-402b0000
[/A]% task28:cnt=2 ← Display from the system (ID=5)
task29:cnt=0 ← Display from the system (ID=6)
[/A]% unlspg 5 ← When termination processing is forced on the system (ID=5), that display appears
task29: cnt=1
[/A]% unlspg 6 ← When termination processing is forced on the system (ID=6), no display appears
[/A]%
Status Reference of T-Kernel Objects
When we use the functions of the development kit's Initial Monitor System (IMS), we can reference object data that exist in the system (please refer to the "IMS and CLI" column concerning IMS and CLI).
Below, I show an example of it (a portion of the display messages have been omitted). When you input 'exit' into the CLI, the IMS changes to command receive status. In this status, if we input an IMS command such as 'ref_tsk', we can reference the object status of T-Kernel. When we return from the IMS to the CLI again, we input '$cli !244'. Furthermore, because the command cannot be properly input if the printf character display of the program and the command input are mixed together, please input in a well timed fashion. In this example, we understand that TID=26 is a task that was generated after sample was executed, and that eninf, the ASCII string 'test', is in wait status with tk_slp_tsk.
[/A]% lodspg sample main: ac=1 tk_cre_tsk: tskid=26 [/A]% tsk26: cnt=0 [/A]% exit ← Execute exit command and move to IMS << EXIT cli >> [IMS]% ref_tsk ← Execute ref_tsk command TSK STATE (MAX:150) TID PRI:BPR SLT WUP SUS STS (*:NODISWAI) ST+UT(x10) RID EXINF/NAME 1 138:138 0 0 0 RUN 17+0 1 [ 1] INIT 10 80:80 0 0 0 WAI-RMBF [ 3] 1+0 1 75425355 USBu 11 80:80 0 0 0 WAI-ACP [ 2] 0+0 1 64425355 USBd . . more(y/n) ← Input 'y' 25 100:100 0 0 0 WAI-ACP [ 4] 4+0 1 40276278 xb'@ 26 80:80 0 0 0 WAI-SLP 0+0 1 74736574 test [IMS]% task26: cnt=2 [IMS]% [IMS]% $cli !244 ← Command to return to CLI pid = 3 (pri = 244) << START cli : R5.000 >> [/SYS]% unlspg 5
On this occasion, as a T-Engine programming primer special feature, I first gave an explanation aimed principally at placing one's hands on T-Engine and trying to use it. T-Engine technical development is centered around the working groups of the T-Engine Forum (http://www.t-engine.org/), and it is vigorously being carried out to be applied to a ubiquitous computing society. For that, we are carrying out development of not just a development environment, but also security, Java, technology for the realization of embedded Linux, and, furthermore, basic technology for RFIDs (wireless tags) plus the application of these to various uses. I will happy if this special feature serves as a first step for my readers.
IMS and CLIIn the development kits, applications called an Initial Monitor System and a Command Line Interpreter (CLI) have been prepared as development tools. I show their locations in relation to the whole system in the figure. IMS The IMS is a program that is started up as the initial task in T-Kernel. It possesses the following functions.
CLI The CLI is a program that starts up as one process of the system. It possesses the following functions.
System startup at the time the development kit is switched on is carried out in the following order. (1) T-Monitor, T-Kernel, T-Extension and the necessary drives start up. (2) The IMS starts up as the initial task. (3) The IMS executes /SYS/STARTUP.CMD. As a result, the CLI starts up. When the CLI starts up, the IMS changes to its wait exit status. For that reason, when we input the exit command into the CLI, execution returns to the IMS. Also, when we input an execution file with '$' attached to the beginning of it, that execution file is started up as a process. That's because execution moves to the CLI again when we input '$cli ! 244' into the IMS. Incidentally, in looking at the contents in /SYS/STARTUP.CMD, we input:
When one looks at these contents, I think he/she will understand that we have started up the CLI after we have started up several subsystems at the time of system startup. 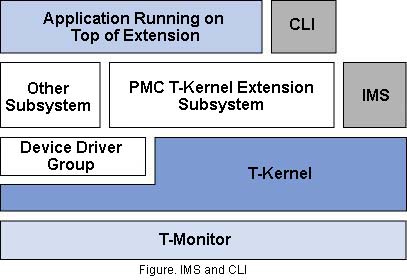 |
About µT-EngineIn this article, I have given explanations using the standard T-Engine development kit. Here, I will briefly touch on what happens on µT-Engine. At the time of the writing of this article, the VR4131 and the M32104 had been turned into µT-Engine products. On the VR4131, one can proceed with program development using the same operations as with the standard T-Engine. On the other hand, on the M32104, there is both the fact that the CPU doesn't support an MMU, and the method for running an execution program is different. Specifically, things of the following nature are different. (1) We specify the memory placement location of the program at build time. (2) We download the execution program directly into memory using the functions of T-Monitor. (3) We specify the execution start address using the lodspg command of the IMS to execute the program. The development environment preparations and the build and execute methods of the sample programs are basically the same as in the case of the standard T-Engine. We write into flash ROM programs that we have finished debugging, from where we can also use them. |
Copyright © 2003 Personal Media Corporation
Copyright © 2003 Sakamura Laboratory, University Museum, University of Tokyo