The same software and development environment of the T-Engine development kits and µT-Engine development kits up to now have all been included in Teaboard so that things such as software development for T-Engine and T-Kernel learning and practice can be carried out smoothly.
In this article, we will give an explanation centering on the software and development environment attached to Teaboard [Note 1].
The software below has been attached to Teaboard.
Target Use
Development Machine Use
Below we shall briefly explain the contents of the various software.
PMC T-Monitor
PMC T-Monitor is a monitor based on the T-Monitor specification decided on by the T-Engine Forum. A monitor is a CPU and hardware operating environment that runs outside of OS management.
PMC T-Monitor is loaded into ROM, and it provides the following various types of system initialization functions, debugging functions, and monitor service functions.
System Functions
- Hardware initialization
- System startup
- Exception, interrupt, and trap processing functions
Debugging Functions
- Memory operations
- Register operations
- I/O operations
- Disassembler
- Program and data loading
- Program execution
- Break point operations
- Trace executions
- Disk read-in, write-in, and boot
Program Support Functions
- Provision of monitor service functions
From the fact that T-Monitor carries out hardware initialization and T-Kernel startup at the time of Teaboard startup, one could also say that T-Monitor shoulders PC BIOS like work. Moreover, even a function that updates the Flash ROM is included.
Furthermore, in addition to the same functions as the PMC T-Monitor that is included in the normal T-Engine development kits, the PMC T-Monitor that is attached to Teaboard possesses a function that connects to a debugging console via the USB.
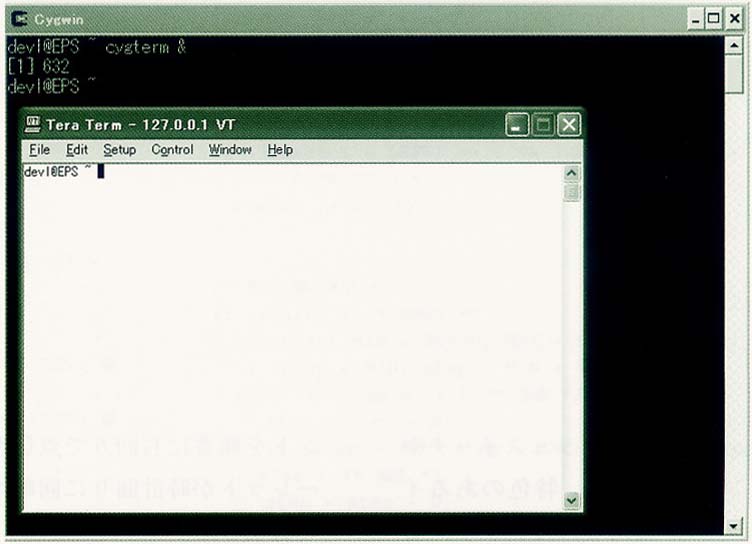
In a case where we will use Teaboard interactively, we we carry out operations from a development machine connected to Teaboard. We show in Fig. 1 the appearance of a user operating T-Monitor on top of the host machine's console.
 |
|
|
PMC T-Kernel
PMC T-Kernel is a real-time kernel based on the T-Kernel specification decided on by the T-Engine Forum.
PMC T-Kernel is made up in the following configuration.
T-Kernel OS (Operating System)
- Task control functions
- Intertask synchronization and communication functions
- Memory management functions
- Exception and interrupt control functions
- Time management functions
- Subsystem management functions
T-Kernel SM (System Manager)
- System memory management functions
- Address space management functions
- Device management functions
- Interrupt management functions
- I/O port access support functions
- Power saver function
- System configuration information management function
T-Kernel DS (Debugger Support)
- Referencing of the internal state of the kernel
- Execution trace
Furthermore, although what we generally call T-Kernel indicates the entirety that includes the three things mentioned above (T-Kernel/OS, T-Kernel/SM, and T-Kernel/DS), there are also cases where we call only T-Kernel/OS T-Kernel (in the narrow sense).
In regard to the functions of PMC T-Kernel also, the same things as PMC T-Kernel of the ordinary T-Engine development kits are used.
PMC T-Kernel Extension
PMC T-Kernel Extension is also called basic middleware for development; it is extended parts of the OS built utilizing the subsystem functions of T-Kernel/OS.
In concrete terms, it includes the following functions.
By means of these extensions, we have realized an OS that supports virtual memory, and which is made up so that it can utilize files and processes as a development environment.
In regard to PMC T-Kernel Extension also, the same things as PMC T-Kernel Extension of the ordinary T-Engine development kits are used.
Device Drivers
The following device drivers, which are based on T-Kernel/SM device management functions for Teaboard use, are included.
In regard to the disk driver, one compatible with Teaboard hardware has been prepared. Furthermore, when an expansion board is mounted, outside of those mentioned above, such things as a USB manager, a screen (display) manager, and keyboard and pointing device drivers will be added.
Applications for Development Use
As applications for development support, various types of tools to support developers are provided.
IMS (Initial Monitor System)
This is a program that starts up as a T-Kernel initial task, and it possesses the following functions.
- Reference/control of the various states of T-Kernel through commands
- Loading/unloading of system programs (subsystems)
- Execution of system programs (processes)
- Execution of command files
- Automatic execution of the system's initial startup command file STARTUP.CMD
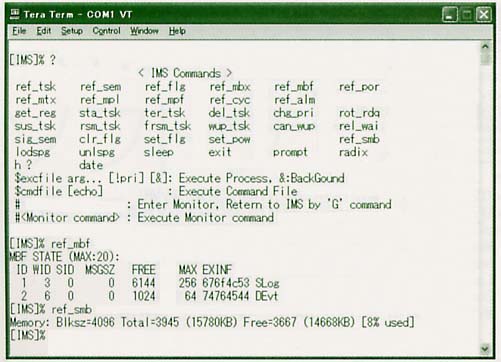
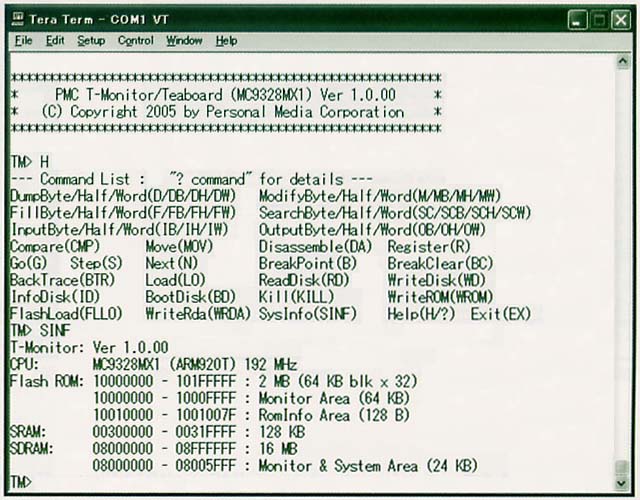
In a case where we use the IMS interactively, we operate from a development host machine connected to Teaboard. We show in Fig. 2 the appearance in which we are controlling the IMS on the host machine's console.
Figure 2. IMS (Initial Monitor System) CLI (Command Line Interpreter)
This is a program that starts up as one process of the system, and it possesses the following functions.
- Various types of operations centered on files based on commands
- Loading/unloading of system programs (subsystems)
- Execution of application programs
- Execution of command files
We operate the CLI also in the same manner as the IMS from a development host machine connected to Teaboard. We show in Fig. 3 the appearance in which we are controlling the CLI on the host machine's console.
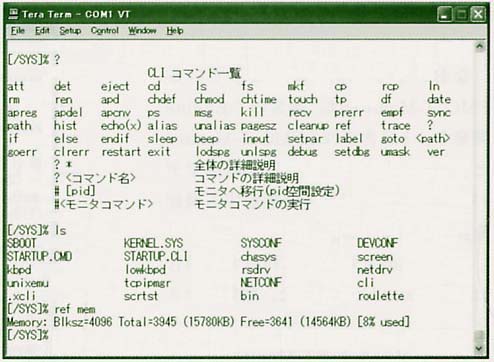 |
|
|
Utilities
Such things as a formatter, various other types of development tools, and a test program are included.
Sample Applications for Learning
Abundant sample programs have been prepared for the purpose of beginning programming on T-Kernel, and learning real-time programming and methods for accessing various types of hardware.
GNU Base Cross Development Environment
As a Teaboard development environment, we provide a GNU base cross development environment that runs on Linux, and Cygwin on top of Windows [Note 2]. It's compatible with RedHat Linux, and the latest version of Cygwin. Because even the source for the cross development environment itself is provided, it is also possible for the user to reconstruct the development environment, matching it to the user's own environment.
We will explain in detail in the next article the actualities of development using a cross development environment.
In this section, let's try taking a look in concrete terms at the procedures up to actually beginning software development after having obtained Teaboard. First, to begin with, we will introduce the procedures through with we install the development environment in Cygwin on top of Windows XP, and then utilize the Cygwin version of the cross development environment.
Cygwin Setup
For Cygwin setup, there are two methods.
- Directly installing from the network
- Installing after downloading the package to the local hard disk from the network
Here, we will carry out setup with the latter method.
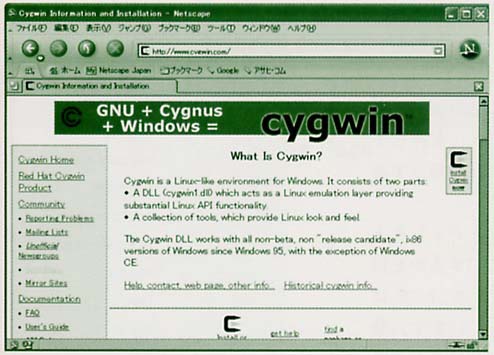
Figure 4. Cygwin's Web page having been accessed Downloading Cygwin
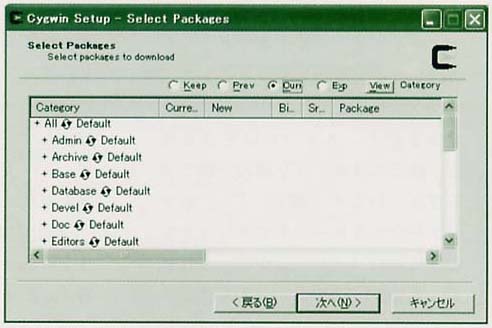
(1) First, start up your browser and then access the Cygwin Web page (http://www.cygwin.com/). The Cygwin Web page will appear on your browser (Fig. 4). (2) Click the link that says "Install or update now!" that is inside the Cygwin Web page. The Cygwin installer will be downloaded. Save the installer in an appropriate place. (3) Double click the saved installer (setup.exe). The installer will start up. (4) Click [Next (N) >]. A screen inquiring about the installation method will appear. (5) Select "Download from the Internet," and then click [Next (N) >]. A screen to specify to the location to save the downloaded files will appear. (6) Input the location where the files will be saved, and then click [Next (N) >]. A screen to select the method for connecting to the Internet will appear. (7) Select a suitable connection method matched to your individual environment. Normally, you can connect with "Direct Connection." After specifying the connection method, click [Next (N) >]. A screen to select the download site will appear. (8) Basically, you can download from whichever site, but in order not to aimlessly increase network traffic, select a site that is close in terms of network topology. Once you have selected a site, click [Next (N) >]. A screen for selecting the package will appear. (9) Here, select the files that you will install. Only the selected files will be downloaded. At this point in time, things have yet to be installed. In the beginning, things are displayed with a category classification (Fig. 5). When you click the "+" mark with the mouse cursor, individual packages will be displayed. When you click the circular mark with two arrowheads, the display changes from "Default" → "Install" → "Reinstall" → "Uninstall" → "Default." The selection state at first is "Default," but because there are insufficient files with "Default" as is, set to "Install" individually. In accordance with Table 1, please install the minimum necessary packages (it is set up so that even files with dependency relationships are automatically installed by clicking on the mark with two arrowheads of the individual packages). (10) When the download is finished, a "Download Complete" dialog box will be displayed. Click "OK." The installer will terminate for the time being.
Figure 5. Package selection screen
Table 1 Packages to Download Category Package Base All Devel
- autoconf
- autoconf-devel
- autoconf-stable
- automake
- automake-devel
- automake-stable
- binutils
- bison
- byacc
- flex
- gcc
- gcc-core
- gcc-g++
- gdb
- libncurses-devel
- libtool
- libtool-devel
- libtool-stable
- make
Editors
- ed
- vim
Interpreters
- m4
- perl
Utils
- clear
- patch
Installing Cygwin
As the downloading of the packages has been completed, we will next carry out the actual installation work. Furthermore, as to installation, please carry it out under administrator authority.
(1) Double click the installer (setup.exe). The installer will start up. (2) Click [Next (N) >]. A screen inquiring about the installation method will appear. (3) Select "Install from Local Directory" and then press [Next (N) >]. A screen specifying the root directory will appear. (4) The installer will specify where on top of Windows it is making the root directory for Cygwin. By default it becomes "C:\cygwin." If you have no particular problem with this, make it the default as is and leave it like that. For "Install For," select "All Users," for "Default Text File Type," select "Unix," and then press [Next (N) >]. A local directory selection screen will appear. (5) The directory into which the installer downloaded the previous packages has been automatically set. Click [Next (N) >] as is. After a file check has been carried out, there will be a screen for selecting the packages. (6) Select the same files as those when you carried out file download, and then click [Next (N) >]. The installation will commence. (7) At the last stage of the installation, you can select whether or not you want to create an icon on the desktop and in the start menu. For simplicity, specify so as to create the icons. (8) At the end, an "Installation Complete" dialog box will appear. Click "OK." The installer will terminate. By the above, the installation of Cygwin is complete.
Settings after Installing Cygwin
(1) Once the installation of Cygwin is finished, we log in as the user who will actually use Cygwin on top of Windows. (2) Double click the "Cygwin" desktop icon and start up Cygwin. At the time of the first startup, a user home directory will be initialized. (3) We arrange several environments for Teaboard development use. First, we paste a symbolic link for make so that make will start up with gmake. (4) We paste a symbolic link from /usr/local/bin to usr/bin/perl so that perl will start up with /usr/local/bin/perl. (5) In accordance with need, and so that it will be easy to use, we arrange the environment by editing home/ user's name /.bashrc. By the above, an environment in which we will carry out make for programs has been arranged.
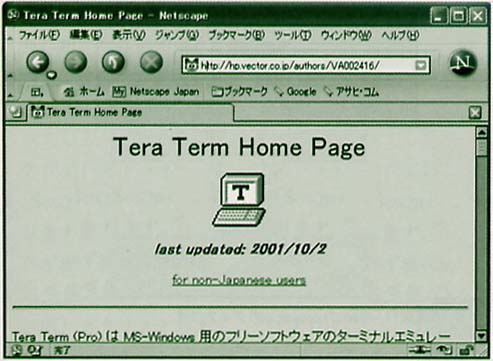
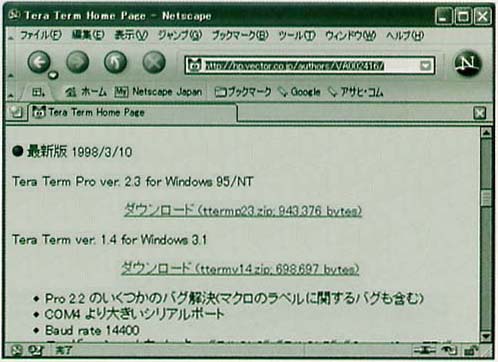
Figure 6. Tera Term Pro Web page Installing Tera Term Pro
Tera Term is terminal emulator software for Windows. We connect it with CygTerm of a telnet server that we will install in the next section, and then it functions as a telnet client. In addition, we also use it as a Teaboard console.
(1) First, we download the Tera Term package. Access the Tera Term Web page (http://hp.vector.co.jp/authors/VA002416/) with your browser (Fig. 6). [TN 1] (2) Download the latest version of Tera Term Pro (ttermp23.zip), which is at the bottom of the same page (Fig. 7). (3) The package is in zip format. After unpacking it, click on the "setup.exe" that has been entered into the package, and then install in accordance with the installer's instructions.
Figure 7. Downloading the latest version of Tera Term Pro Tera Term Pro Settings
Besides utilizing Tera Term as a debugging console for Teaboard, we also utilize it as a telnet terminal for operating cygterm, which we will explain in the next section.
Accordingly, we carry out individual settings, and then we store those settings in a settings file. This will make it so that the next time we start up the application, the saved settings file will be read in, and the resettings will automatically be carried out.
In a Case Where You Will Utilize Tera Term Pro as a Teaboard Console
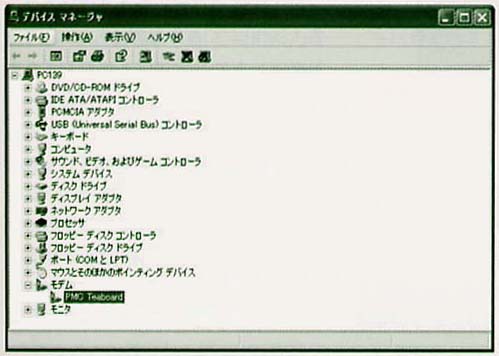
(1) Confirmation of the COM port number
Before we start up Tera Term, we confirm with the following procedures the COM port number through which Teaboard is connected.
Figure 8. Device manager
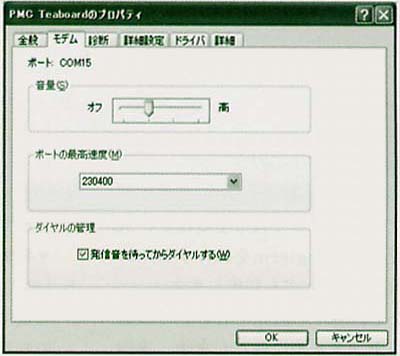
(1) Select "Start" → "Control Panel." The control panel window will appear. (2) Double click the [System] icon. The system properties window will appear. (3) Click the [Hardware] tab. The contents of the window will switch. (4) Click the [Device Manager] button. The device manager window will appear (Fig. 8). (5) Find the [Modem] icon (it's fairly down the list), and then click the [+] mark that lies on the left side of the icon. The modem devices will unfold. (6) Confirm that a device called "PMC Teaboard" exists as one of the modem devices. (7) Double click "PMC Teaboard." The properties window of PMC Teaboard will appear. (8) Click the [Modem] tab. The contents of the window will switch (Fig. 9). (9) Confirm the [Port] contents. In the example in Fig. 8, the [Port] contents becomes those called COM15.
Figure 9. Srceen of the "Modem" tab (2) Confirmation of the COM port number
In a case where the port number is greater than COM4, we change the Tera Term Pro settings file with the following procedures.
(1) Double click TERATERM.INI, which is in the folder in which Tera Term Pro was installed (the default is "C:\Program Files\TTERMPRO"), and then open it with the Memo Pad or an editor of your choosing. (2) Find the line where it says "MaxComPort=4," and change it to "MaxComPort=16." This MaxComPort can be selected with Tera Term Pro. It means the maximum COM port number. If it is normally up to COM16, we believe that that should be sufficient, but please make an appropriate change matched to the environment at hand. (3) Change TERATERM.INI and terminate.
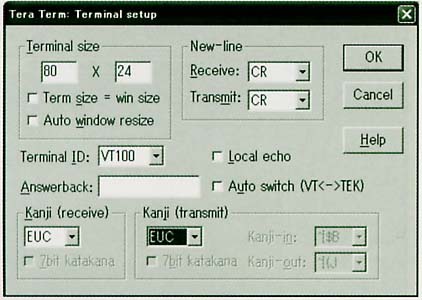
Figure 10. Terminal setup dialog box Figure 11. Serial port setup dialog box (3) Tera Term Pro settings
Finally, we carry out the settings of Tera Term Pro.
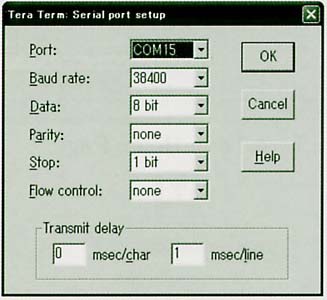
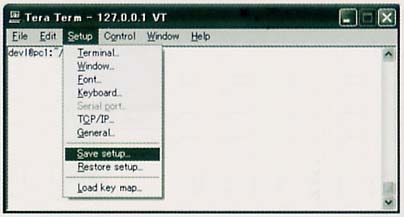
(1) Start up Tera Term Pro. The Tera Term Pro window will appear, and again a new connect selection dialog box will appear. (2) Select "Serial," and then click "OK." The new connection selection dialog box will disappear. (3) Select "Setup" → "Terminal..." The Terminal setup dialog box will appear (Fig 10). (4) Set the Kanji code for transmit and receive to EUC, and then click "OK." The dialog box will disappear. (5) Select "Setup" → "Serial port..." The Serial port setup dialog box will appear (Fig. 11). (6) Set the COM port number that connects Teaboard in [Port]. In the case of a USB connection, because the setting of the [Baud rate] is ignored, it doesn't matter whether you leave it as is at the default of 38,400bps. Also, without fail, make the [Flow control] none. Once the settings are finished, click [OK]. The dialog box will disappear. (7) Once the settings are finished, please select [Setup] → [Save setup...] (Fig. 12), and then attach a name to the settings file and save it.
Figure 12. Saving the settings In a Case Where You Will Utilize Tera Term Pro as a telnet Terminal (Use in Conjunction with CygTerm in the Next Section)
There is nothing in particular to set. Changing the settings for ease of use in accordance with need will not be a problem. After changing the settings, please select [Setup] → [Save setup...] (Fig. 12), and then attach a name to the settings file and save it.
Installing CygTerm
Because when we use Cygwin the console is a Windows console, the two-byte character code written with EUC is interpreted as Shift-JIS, and this ends up causing character corruption.
Accordingly, by running a telnet server on top of Cygwin and connecting to the telnet server with Tera Term Pro, we create an environment in which two-byte codes written in EUC are displayed normally.
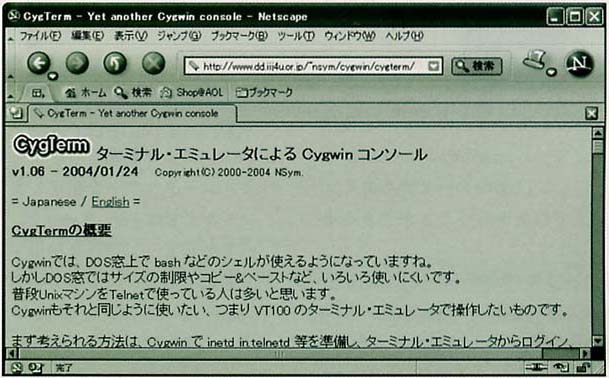
For this reason, we install a telnet server called CygTerm that runs on top of Cygwin. By using this software, it comes about that we can carry out work on top of the VT100 terminal emulator, instead of the Cygwin console.
Figure 13. CygTerm Web page
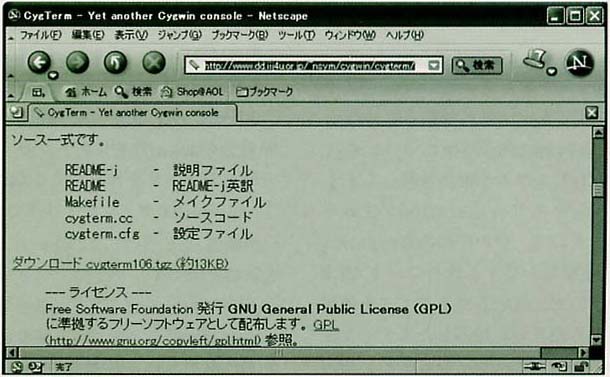
Figure 14. CygTerm download
(1) Access the CygTerm Web page (http://www.dd.iij4u.or.jp/~nsym/cygwin/cygterm/) (Fig. 13) [TN2] (2) Download the installation package (cygterm106.tgz) (Fig. 14). (3) Place the downloaded file (cygterm106.tgz) in "home/user's name," which is your home directory. (4)
- By means of cd on top of the Cygwin console, move to this directory, execute
- tar zxf cygterm106.tgz
- and expand the file.
(5)
- As the directory cygterm106 will be created, we edit cygterm.cfg, which is inside that. Because the line feed code is LF, please use a compatible editor. In a case where you don't have a compatible editor, please use something like Cygwin's vi. In the directory, cygterm.cfg is made up as in Table 2.
1.
- By means of TERM, we designate the terminal emulator software that will start up. In the default, it is made up so that we start up with settings that use Tera Term, plus Shift-JIS as the character code. Please change here to EUC.
- Moreover, in a case where you will install a later to be installed Tera Term in a place that is not the default, please revise the path also to match that.
- TERM = C:\program files\ttermpro\ttermpro.exe %s %d /KR=EUC /KT=EUC
2.
- Please set HOME to your home directory.
- ENV_2 = HOME=/home/user's name
(6) Under your home directory, please create a bin directory. (7)
- Please execute
- make
- make install
- inside the cygterm106 directory. By this, cygterm will be installed.
(8)
- Add
- PATH=$PATH:~/bin
- to .bashrc in your home directory, and the restart Cygwin.
(9)
- Once you have restarted, please execute
- cygterm &
- CygTerm will start up, and automatically Tera Term will start up (Fig. 15).
Work on Cygwin hereafter will be carried out on the Tera Term telnet terminal.
Table 2 The Default cygterm.cfg
Figure 15. Tear Term automatically starts up
Table 3 Development Environment Packages to Install with Cygwin Cygwin platform common part te.Cygwin-i686.common.04.tar.gz Cygwin MC9328MX1-compatible part te.Cygwin-i686.arm.03.tar.gz T-Kernel resource part te.resource.tbmx1.01.tar.gz Installing the Teaboard Development Environment
The development environment packages to be installed with Cygwin are in Table 3. Furthermore, the file names in Table 3, the GNU development environment version, the program versions displayed inside make of the sample program of the next section below, file sizes, and so on will change as a result of upgrades. There will be occasions where the actual results differ with the pages of this magazine. Please be understanding beforehand.
(1)
- Start up Cygwin, and then start up CygTerm from the Cygwin console.
- cygterm &
- Tera Term Pro will automatically start up. Work hereafter will be carried out on top of Tera Term Pro (we will not use the Cygwin console).
(2)
- Create a directory in which you will install the development environment. Normally, we create /usr/local/te.
- % mkdir /usr/local/te
(3)
- Expand all the GNU development environment packages in the /usr/local/te directory. In a case where the install directory is /usr/local/te, we copy the package files
- te.Cygwin-i686.common.04.tar.gz
- te.Cygwin-i686.arm.03.tar.gz
- te.resource.tbmx1.01.tar.gz
- into /usr/local/te (on Windows it's C:\cygwin\usr\local\te), and then we expand them with the following commands.
- % cd /usr/local/te
- % tar zxpf te.Cygwin-i686.common.04.tar.gz
- % tar zxpf te.Cygwin-i686.arm.03.tar.gz
- % tar zxpf te.resource.tbmx1.01.tar.gz
Through the above, the installation of the T-Engine development environment is finished.
Testing the Development Environment
Once the development environment is prepared, we conduct a test as to whether or not it can compile.
(1) Move to the directory /usr/local/te/kappl/sample/tbmx1 (we carry out the operation on top of Tera Term Pro in the same manner as the previous section). (2) Carry out Make with the gmake command. The compiling and linking of the program will proceed in accordance with the contents of Makefile. (3) If the files main.o, sample, etc. have been made, then the test is OK. Once the development environment is prepared, we begin programming. We will explain in the next article, "Program Development with Teaboard," the procedures through which we actually compile a program and load it onto the actual machine.
The same software and development environment as the T-Engine development kits are attached to Teaboard, and thus development is possible from the day that you obtain Teaboard. Moreover, even when you move up to a T-Engine development kit, the development environment you built with Teaboard can be used as is just by overwriting the T-Engine-compatible parts.
It would be fortunate if everyone's utilization of Teaboard serves a chance to learn the basics of T-Kernel and real-time programming, and for them to grow into embedded engineers of the ubiquitous computing age.
____________________
[Note 1] In this article we are explaining the latest information on Teaboard, which at the time the article was written is a product in development. Because there may also be cases where a portion of the specifications and so on are modified in the product that is finally put on sale, please be understanding beforehand. Please confirm the latest information at the time you purchase Teaboard.
[Note 2] Cygwin is an emulator that provides a Linux-like environment on top of Windows. It is made up of DLLs that emulate Linux APIs and open source tools such as GNU.
[Translator's Note 1] An English-language package for non-Japanese users is here: http://hp.vector.co.jp/authors/VA002416/teraterm.html.
[Translator's Note 2] The English-language page and package is here: http://www.dd.iij4u.or.jp/~nsym/cygwin/cygterm/index-e.html.
The above article on Teaboard appeared on pages 36-45 in Vol. 95 of TRONWARE. It was translated and loaded onto this Web page with the permission of Personal Media Corporation.
Copyright © 2005 Personal Media Corporation
Copyright © 2008 Sakamura Laboratory, University Museum, University of Tokyo