Special Feature
With computers recently, a lot of opportunities have come about in which they are used as Internet terminals. By connecting to the Internet, we can access enormous amounts of information scattered throughout the world while sitting in front of a personal computer and reading Web sites and exchanging information through e-mail.
In Cho Kanji 4, as Internet applications, a Web browser called the "Basic Browser" and e-mail software called "Cho Kanji Mail" have been prepared as standard applications. It will come about that you will be able to immediately use them by just making the necessary network settings after registering Cho Kanji 4 in your personal computer.
In this article, after we first briefly explain the network setting methods, we will explain the basic ways of using the Basic Browser and Cho Kanji Mail.
In connecting to the network with Cho Kanji, there are two methods: a LAN connection that uses a network card (LAN card, LAN adapter, NIC), and a dial-up connection that uses a modem, PHS, etc. Please carry out either settings in accordance with the explanations below [TN1].
Case of a LAN Connection
LAN connection settings are made up from two steps: (1) the network adapter setup, and (2) the network setup utility settings.
Network Adapter Settings
|
|
Leave only the initial window (the window that first appears when Cho Kanji has started up), and close all other unnecessary windows. |
|
|
Select [System Setup] from the [Utility] menu. |
|
|
Click [Network adapter] and attach the ON mark. |
|
|
Click the [Details] switch. A panel for carrying out network adapter settings will appear (Fig. 1). Here, we specify the network adapter we will use with the LAN connection. 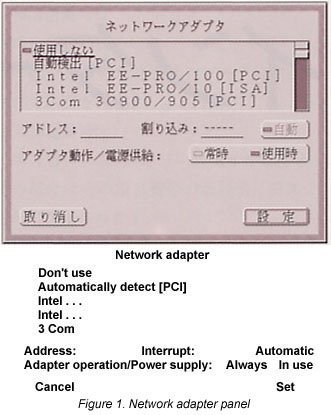
|
|
|
Click the [Set] switch. The panel "The device settings have been modified. Please restart the system." will appear. Click the Yes switch, and restart. |
|
|
Once the system has restarted, operate in accordance with procedures (1)~(4) above, and confirm that "Normal operation" is displayed in the network adapter panel (Fig. 2). When "Normal operation" is not displayed, try selecting another network adapter to see what happens. 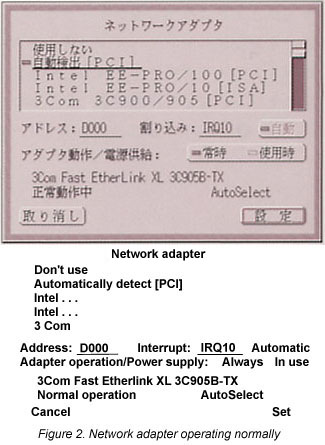 |
Setting of the Network Setup Utility
|
|
Select the [Network Setup] utility under the [Utility] menu. The network settings utility window will appear. |
|
|
Set the information for connecting to the network (Fig. 3). 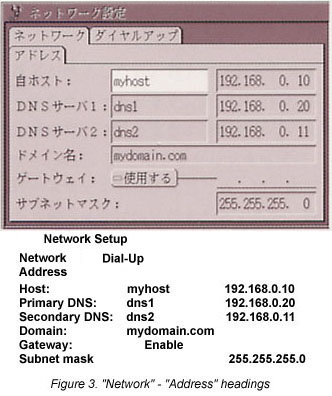
|
|
|
In a case where you will be using a wireless LAN, click the "Wireless LAN" heading, and there the wireless LAN network settings are required (Fig. 4). Set them in accordance with the instructions of the LAN system administrator. 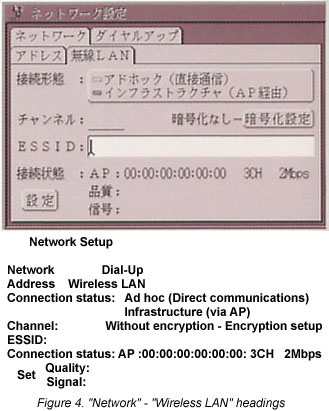 |
|
|
End the [Network Setup] through the [Exit] menu. |
In the Case of a Dial-Up Connection
For LAN connection settings, we only set the Network Setup utility.
|
|
Select the [Network Setup] utility under the [Utility] menu. The Network Setup utility window will appear. |
|
|
Select the "Dial-Up" heading. |
|
|
Make the settings under the "Modem" heading (Fig. 5).  Modem: make the first one A, the second B. Serial port: select the serial port to which the modem is connected. COM1~COM4 correspond to #0~3. Please be careful, as the accompanying number has shifted. In the case of a PC Card type modem card or a PHS/cell-phone adapter, specify the serial port in the PC Card heading of the [System Setup] utility. Speed: specify 115200 Dialing: in the case of a general public telephone circuit, select "Tone" if your telephone makes a beep-boop-baap pushing sound when dialing, or "Pulse" if it makes a buup-buup-buup pulsing sound. In a case of something outside of these, select "None." Speaker: select "Off." Command: set the modem command in accordance with need. For example, in a circuit of the type where you transmit 0 to connect to an outside line, we set ATX3 for the purpose of ignoring dial tone detection. Redial: number of times/Interval: number of seconds; make it 0 times/0 seconds. |
|
|
Next, select the "Connect" heading. Set the connection address information (Fig. 6).  Connection to: input the setting name of the connection address. We make this name a mark, and at the time of the dial-up connection, we select a connection address of our choosing from multiple connection addresses. Telephone no.: input the appropriate access point telephone number, matching it to the circuit and connection equipment that you will use. If it is a modem based on V.90, input the V.90 access point, if you are connecting with PHS, normally, you input the telephone number of the access point for exclusive PIAFS use. Modem: select the modem you will use in connecting. Match it with the A/B of [Modem] under the "Modem" heading. DNS server/Domain name/user name/password: input the respective information specified by your provider. The user name and password are mandatory. The corresponding setting information for representative providers are as in Table 1. |
|
|
End the [Network Setup] through the [Exit] menu. |
|
|
|||||
| @nifty | BIGLOBE | OCN | ODN | So-net | |
| DNS server |
|
|
|
|
|
| Domain name | Omitted |
|
Omitted | Omitted | Omitted |
| User name | @niftyID | User ID | Verification ID | Connection ID/mail ID | User ID/PPP log-in |
| Password | Log-in password | (Original) password | Verification password | Connection password | Password/PPP password |
When actually connecting to the network through Cho Kanji, the method is different with a LAN connection and a dial-up connection.
Because this is a state in which you are already connected to the network, particular operations for connecting to the network are not necessary. Without doing anything in that state, the Basic Browser and Cho Kanji Mail can be used.
When reading Web sites with the Basic Browser and performing operations to send and receive with Cho Kanji Mail, it is necessary to connect to the network by telephoning to an access point with the dial-up connection utility.
|
|
Select [Dial-Up Connect] under the [Utility] menu. The Dial-Up Connect window will appear (Fig. 7). 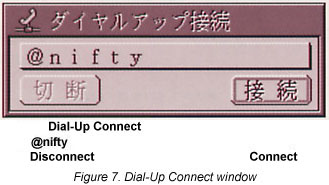 |
|
|
Select the connection address by pressing the connection address. |
|
|
Click the [Connect] switch. The computer will dial the access point that has been set and then begin the dial-up connection. |
|
|
When the connection process ends, connected will be displayed (Fig. 8). In this state, sending and receiving with the basic Browser and Cho Kanji Mail is possible. 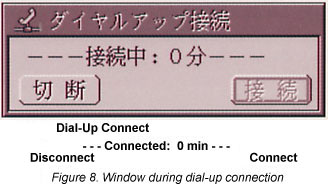 |
|
|
When sending and receiving with the Basic Browser and Cho Kanji Mail have ended, click the [Disconnect] switch and terminate the dial-up connection. |
The Basic Browser [TN2] is the Web browser bundled with Cho Kanji; it has realized an ease of use exclusive to Cho Kanji through such things as making it possible to save Web pages and bookmarks by making use of the real objects/virtual objects.
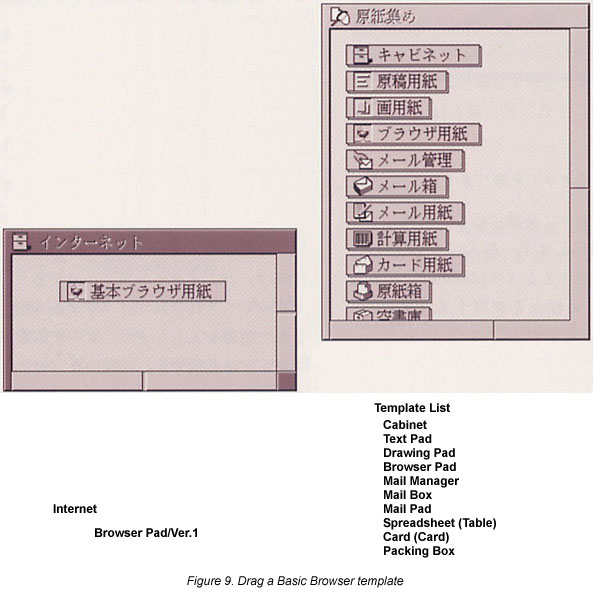
In the same manner as when we use the Basic Text Editor, we take out and drag into another window a "Browser Pad" template from the [Template List] under the [Utility] menu (Fig. 9).
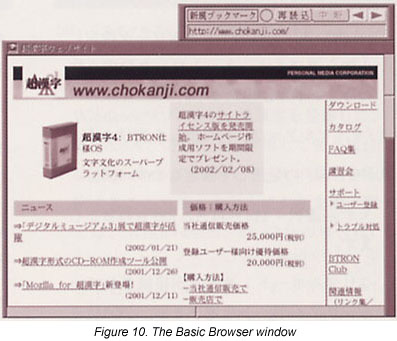
By double clicking on the Basic Browser virtual object, it opens into a window (Fig. 10). At first, it is set to open the http://www.chokanji.com/ Web page. In a case where the personal computer has been connected to the network normally, the www.chokanji.com Web page will appear in the window. When it cannot be viewed well or an error is displayed, take another look at the contents of the network adapter and network setup utilities, and when it's a dial-up connection, confirm whether or not the dial-up connection has taken place normally.
As for Basic Browser operations, in the same manner as Internet Explorer and Netscape Navigator/Communicator, you can click links and follow links, and scroll window contents with the scroll bar or the mouse wheel.
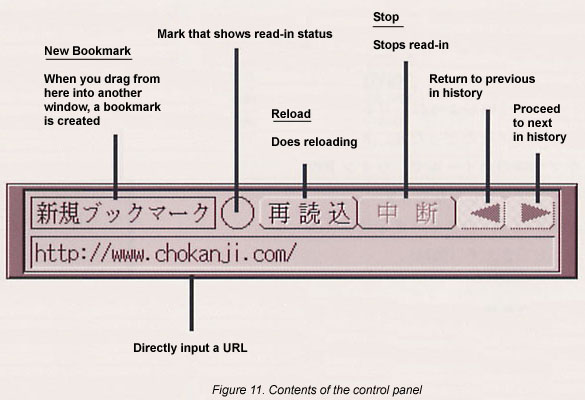
Moreover, you can also perform operations using control panel switches (Fig. 11).
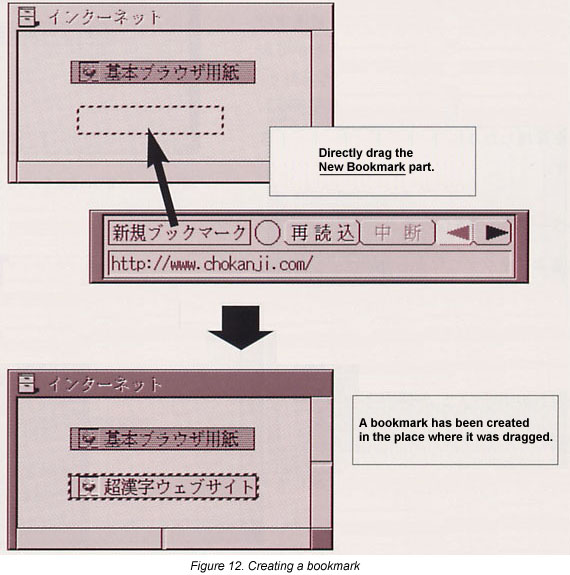
After displaying the Web page you would like to bookmark with the Basic Browser, drag the portion of the control panel that says [New Bookmark] to another window.
A bookmark will be created in the window that is the destination of the dragging (Fig. 12).
The bookmark has actually become a Basic Browser virtual object for the purpose of displaying the URL you have book marked, and it has become the same thing as the Basic Browser virtual object that we have taken out of the Template List. To this, there is the advantage that "a bookmark also is the same as a normal virtual object," and you can well handle things in Cho Kanji's real object/virtual object model. For example, you can easily do such things as mixing Web pages with text and figures, or manage bookmarks in the Basic Spreadsheet and MicroCard.
|
|
Display the page contents that you would like to save with the Basic Browser. |
|
|
Select [as New Real-object] under the [Save] menu. The Save Panel will appear. |
|
|
Select TAD (figure) in Format. |
|
|
Click [Save]. |
|
|
A light yellow virtual object will appear on top of the Save Panel (Fig. 13). 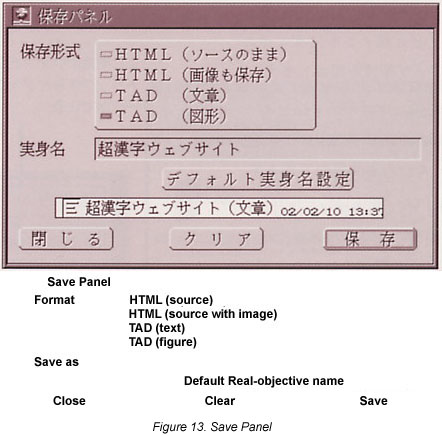 |
|
|
Drag the light yellow virtual object to another window. |
|
|
A virtual object to the real object in which you saved the page contents will be created at the drag destination. |
The contents of Web pages cannot be directly printed from the Web browser. Save the page contents as a real object temporarily in accordance with the explanation in the previous item "Saving Page Contents," open that into a window, and then print.
Cho Kanji Mail is the electronic mail software bundled with Cho Kanji. This is mail software of outstanding compatibility with Cho Kanji, which, outside of making it possible to send and receive as is messages that include 170,000 characters, also makes it possible to send and receive as is real objects and virtual objects as attached files.
First, in the beginning, we prepare a Mail Manager virtual object that governs the sending and receiving of messages.
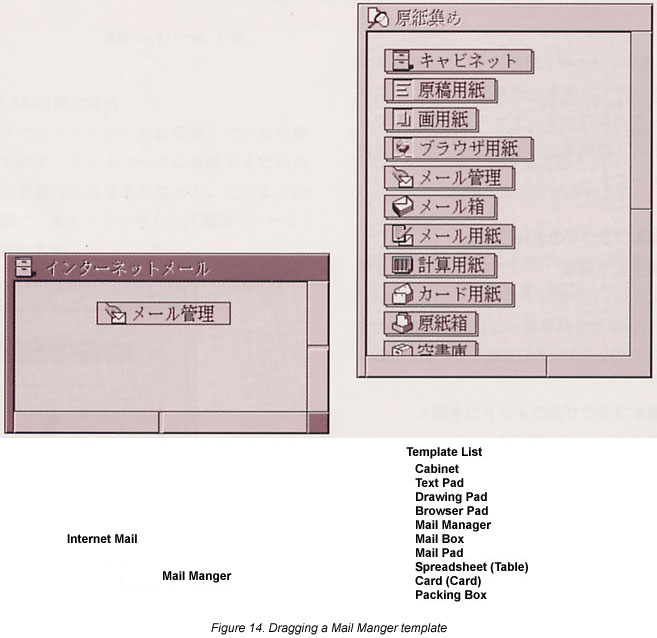
In the same manner as when use the Basic Text Editor (word processor), we take out and drag to another window a [Mail Manager] template from the [Template List] under the [Utility] menu (Fig. 14).
We open the Mail Manager into a window, and perform the various environment settings, such as the communication settings.
Communications Settings
|
|
Select "Communications Setup" from the [Setup] menu. |
|
|
Input the following settings (Fig. 15).  Input the information specified by the respective provider and network administrator: SMTP server, POP server, user name, password, encryption (Table 2). In the case of an APOP-compatible POP server, the password will be encrypted and sent by setting [Encrypt] to ON. In a case where encryption can be utilized, in the beginning make the setting with OFF as is, test the sending and receiving of mail, and after being able to confirm that there is no problem, it should be all right to set ON. Leave mail on the server even after reading it in: set whether or not to leave mail on the server after it has been received by Cho Kanji Mail. During the setting of Cho Kanji Mail, temporarily leave it to ON and make it the leave mail setting; once you can confirm that the settings have taken effect normally, all you have to do set it to OFF and make it so that you delete the mail after it has been read in. Also, in a case where there is additional electronic mail software you are using as your main electronic mail software, set it to leave the mail on the server on the Cho Kanji Mail side. Character set: make it [Auto-select (ISO-2022-JP Fixed)]. Cyclic processing: in an environment where you are always connected to the network via a LAN connection, etc., you can automatically receive newly arrived mail with [Receive], and automatically confirm the existence of newly arrived mail with [Confirm New Arrivals]. |
|
|
Click the [Set] switch. The setup panel will disappear, and the settings will be immediately reflected. |
|
|
|||||
| @nifty | BIGLOBE | OCN | ODN | So-net | |
| SMTP server |
|
|
|
|
|
| POP server | POP server |
|
|
POP server name/POP mail server | POP server |
| User name | Mail account | Mail account |
|
Connection ID/mail ID | POP ID |
| Password | Mail password | (Original) mail password | Mail password | Mail password | POP password |
| Encryption | Possible | Possible | Possible (request necessary) | Not possible | Possible |
Personal Settings
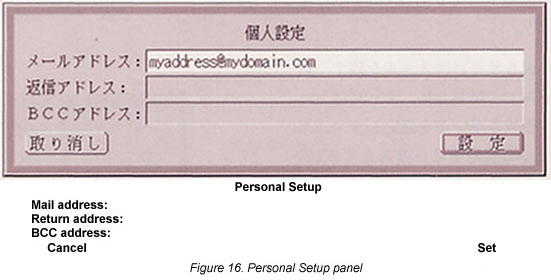
(1) Select [Personal Settings] from the [Setup] menu. The [Personal Setup] panel will appear. (2) In the Mail Address space, input your mail address (Fig. 16).
(3) Click the [Set] switch. The setup panel will disappear, and the settings will be immediately reflected.
Sending E-Mail
|
|
Open the Mail Manager window. |
|
|
Click the "Await Send" heading. |
|
|
From the [Template List] under the [Utility] menu, drag a "Mail Pad" template to the Mail Manager window (Fig. 17). 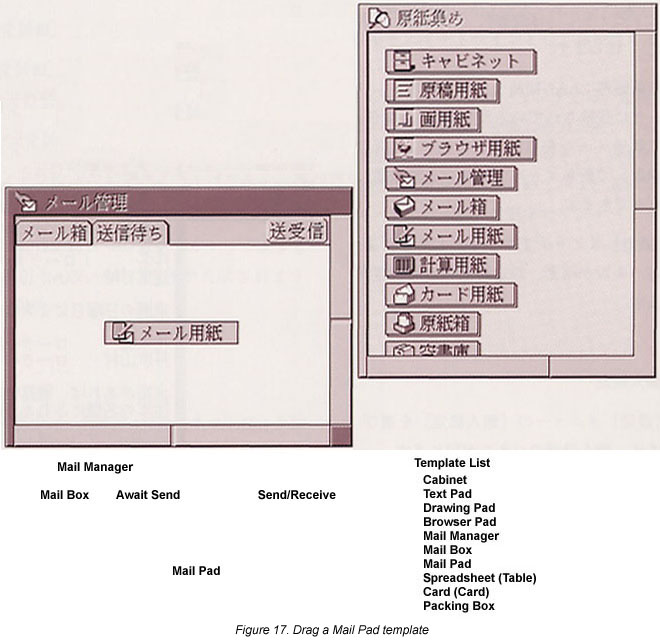 |
|
|
Open the newly created Mail Pad template into a window, and then create the mail contents (Fig. 18). Be sure to input the addresses (To, Cc, Bcc) with hankaku [half-width; TN3] characters. Also, let's not forget to input a subject. If we make the subject into contents where we have briefly and concisely gathered together the essence of the matter at hand, our opposite who has received the mail will be able to discern the contents of the mail from just the subject, and thus it is convenient for him or her. 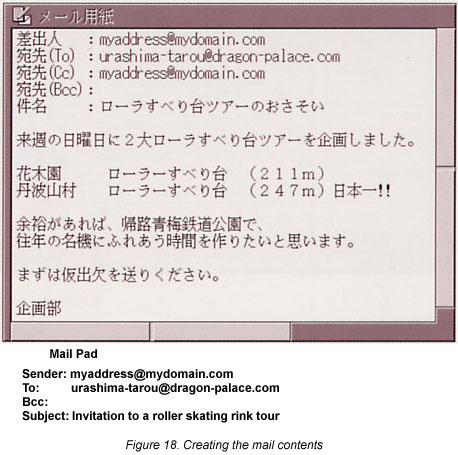 |
|
|
Once you have finished writing the mail, select the Mail Pad template's [End/Send] menu. |
|
|
Select whether you will send it or not (Fig. 19). 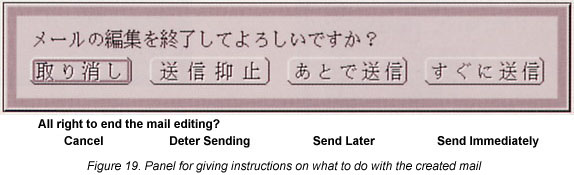
|
Receiving E-Mail
|
|
Open the Mail Manager window. |
|
|
In the case of a dial-up connection, execute the dial-up connection beforehand, and establish in advance a connection to the network. |
|
|
Select [Send/Receive]/[Receive Only] under the Mail Manager's [Communications] menu. |
|
|
The received mail will be saved in the [Inbox] mail box, which is in the "Mail Box" heading of the Mail Manager. |
|
|
Double click [Inbox] and open it into a window. The mail list will appear. |
|
|
When you double click a mail message in the list, the contents of that mail will be displayed (Fig. 20). 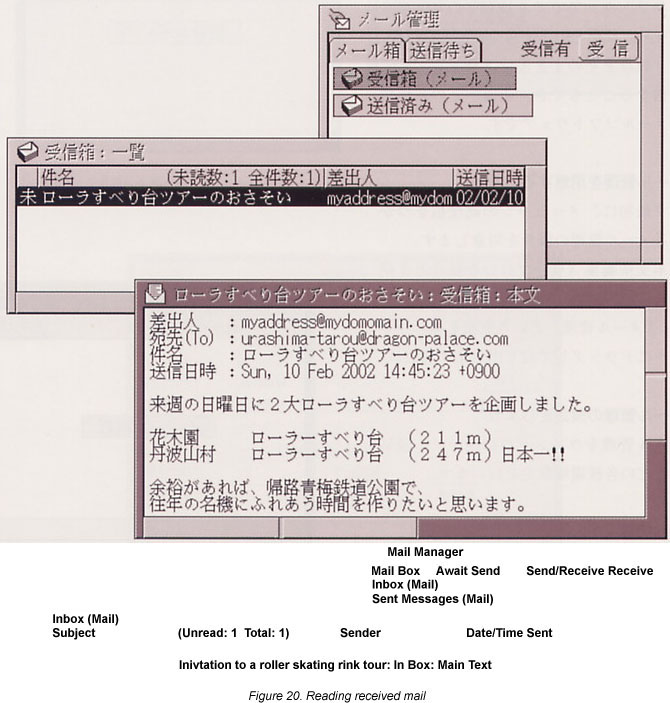 |
In this article, we have briefly explained the methods of the "network settings" and the way to use the "Basic Browser" and "Cho Kanji Mail" in Cho Kanji 4.
With Cho Kanji 4, by using the "Basic Browser" and "Cho Kanji Mail," outside of being able to perform the basic operations of the Internet, such as viewing Web pages and exchanging electronic mail messages, there is the added feature unique to Cho Kanji of being able to smoothly take in and handle information from the Internet in the "real object/virtual object model," which is one characteristic of Cho Kanji, by saving in real objects Web page contents and contents received with "Cho Kanji Mail."
In the practical use of the Internet using Cho Kanji, please use this article as a starting line.
Furthermore, Personal Media is marketing Hajimete miyoo Cho Kanji sekando suteppu~Cho Kanji-de intaanetto~ [Let's try beginning Cho Kanji second step~the Internet with Cho Kanji], an explanatory book in which we have explained gently and in concrete terms using abundant color illustrations the methods of enjoying the Internet with Cho Kanji 4.
|
Using Mozilla for Cho Kanji "Mozilla for Cho Kanji" is recorded on the Cho Kanji 4 CD-ROM. Mozilla for Cho Kanji is the Mozilla open source Internet browser, which was ported to Cho Kanji. Mozilla for Cho Kanji is compatible with JavaScript, frames, Secure Sockets Layer, and cookies; by properly using it with the Basic Browser, you can view without any problems even Web pages that cannot be viewed well with the Basic Browser by using Mozilla for Cho Kanji. You can register Mozilla for Cho Kanji in the system through the following procedures.
For details, in addition, please look at "Welcome to 'SPMC'" in this issue (p. 100). 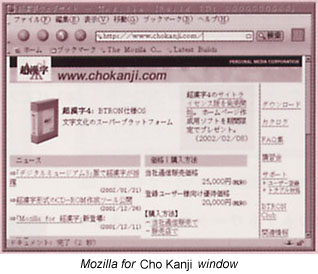 |
|
Cho Kanji and ADSL In using ADSL with Cho Kanji, there are a few points to be careful about. In Cho Kanji, there are no functions to serve as the PPPoE and PPPoA clients. For that reason, we adopt a method in which we entrust the PPPoE client function to broadband, the PPPoA client function to the ADSL modem, and then Cho Kanji merely makes a LAN connection to those. In concrete terms, we adopt one of the following methods.
For example, with ADSL providers such as eAccess and ACCA, it's set up so that you can select a router type ADSL modem when you request service. When you use this router type ADSL modem, it will come about that you will be able to use ADSL from Cho Kanji by connecting the Cho Kanji machine and the ADSL modem with a LAN cable. Also, please be careful, because a USB connected ADSL modem cannot be used from Cho Kanji. Reference article: "ADSL that Can Be Used from Cho Kanji," Vol. 71 TRONWARE, p. 44 |
____________________
[Translator's Note 1] The translator uses the Internet via a cable modem based on DHCP, and thus was not able to test out Cho Kanji via a wireless LAN and/or dial-up connection. However, as far as possible, he changed settings and opened up panels to confirm the translations of the interface parts mentioned in this article. Accordingly, a reader who has installed the Emglish-language interface kit should be able to get Cho Kanji connected to the Internet with few problems.
[Translator's Note 2] The BTRON Basic Browser project was begun prior to appearance of the open source Mozilla Application Suite, which is based on a code base that Netscape Communications Corporation released to the open source community in March 1998. Since the BTRON Basic Browser is based on HTML 3.2, it is a more primitive browser than Mozilla, which ironically in some ways is good, as it eats pop-ups and prevents system exploits by malicious Web sites. It is also based on the TRON operation method, which means it is compatible with the BTRON human-machine interface. On the other hand, it is not compatible with JavaScript, frames, Secure Sockets Layer, cookies, and cascading style sheets. After the Mozilla source code became available, BTRON Web browser efforts switched to porting Mozilla and Firebird (the predecessor to Firefox) to the BTRON3-specification Cho Kanji operating system. At present, there are three Web browsers available for Cho Kanji: (1) the BTRON Basic Browser, (2) Mozilla 1.0, and (3) Mozilla Firebird 0.7. The first is the standard system browser and is loaded as part of the standard system installation, the second is recorded on the Cho Kanji 4.0 CD-ROM, and the third is available for downloading free of charge from Personal Media Corporation's Cho Kanji Web site.
[Translator's Note 3] You switch in and out of hankaku characters by pushing the Hankaku/zenkaku kanji [Half-width/full-width Chinese character] key, which is directly above the Tab key on the 109-key Japanese-language keyboard. If you are using a 101/104-key English-language keyboard, you simultaneously push the Shift key and the key directly above the Tab key to the same effect. Keyboard selection is set through the [System Setup] panel, which is under the [Utility] menu.
B-right is a registered trademark of Personal Media Corporation.
The above article on the using the Internet with Cho Kanji appeared on pages 47-55 in Vol. 74 of TRONWARE. It was translated and loaded onto this Web page with the permission of Personal Media Corporation.
Copyright © 2002 Personal Media Corporation
Copyright © 2006 Sakamura Laboratory, University Museum, the University of Tokyo